Smart Objects/Smart Filtering & Digital Lith Prints; Nondestructive Editing Techniques Page 2
 |
|
|
4) At this point in the project the lith-print effect is finished but to show the power of working with Smart Objects let's take the process a little further by adding some extra canvas space and a blurred border to the otherwise completed photo. Start by selecting the base image's Smart Object layer. Next choose Layer>Smart Objects>Edit Contents. This will open the original photo as a separate Photoshop document with no color or texture effects applied. Change the background layer to a standard image layer by double-clicking on its entry in the Layers palette. Now add a new layer and convert this layer to a background layer by selecting Layer>New>Background from Layer. Make sure that the default Foreground/Background colors are selected before this step. To extend the white background, choose Image>Canvas Size, and add 120 percent for both Width and Height settings.
 |
|
|
5) To add a blurred border to the size of the image, create a new layer above the photo. Label this layer Border. Hold down the Ctr/Cmd key and click on the picture in the thumbnail of the image layer. This creates a selection based on the size and shape of the picture content of this layer. Now choose the Border layer and then select Edit>Stroke. Adjust the settings so the stroke is 100 pixels wide (this may change for your image), is black, and is located on the Inside of the selection. Click OK to draw the stroke.
 |
|
|
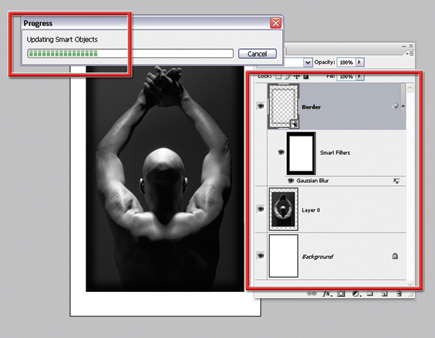
6) We will use the Gaussian Blur filter to blur this border but before applying the filter change the Border layer to a Smart Object. This way it will be possible to alter the settings used for the border later, if needed. Select the Border layer and choose Layer>Smart Objects>Convert To Smart Object. Next, with the selection that you used to create the border in the first place still active, apply the Gaussian Blur filter to blur the inner edge of the stroked border. If you have lost the selection recreate it by holding down the Ctrl/Cmd key and clicking on the image layer's thumbnail.
 |
|
|
7) With the border now created it is time to apply the settings
back to the original lith print. Save the file (File>Save) and then close
the document. Photoshop will automatically update the picture's Smart
Object layer that sits inside the lith document with the changes. Select Image>Reveal
All to show the extended canvas area.
Using Smart Objects in this technique provides endless opportunity to adjust
the settings for the color and texture of the final result. Even the blur of
the border can be manipulated at a later date as applying the filter via a selection
automatically creates a mask that will restrain the blur effect to the inside
of the image.
- Log in or register to post comments


