Sharpening Strategies; There’s More Than One Way To Get It Done Page 2
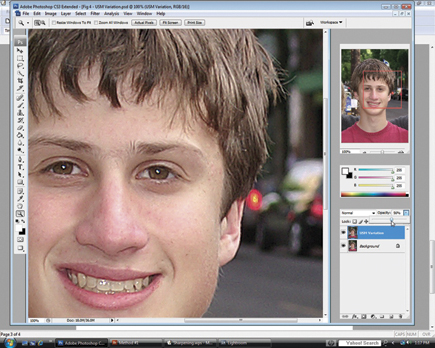
Step 3. After closing the USM dialog go to the Opacity slider on the top right side of the Layers palette and take it all the way to the left, zero. Slowly move it to the right until you find just the right amount of sharpening. For this image I chose 56 percent.
 |
|
|
Method 3—Smart Sharpen (SS)
No article on sharpening in Photoshop should overlook the Smart Sharpen filter, which was introduced in CS2. Smart Sharpen incorporates better edge detection and can improve the appearance of blurry images without introducing unwanted halos. Some photographers think it is a dummies’ tool as the name Smart Sharpen implies that all you need to do is click on OK and Photoshop will do the work. Far from it. Correct use of the Smart Sharpen filter takes as much discernment as USM, perhaps more.
Unlike USM, the controls in Smart Sharpen do not include Threshold. Instead there is a selection of three blur removal modes: Gaussian Blur, which is about the same as used in USM; Lens Blur which is the most useful; and Motion Blur which can be used to remove small amounts of motion blur.
Unless you are attempting to remove motion blur, choose Lens Blur.
Step 1. Begin in the same manner as USM with a Background Copy, enlarging to 100 percent, but open the Smart Sharpen dialog instead.
 |
|
|
Step 2. Set the Amount and Radius, select Lens Blur and More Accurate.
 |
|
|
Step 3. Click on Advanced. This will bring up two new tabs, Shadow and Highlight. This is where you can refine Smart Sharpen for the best overall sharpening without the disadvantages of USM. Depending on the tab you are in the Fade Amount slider will reduce the amount of sharpening in either the Shadow or Highlight area. This is the more important of the three controls.
The Tonal Width slider determines the tonal width range to which the Fade
Amount just selected is applied. Radius is used to control the overall area width of
the sharpening.
 |
|
|
Method 4—Selective Sharpening
As part of an overall sharpening strategy it is good to know how to apply sharpening selectively. For example, on the image of Kayla, I have created a Background Copy, called it Blur, and used Gaussian Blur to smooth her skin. If I apply overall sharpening to the image I may lose some of the smoothness. On the other hand, in portraits it is important to keep the eyes, eyebrows, nostrils, and lips sharp.
Step 1. Begin by collapsing all layers, Shift/Ctrl + E or Shift/Cmd +E before applying sharpening. In this image of Kayla this collapsed the Blur and Levels layer.
Use Ctrl/Cmd +J to create a copy of the Background layer and name it Sharpen. Enlarge the image to 100 percent and choose one of the sharpening strategies mentioned, or any other familiar to you, and sharpen the overall image.
 |
|
|
Step 2. With the Sharpen layer highlighted create a black vector mask over the layer by holding the Alt/Opt key and clicking on the circle in a gray square at the bottom of the Layers palette. The black mask will hide the effects of sharpening on the current layer.
Choose a Brush with 0 percent hardness from the Tools palette and then brush over the eyebrows, eyes, nostrils, and lips to reveal the sharpening effect. Enlarge or make the brush smaller as needed and control the opacity on the Brush Options bar.
 |
|
|
The one thing to remember is that sharpening is not about making a blurred image sharp; it is about getting the optimum sharpness from a photo that was sharply focused. In any event, choose one sharpening method and use it until you find another method you prefer.
- Log in or register to post comments


