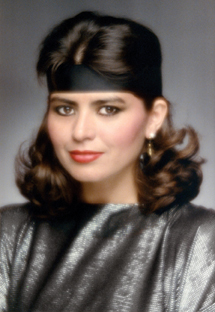
Soft Focus Revisited, Digitally; How To Make Your Own Soft-Focus Lens Like The One I’ve Used For 40 Years Page 2
The remaining part of the soft-focus lens assembly is the means to focus it mounted to a 35mm/digital SLR camera body. When I made my soft-focus lens initially I used an accessory bellows attachment. This works fine but is a bit awkward to use if not mounted on a tripod. In fact, you can use a rather old bellows from just about any camera manufacturer if you can find a lens mount adapter ring that will fit your particular make and model SLR. With a fixed aperture lens (which the soft focus is), there is no need for a diaphragm stop-down interconnect or any kind of lens to body electrical connection.
|
|
|
You will also need a lens flange ring for the front. This is used to attach
the 55mm +10 diopter close-up lens filter to the aperture retaining filter ring.
Most bellows are made with a removable lens ring that provides the option of
using special screwmount macro lenses. You can use this kind of adapter ring
for the bellows and actually glue (industrial-grade epoxy) a 55mm screw-in filter
adapter ring to the bellows lens adapter ring. Old screw-in filters and adapter
rings, as well as bellows, are often available at camera swap meets, and if
you still have an old-fashioned camera store in your town, most that have been
around for a while have "junk" drawers with all kinds of useful
stuff.
Not long after I made my soft-focus lens I switched to Topcon 35mm SLR cameras
(first 35mm SLR with a full motor drive). And, the bellows I had was not adaptable
to my new camera, but I found Topcon had an adjustable (focusing) extension
tube accessory, so I purchased one and made an adapter for my soft-focus lens
to fit the Topcon bayonet lens ring (Exakta). This made the soft-focus lens
much easier to use handheld and it got a lot of use until Topcon went out of
business.
|
|
|
Then I got into Canon F-1 SLRs. For a while I used an adapter ring I had made
so I could use my Topcon lenses with the Canon. But eventually Canon switched
to the EOS and a new lens mount. The Topcon focusing extension tube by that
time was pretty well worn out, so I looked for a replacement, and found the
Zörk Mini Makro, a helical focusing close-up extension tube. A Mini Makro
to camera body ring adapter was available for Canon and the front is a standard
M 42-1 thread screw ring, which allowed the use of a step ring to mount the
soft-focus lens assembly. You can obtain the Mini Makro and adapter rings currently
from Zörk Film & Phototechnic, US, 2508 Park Forest Dr., Eugene, OR
97405; (971) 222-3513; e-mail: usa@zoerk.com;
www.zoerk.com.
How To Use A Soft-Focus Lens
After years of using my homemade soft-focus lens I have learned the easy part
is making the lens, while using it effectively is another matter. This involves
several different factors, including: an effective focusing technique, limits
of subject lighting, and either the selection of compatible films or the adjustment
of contrast and saturation with a digital SLR. However, this should not discourage
you, as you can learn from my experience and all the missed shots that ended
up in the round file.
First of all, if you used an aperture disk with just one central hole about
5/16" in diameter, you would have an effective f/stop between 11 and 16,
and the images would be surprisingly sharp, even though this is a simple, one-element
lens. The soft effect comes entirely from the many small apertures surrounding
the main, larger aperture. The large aperture focuses a basic central image
with about half the exposure intensity of the total light transmission of the
entire disk, recording a quite sharp image. All of the small surrounding apertures
focus slightly off-center very low-level images blended into the main image.
But because these small aperture images are at such a low-light level only the
brighter parts of the subject rise above the exposure threshold and record on
film or a digital sensor. The result is that the brighter subject values are
enhanced in value by the ring of small apertures that are off-center and overlap
each other, creating a highlight halo effect and making these light tones soft
and smooth. On the other hand, dark detail focused sharply by the large main
aperture is not much affected by the ring of small apertures, so are not softened
much, if at all. Thus, dark eyelashes and eyebrows in a portrait are defined
crisply while light complexion tones are softened with a halo-like glow. Compared,
however, to the same subject photographed with a "normal" lens the
effect is soft and lower in contrast and saturation.
|
|
|
You might think that higher contrast lighting would be advantageous to use
with this soft-focus lens. Unfortunately it does not work, as the high contrast
of direct sun, for instance, creates highlights which acquire far too strong
a halo effect that rarely looks good and is just a distraction to the subject
and image. Actually, normal 1:3 ratio studio portrait lighting is ideally compatible
with the soft-focus lens, as well as open shade for similar subjects outdoors.
For landscapes I have captured with the lens, the most successful were taken
at dawn or dusk with the light coming just from the sky, or during the middle
of the day with a light cloud cover. In other words, soft, low-contrast lighting
produces the most effective images with the soft-focus lens.
Film also plays a role. In my experience, very contrasty, saturated films work
best. My favorites in the early days of using the
soft-focus lens were Kodachrome 64 and 3M 1000 Color Slide films, as well as
occasionally faster Ektachromes overrated by one stop and push processed. With
black and white films of course I could easily extend development, in some cases
as much as 50 percent, which produced a negative that would print on Grades
2 and 3 paper satisfactorily. Now with digital, I use the camera controls and
increase contrast and saturation in the parameter settings, which compensate
for the soft effect and shooting in low contrast, soft lighting.
Probably the most difficult and demanding skill is learning to focus both manually
and selectively. The lens produces the best looking effective sharpness in detail
if focused just in front of the main subject. For instance, if you are doing
a close-up portrait with the soft lens and want the eyes and lashes sharp you
really need to focus on the tip of the nose. It is what is just behind the plane
of acute focus that looks best and the most crisp images are made. My technique
very often is to adjust the lens so it looks like the key part of the subject
that needs to be critically defined in the image is in focus, and then adjust
the lens focus on the "air" just a very short distance in front
of the subject. Of course, this focus adjustment is a greater movement of the
lens position if the subject is a close-up compared to a more distant subject
in a landscape. If your subject allows, you might try bracketing a few shots
at slightly different focus adjustments. In a short time your results will train
your eye and technique, I am sure.
- Log in or register to post comments


