From Digital To Film: Get Your Favorite Film Looks

To further personalize your photo, each look can be fine-tuned with sliders and other controls for the parameters of each film, as well as with filter effects, toning and cross processing. Create your own new digital film emulsions by combining the color characteristics of one film with the grain of another, the contrast of a third, and so on. FilmPack 3, (FP3) can be used as a stand-alone program or as a plug-in with Adobe Photoshop, Elements or Lightroom, Apple Aperture, and DxO Optics Pro.
Digital To Film Effect
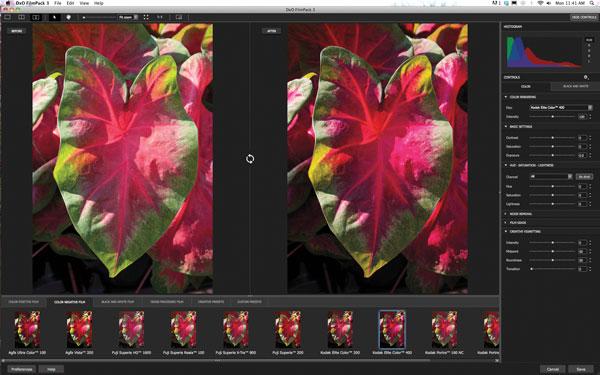
Starting with a shot of a red and green caladium leaf [1], I opened it in Photoshop CS6. Choosing Filter>DxO Labs>DxO FilmPack 3 and brought up this screen, [2]. For the large preview, you can select a single image, before and after (nicely labeled, as seen here) or split. Below the preview are 6 categories: color positive film, color negative, black and white, cross-processed, creative presets and custom presets. Clicking on the color positive category displays a row of thumbnails along the bottom of the screen of 11 film types ranging from Agfa Ultra Color 100 through Fuji, Kodak and Lomography. Click on a thumbnail to apply that look to the preview. You can also navigate through the effects with your right and left keyboard arrow keys.

All Photos © 2012 Howard Millard All Rights Reserved

I first tried Fuji Velvia 50, for its famed color saturation. It definitely delivered, with the reds glowing like a bright light [3]. However, as was my experience with the actual film, some detail is lost in the brightest and most saturated areas. This can be toned down with adjustments in the many controls found in the right column, but then it wouldn’t be Velvia 50, would it?

Moving along the thumbnails to Kodak Elite Color 400 yielded a dramatically different look, which I hope will be evident in reproduction [4]. The reds are all intensified, with an orange red now in the upper left of the leaf, deep red replacing pink in the lower half of the leaf and, in the bright central right hand area, the original light pink has become intense. Yellows have been boosted and greens have been darkened, while contrast and grain have been increased. The new film renders the image with a totally different palette.

As a finishing touch, from the controls available on the right side of the screen, I selected Creative Vignetting [5]. Moving the Intensity slider to the right from its central point of 0 creates a white vignette, while moving it to the left, as I did here to -80, adds a dark vignette. With this image, the vignette helps remove distracting background detail and focuses the eye on the central subject [6].


When you click Save at the bottom right of the screen, FP3 applies the effect to a copy of the original and saves the new file with the effects added in its original format (jpeg, tiff or psd). The new effects image is a flat file, containing no layers. A handy feature is that your original file is not changed and remains in its original location.
Portrait Options
To enhance my portrait of actor and model Laura Summerhill [7], I headed to the Creative Presets where I experimented with some looks. Granular added industrial strength grain, courtesy of Ilford Delta 3200, but it was too much for this shot. How about Infrared? It’s not only for landscapes.

Here the preset provided a very punchy, high contrast black and white 1930’s movie look with pale skin and very dark lips and eyebrows—a serious contender [8]. To adjust the default setting, which was too dark, I used the Basic Settings under the Controls in the right panel [9]. Moving the Exposure slider to the right, I changed the default -1.1 to a new setting of -0.6.


Next, it was time to try a color rendition. Prussian red pumped up the saturation in the skin tones and lips, but was too much like the original. Nostalgia, Photo 1900, Photo 60’s and Sepia all gave convincing aged looks, but they are all heavily warm toned. I sought a cooler rendition. Finally, I tried Lo-Fi [10], which added blue tones to the background and clothing, while still maintaining some warm color in the skin, lips and hair. Plus, it automatically adds an edge vignette. Here was the 1950’s movie star look I was after.

“Toned” Black And White
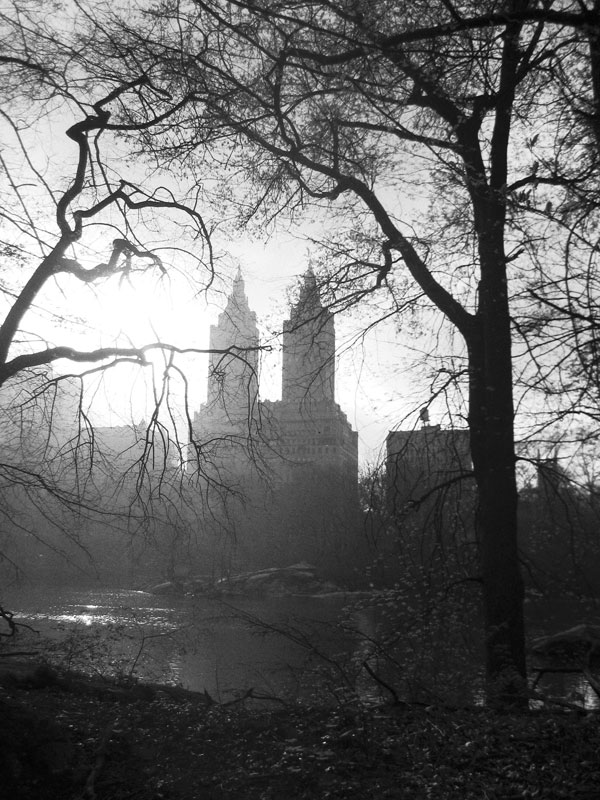
To investigate the Black and White (b&w) Film capabilities of the Creative Presets in FilmPack 3, I began with a moody, almost monochromatic shot I’d taken on a foggy day in New York City’s Central Park looking west across the lake [11]. Polaroid 664 produced b&w that looked very much like the original in terms of detail, with a slight lightening of the midtones. Agfa APX 100, the first choice in the b&w category, opened up the shadows quite nicely but also brightened the sky and added significant contrast [12].


In the right panel of the FP3 screen, an impressive array of controls are available to fine-tune any preset, with tabs for both color and b&w [13]. As someone who put in many years in the darkroom, I was pleased to see the Toning options offered here: b&w, ferric sulfate, gold, selenium, sepia terra, sepia gold and sepia, [14]. Ferric sulfate imbues the scene with a subtle green [15], reminiscent of gum bichromate over platinum prints from the early 1900’s such as Edward Steichen’s Flatiron building. Selenium toning, long favored by fine art traditional gelatin silver printers, yields a subtle purplish tone and an entirely different mood [16].


Finally, for a more traditional antique look, FP3 offers 3 different sepia toning options. Sepia terra is the coolest while increasing warmth is added with Sepia gold and Sepia, which is very saturated. Sepia gold [17] adds an elegant vintage look to this image while enhancing the sky with some midtone color. Remember that you can season any of these effects to taste with the many options in the Controls panel.

Whether your photographs are classic landscapes or portraits, cool contemporary cityscapes or funky, cutting edge grunge, DxO Labs has something that will speak to you. And no matter which emulsion you fancy, FilmPack 3 can help you create the film look of your memories and your dreams.
Sources
DxO FilmPack 3 is available in the Essential Edition for $79 and the Expert Edition, reviewed here, for $129. The Expert version adds more types of films, grain and filters as well as 25 creative rendering choices. Further, it adds fine tuning controls for b&w, color, noise reduction, vignetting, presets and batch processing. To buy or for a free trial download, further information, many examples and details of features, system requirements and compatibility, go to www.dxo.com/us/photo.
- Log in or register to post comments


