BEGINNERS Guide to Photoshop’s Adjustment Layers (VIDEO)

So what exactly is an “Adjustment Layer” in Photoshop, and what does it enable you to do? According to Adobe it’s “a layer that lets you apply color and tonal values to your image without permanently changing pixel values.” In basic terms, you can use various layers to experiment with color, tones, and more.
If you’re new to Photoshop and the notion of layers sounds complicated, the explainer below will set you straight, because this powerful capability can actually make the task of processing images faster and more effective.

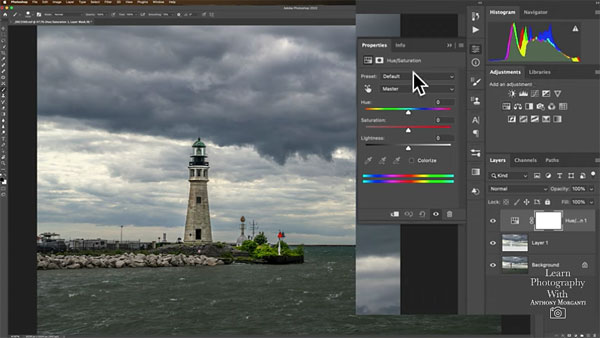
While this 20-minute beginners guide falls into the category of “Photoshop 101,” even more experienced users will likely learn a tip or two. Instructor Anthony Morganti pulls up a seaside photo on his screen, and walks you through a step-by-step process for dramatically enhancing the image using layers to get the job done.
As Morganti explains, before using an Adjustment Layer it’s important to “prep the image.” He begins that process by creating a selection of the sky, demonstrating how to do that before placing that selection on a separate layer. Here (and throughout the episode) he provides keyboard shortcuts to speed up the process.
At this point you now have two layers; one with the original image and another with the sky. The next tip is both versatile and important, as Morganti explains the two options you have: You can make adjustments to both layers simultaneously, or make your enhancements more selectively by assigning them to just the sky.

As you can imagine, especially with outdoor scenes containing a wide range of tones, it may take two or three layers (or more) to perfect an image. And by the time you’ve finished watching this video, you’ll know exactly what to do.
You can find more helpful tips and tricks on Morganti’s YouTube channel, so be sure a pay a visit.
And don’t miss a tutorial we posted on a related topic yesterday, explaining a simple Photoshop “Layer-Lock” trick to prevent losing your work,
- Log in or register to post comments


