- REVIEWS
Camera Reviews 
More Reviews Mobile Reviews Photography Reviews - GALLERIES
- VIDEOS
- BUYER'S GUIDES
Solve Technical Problems With Affordable Photoshop Plug-Ins
Fred Miranda’s Suite Of Solutions
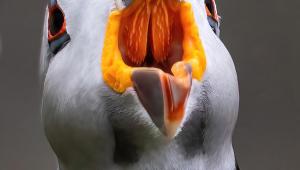
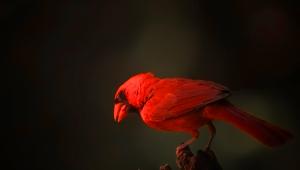
All Photos © 2004, Peter K. Burian, All Rights Reserved
The Adobe Photoshop series is the most popular among image-editing programs,
and this software includes a vast range of image-enhancing features. While some
of the available tools are quite easy to use, advanced image-correction techniques
require sophisticated and time-consuming multi-step processes. These are described
in books and in Photoshop courses but not everyone wants to devote that much
time and effort to becoming a Photoshop expert.
That's exactly why several companies make plug-ins: software that can
automate time-consuming processes to produce professional-caliber image adjustments.
Some of these products are pricey but the many plug-ins (for PC and Mac) from
Fred Miranda's Digital Darkroom Inc. are quite inexpensive at $25-$50.
(All are compatible with Photoshop 6, 7, and CS; some are also compatible with
Photoshop Elements 2.0.) But don't let the simplicity of use and the low
price fool you. These are highly sophisticated programs based on complex algorithms.
After you purchase one of these plug-ins at www.fredmiranda.com,
the download and installation process takes only a few minutes. The plug-in
then becomes another tool in Photoshop available under File>Automate. (Some
plug-ins are also compatible with Photoshop Elements.) Fred Miranda markets
dozens of useful products but the following problem-solving tools are particularly
valuable for pro-caliber image enhancement.
 |
|
 |
|
 |
|
 |
|
|
Boost Color Saturation
Photographers who appreciate the warm, highly-saturated look produced by Fujichrome
Velvia slide film can simulate that effect with the Velvia Vision plug-in. Granted,
Photoshop's built-in Saturation filter can also be used to boost color
richness, but it can create digital noise and artifacts, or color shifts. That's
why most experts recommend using a value no higher than +15 (a moderate level)
for boosting overall color saturation.
If you want considerably more vibrant hues and tones without the side effects,
use Velvia Vision instead (File> Automate>Velvia Vision). By employing
an automatic multi-step process, the software adjusts colors individually within
the red, green, and blue channels as a Photoshop expert might. Open an image,
activate this plug-in, select the Preview option, and set an estimated intensity
level such as +30 percent. In a couple of seconds, the preview image changes
to depict the exact effect. Now you can moderate the intensity of saturation,
using the Global Intensity tweak slider. When the preview looks perfect, click
on the OK button and the modification is made. (You can also use this plug-in
to reduce saturation with a minus intensity setting.)
Eventually, you'll also want to experiment with the other features: a
minus level for color saturation reduction, Warm Color, Smart Color Correction,
Smart Contrast (to enhance tonal range without clipping), and especially, with
Add Dynamic Range (for better highlight/shadow detail).
Evaluation: A +20 percent to +30 percent level produces the rich colors that
are perfect for many images. Some subjects benefit from much greater intensity
and that's where the plug-in really shines producing very "clean"
results in super-saturated areas even at a very high level of 50 percent. The
only drawback? There's no option for modifying the richness of one or
two specific colors. (Compatible with 8-bit files in Photoshop 6, 7, and CS
only; $25.)
Convert Color Images To Monochrome
Although it's easy to convert a color image to monochrome with desaturation,
professional effects take a lot more time and experimentation with the Channel
Mixer in Photoshop. For much greater simplicity, and an incredibly wide range
of different effects, it's worth using BW Workflow Pro (File>Automate>BW
Workflow Pro).
 |
|
 |
|
 |
|
 |
|
|
Start with the default setting for good results, but try making a filter selection:
yellow, red, orange, blue, green, or high contrast. Check the Preview box and
you can evaluate the effect that each of these options produce. When you find
the one that's just perfect for any image, click OK and the conversion
is made automatically. More serious black and white aficionados will also want
to check out the many duotone, tritone, and quadtone presets. The other features
can be useful, too: "Tweak Filter," "Intensity" adjustment,
dynamic range expansion, "Smart Mix" for greater customizing control,
and the "Film Grain" option for making images that resemble those
from fast films.
|
| |||||||||
- Log in or register to post comments


![]()
Get the Latest Photo Tips, News & Reviews from Shutterbug!
| Camera Reviews Other Reviews | Mobile Reviews Photography Reviews Columns | News | Features | How-To | Resources |
 © 2025 Shutterbug
AVTech Media Americas Inc., USA
All rights reserved