- REVIEWS
Camera Reviews 
More Reviews Mobile Reviews Photography Reviews - GALLERIES
- VIDEOS
- BUYER'S GUIDES
Solve Technical Problems With Affordable Photoshop Plug-Ins
Fred Miranda’s Suite Of Solutions Page 2
Sharpen Your Image
All of the Adobe programs include several tools for sharpening images. Unsharp
Mask is particularly versatile and effective but it can also introduce undesirable
side effects such as exaggerated digital noise and artifacts. That's why
advanced imaging enthusiasts have developed complex, multi-step methods for
"cleaner" results, often using Layer masks and opacity control to
refine the sharpening effect. Since that technique is very time-consuming, I
prefer to use Intellisharpen II. This plug-in employs many complex steps in
Photoshop or Elements quickly, with great simplicity (File>Automate>Intellisharpen
II).
Activate the plug-in and select sharpening for a high ISO or low ISO image and
a sharpening level, such as 30. Click on the Apply button and the plug-in proceeds
with multi-step processing; in a few seconds your image changes to reflect the
sharpening level selected. If it seems excessive, use the Intensity tweak slider
to moderate it to the desired level. Advanced users will appreciate the additional
Intellisharpen II features: Normal, Low, and 0 percent Halo, Reduce Color Noise
(chroma noise reduction), a Levels setting for Sharpen Fine Detail, and Levels/Sharpening
tweak for final fine-tuning of the effects. When the image looks perfect, click
on the OK button and the changes are made immediately.
Evaluation: Intellisharpen II enhances important image elements without affecting
the sky or smooth skin areas in portraits, a defocused background, or any electronic
noise pattern. Granted, the various options are not "simple." At
first, use the settings recommended in the User's Manual as starting points
but then spend a few minutes experimenting with each of the additional features
and different levels. The extra effort will definitely pay off. (Compatible
with 8- and 16-bit files in Photoshop CS and with 8-bit files in Photoshop 6
or 7 and Elements 1.0 and 2.0; $25.)
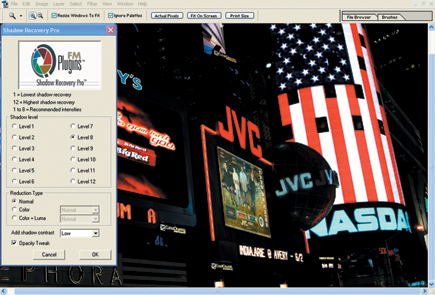
Recover Shadow Detail
Anyone who owns Photoshop CS or Elements 3.0 should certainly benefit from the
Shadow/Highlight Correction tool for recovering detail in bright and dark areas
without affecting other tonal values. But if you own an earlier version of either
Adobe program, you'll want another alternative, such as Fred Miranda's
SR (Shadow Recovery) Pro. Designed to restore detail hidden in shadow areas,
this plug-in duplicates the lengthy and complicated masking techniques often
used by experts, for professional effects.
At its most automatic setting ("Normal" mode), SR Pro can be used
at any intensity level from very low (1) to very high (12) shadow recovery intensity
(File>Automate>SR Pro). As a starting point, select Level 5 and set the
"Add Shadow Contrast" option to "Low"; this combination
often produces a pleasing, natural effect. Or start with a higher intensity
level and select the "Opacity Tweak" feature; after processing is
finished, use it to moderate the shadow lightening effect. More advanced "Color
+ Luma" options are available, too; most useful for reducing noise in
the lightened shadow areas of high ISO images. (Not available when using Elements.)
Evaluation: This "intelligent" plug-in uses sophisticated
multiple steps to recover valuable shadow detail but leaves mid tones and highlights
unaffected. (If you already own the Velvia Vision plug-in, with its Add Dynamic
Range feature, for better highlight/shadow detail, you would not also need SR
Pro.) It's easy to use, without any need for complex masking and blurring
techniques. SR Pro produces natural mid-tone blending, especially in images
without extremely dark shadow areas; for the best results, be sure to activate
the "Add Shadow Contrast" feature. (Compatible with 8- and 16-bit
files in Photoshop CS and 8-bit files in Photoshop 6 or 7 and Elements 1.0 and
2.0; $20.)
Increase Dynamic Range
While SR Pro works well for many images, there is another technique that is
even more useful for solving problems of excessive contrast. Let's say
you want to make a photo of a waterfall in brilliant sunshine surrounded by
an area that's heavily shaded by mature trees. In any single image you'll
get detail in either the highlights or the shadows, but not in both. The best
solution is to make two identical images (with the camera on a tripod) at different
exposure levels. For the first, allow the camera to take a meter reading from
the bright waterfall; for the second, expose for the darker landscape. Later,
combine the two images in Photoshop, using a complex layer masking technique
to create a nicely blended image that exhibits detail in both highlight and
shadow areas.
 |
|
 |
|
 |
|
|
Frankly, that's a labor-intensive process requiring advanced Photoshop
skills. The alternative is quick and uncomplicated: use the DRI (Dynamic Range
Increase) Pro plug-in for Photoshop 6, 7, and CS and Elements 2.0 (File>Automate>DRI
Pro). Following the on-screen instructions, identify the "underexposed"
image and the "overexposed" image. Click on OK and the software
will blend the two to generate a final picture with great detail in both highlight
and shadow areas. For greater control, experiment with the Radius Tweak feature
(not available if using Elements) to adjust the blending between the dark and
the bright images.
Evaluation: DRI Pro produces pleasing, natural-looking images
without any indication that complex digital processes have been employed. However,
the technique discussed earlier is most useful for scenes with extreme contrast.
In most other situations, I would make a single exposure for good highlight
detail, and use SR Pro instead to recover shadow detail. (Compatible with 8-
and 16-bit files in Photoshop CS and 8-bit files in Photoshop 6 or 7 and Elements
1.0 and 2.0; $20.)
 |
 |
|
 |
||
|
||
For additional specifics on the many plug-ins available from Digital Darkroom Inc., visit www.fredmiranda.com/software.
A long-time "Shutterbug" contributor, stock photographer Peter K. Burian is the author of "Mastering Digital Photography and Imaging." This 270-page book covers all aspects of the topic and provides a great deal of practical advice.
|
| |||||||||
- Log in or register to post comments


![]()
Get the Latest Photo Tips, News & Reviews from Shutterbug!
| Camera Reviews Other Reviews | Mobile Reviews Photography Reviews Columns | News | Features | How-To | Resources |
 © 2025 Shutterbug
AVTech Media Americas Inc., USA
All rights reserved