- REVIEWS
Camera Reviews 
More Reviews Mobile Reviews Photography Reviews - GALLERIES
- VIDEOS
- BUYER'S GUIDES
Picture Taking; Get Perfect Exposures Every Time; Get It Right Out Of The Camera And You'll Need Less Fix Time Later In The Computer Page 2
Raw Exposure Techniques
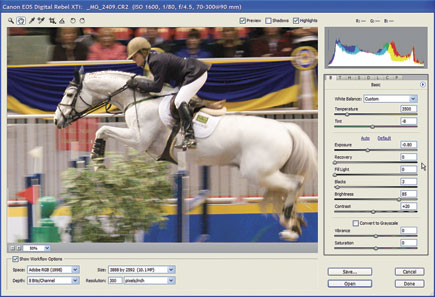
When you switch from JPEG to Raw Capture mode, the camera records raw data from the sensor. Data on aspects such as exposure are recorded but not locked in. Later, using a raw converter program you’ll be able to modify exposure or tonal value. This is a non-destructive process. The raw data file can handle fairly major brightness modifications because it contains 4096 levels of tonal information.
Since a raw data file is quite different than a JPEG, it also calls for a different approach in terms of light metering and exposure control. The best technique is based on a principle called expose to the right, first publicized by Michael Reichmann on his website: www.luminous-landscape.com. After using this approach extensively while shooting in Raw Capture, I can provide the following practical advice that you should try while experimenting.
 |
|
|
1. If practical, start by metering a mid-tone such as grass or a gray card, in the same light as your primary subject. This is only a preliminary step and will not often provide the ideal exposure.
2. Be sure to activate your camera’s highlight/shadow warning feature or
the histogram.
3. Take a photo and evaluate exposure in Playback mode.
4. If it seems to be fine, increase exposure; try a +1 setting while experimenting; make another photo that’s brighter than ideal.
5. When viewing the second photo, check the histogram and any warning about loss of highlight detail.
6. If important highlight areas are blinking, set a lower level of plus compensation and re-shoot. This may take several attempts, at different exposure levels, until you get one photo that is “ideal”: as bright as possible but not triggering a loss of highlight detail warning. With experience, you’ll learn to predict the suitable amount of exposure compensation for many scenes.
 |
|
 |
|
 |
|
|
Exposing to the right in Raw Capture provides a significant benefit. Because you won’t need to do much (if any) lightening of shadow and midtone areas in the converter program, digital noise (a grainy or mottled color effect) will rarely be problematic. Before converting the raw data to a TIFF file try to maximize detail in all important areas, using the available software tools. After conversion, use your conventional image-editor to slightly tweak brightness, contrast and midtone detail until the photo looks perfect.
 |
|
|
The Bottom Line
While many digital cameras include an “intelligent” light metering mode (Matrix, Evaluative or Multi-Segment), no such system will always produce optimal exposures. So plan to exert some control. Use Auto Exposure Lock and exposure overrides as necessary to achieve optimal results as confirmed by your camera’s exposure feedback features. Then spend a few minutes perfecting the image in your computer. All of that may seem complicated at first but it merely calls for some practice with new concepts and tools. Based on my experience, the extra effort will definitely pay dividends, with accurate exposures that will make excellent prints.
 |
|
|
A long-time Shutterbug contributor, Peter K. Burian (www.peterkburian.com) is a freelance stock photographer and a digital course instructor with BetterPhoto.com. He is the author of “Mastering Digital Photography and Imaging, Magic Lantern Guide To The Sony A100 and Pentax K10D,” and co-author of “Photoshop Elements 5 Workflow.”
 |
|
|
|
|
|
| |||||||||
- Log in or register to post comments


![]()
Get the Latest Photo Tips, News & Reviews from Shutterbug!
| Camera Reviews Other Reviews | Mobile Reviews Photography Reviews Columns | News | Features | How-To | Resources |
 © 2025 Shutterbug
AVTech Media Americas Inc., USA
All rights reserved