Fix Underexposed Landscape Photos in Lightroom Like This (VIDEO)
It's not unusual to return from a day in the field and discover that some of your images are either too light or too dark. That's because landscape scenes often have a wide range of tones that are difficult to capture accurately in a single shot.
Today's tutorial from the PHLOG Photography YouTube channel tackles the latter problem with a quick step-by-step Photoshop technique for restoring underexposed photos. You'll learn how to balance all the tones throughout an entire image, bring out more details in the shadows, and make a few straightforward adjustments to retain the natural colors your observed through the viewfinder.
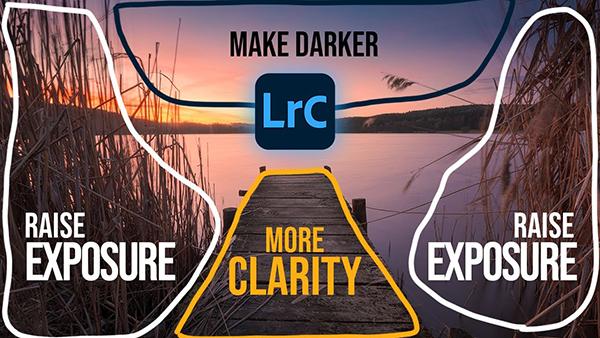
Instructor Christian Mohrle is an acclaimed German landscape photographer whose post-processing tutorials are very popular with Shutterbug readers. This episode features an extremely dark lakeside photo that you can download with a link beneath the video so that you and Mohrle can make the necessary enhancements together as the lesson proceeds.

After a quick glance at the sample shot you may wonder why Mohrle neglected to shoot an HDR sequence. His answer his simple: "I wanted to shoot a long exposure for silky smooth water and other moving elements on either side," and the edit below doesn't work well when taking that approach.
Mohrle always begins his edits with a few basic global adjustments that create an optimum base image for the selective adjustments that follow. The first step is improving the exposure as much as possible by adjusting dark areas without overexposing the sky. This is a difficult task with the Adobe Color profile so he changes that to Adobe Neutral.
As you'll see, the one-click profile shift provides much softer highlights, and details begin to peeking out of the shadows. Other preliminary adjustments involve using simple sliders to raise Exposure, reduce Highlights, and open up Shadows. He also modifies White Balance and makes a few other simple tweaks, and the effectiveness of these basic adjustments are confirmed in the Histogram.

With the image now looking much better it's time to apply a few masks to significantly enhance the photo. Mohrle targets the sky with both a Linear mask and a Radial mask—the latter of which he uses to subtract the brightest part of the sky from the initial selection. He also uses masks over the plants on either side of the frame, as well as on the jetty jutting out into the lake.
Color grading is the next step in the process, and Mohrle take a subtle approach because a natural effect is his goal. He concludes the impressive transformation with a bit of judicious sharpening. Compare his before/after images and you'll be very impressed by the final result.
Mohrle's instructional YouTube channel is well deserving of a visit, especially if landscape photography is your thing. We also suggest checking out the tutorial we posted earlier from another image-editing expert who explains a simple two-step Lightroom technique for achieving dramatic, realistic skies in landscape photographs.
- Log in or register to post comments


