
Indeed, the background is an important factor that will define the work. - Eric Ludy
- REVIEWS
Camera Reviews 
More Reviews Mobile Reviews Photography Reviews - GALLERIES
- VIDEOS
- BUYER'S GUIDES
Backgrounds & Montages
Create A Unique, Custom Image For Your Portrait Clients Page 2
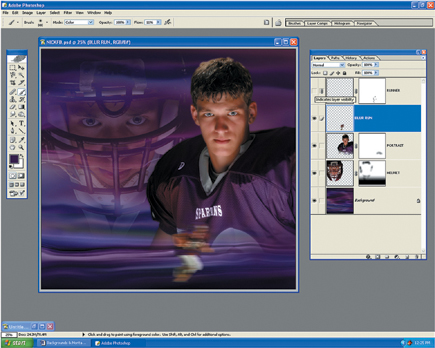
Figure 3
We are now ready to add the secondary element, which will be the close-up image of Nick in the studio with his helmet on. I call this image my secondary element because it is the second largest element. I tend to work from largest to smallest when creating montages. This allows me to make the image flow with the background image.
We are now ready to add the secondary element, which will be the close-up image of Nick in the studio with his helmet on. I call this image my secondary element because it is the second largest element. I tend to work from largest to smallest when creating montages. This allows me to make the image flow with the background image.

Using the "Lasso" tool I select very loosely and rapidly around
the helmet and face of the second image, then I copy and paste it into the montage.
We are going to apply some creative layer modes to this element. Before we do,
let me explain a few tricks. We are using what I would call a very low key background,
or dark background. If you press "F7" on your keyboard you will
bring up your "Layers Palette" and you will see that you have three
layers showing on your palette. Layer-III should be highlighted because it was
the last element pasted down of the portrait of Nick with his football helmet.
Now I am going to go into layer modes and change the mode from normal to lighten.
This will only allow the highlights of the image to show through. Anything that
is in shadows will become transparent, thus permitting the background image
to bleed through. By the background image bleeding through the shadow areas,
it blends this element very nicely into the background, producing a nice melting
of the image into the background. I can now lower the opacity of the element
35-45 percent, thus having it blend even more into the background and causing
it to be less noticeable than the main element.
This element, even though it is the secondary element, will most likely be the
last image that the viewer will see, due to the fact that the opacity is so
low. This creates a little mystery in an image. I will now create a Layers mask
to take out unwanted highlights or other distracting image areas that I do not
wish to have in the final illustration. I think you will find this technique
of changing layer modes quite helpful, and it can be used in many creative forms.
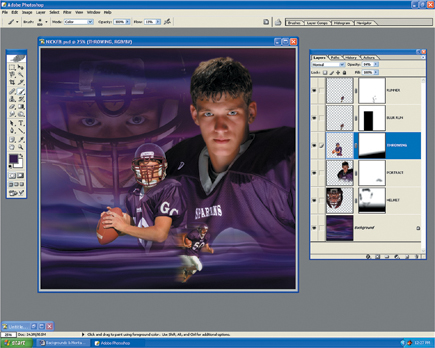
Figure 4
I then use my Paintbrush tool (still in mask mode) to custom fade out areas
or to tone down areas that are distracting, like the white foam padding in the
helmet around the ears, the logo on the helmet, and the chin straps.

Figure 5
The next element we are going to add is the image of the football player running.
After selecting the player we are going to paste it down into the image. I am
going to scale this down so it will become quite small in comparison to the
other elements. If you hold down the Shift button while scaling, you can scale
in perspective.

By varying the size of elements you can control the emphasis or importance of
a given element. Once you size the element, make a copy layer of the element.
I make sure there are two layers of the same element.
Figure 6
Now I select the bottom layer, and turn off the top layer, and apply a motion
blur to the bottom layer. How much you wish to blur is up to you--whatever
you think looks best. Next I turn back on the top layer, which is lying over
the blurred copy. This gives the illusion of speed, without taking away the
sharpness of the original image. I now can add a Layers mask to the top image
and fade away the back edges of the body so they blend more into the motion-blurred
bottom copy. I sometimes will offset the top layer from the bottom just a little
to give it more of a sense of speed.
Once you are completely satisfied with how the two elements are working together,
you might want to merge the two layers. This way you lower the opacity of just
one layer, and thus reduce the importance of this specific element within the
image. The opacity for this image is set around 75 percent. Remember you have
primary and secondary elements; this forces the viewer to focus on where you
want them to go within the image.
Figure 7
The final element is the football player throwing the ball. After selecting
the player it is pasted down into the image. Using "Ctrl+T" (free
transform) and holding down the Shift key to maintain perspective, I scale this
element down as well. Now I apply a Layers mask using the Gradient tool once
again. If I lay down a layer, 99 percent of the time I will have a Layers mask
going on. If you ask me, the Layers mask is the tool for blending, controlling,
and composing a montage. After I am satisfied with masking, I will lower this
element's opacity to around 85 percent as well and presto, the image is
done.
How long did it take to create the image? About 20 minutes. The word of mouth
that this type of work generates is incredible. I encourage you to try it out
and just have fun. If you're not experienced with creating montages, of
course it is going to take you a little more time. But like everything else
in life, practice makes perfect. Having the ability to illustrate your client's
passions or hobbies will sell portraits. You are creating a one of a kind piece
of artwork illustrating their world.
In the early stages of developing this technique, I wasted many hours on creating just the right backgrounds to highlight my subjects. For those of you who have more important things to do rather than making backgrounds, I have made available my custom backgrounds on two CDs. For more information on backgrounds and montages, please visit my website at: www.woodywalters.com.
Montage Tip
Learn to have different sizes of elements when making montages. One of the biggest
mistakes photographers make when they first start out creating montages is that
all their elements are the same size. This makes for a very stagnant image and
will also cause the viewer's eye to wander.
|
| |||||||||
- Log in or register to post comments


PHOTO OF THE DAY

Today’s photo is Pure by Odette
eNEWSLETTER SIGNUP
![]()
Get the Latest Photo Tips, News & Reviews from Shutterbug!
| Camera Reviews Other Reviews | Mobile Reviews Photography Reviews Columns | News | Features | How-To | Resources |
 © 2025 Shutterbug
AVTech Media Americas Inc., USA
All rights reserved