A Special Effects Toolkit: OnOne Software’s Perfect Effects 3
 OnOne Software’s Perfect Effects 3 (www.ononesoftware.com) offers more than 300 effects in 14 categories: Vintage, Darkroom, Borders, Portrait, Color and Tone, Film, Glow, Detail, Black and White, Landscape, Movie Looks, Photo Filters, Textures and Vignettes. For maximum flexibility in your workflow, Perfect Effects 3 works as a standalone program, or as a plug-in. Perfect Effects 3 integrates as an external editor for Lightroom and Aperture or as a plug-in for Elements or Photoshop. If you are using PE3 as a Photoshop plug-in, the effects appear under the File>Automate menu.
All the photographic effects you select are now previewed full screen before you decide to apply them—they draw in seconds. Further, the program offers the ability to stack multiple effects together to create your own unique look, with the option of selective masking on each layer. Advanced tools allow you to change the Blending mode options of the layers, as well as to control which tonal regions and/or colors of the image the effect is applied to. With new manual controls, you can adjust every element of an effect—not just the strength but also the color, tone and texture—to fine tune and customize your personal look. Here’s a look at some of the magic you can perform with this program.
Borders
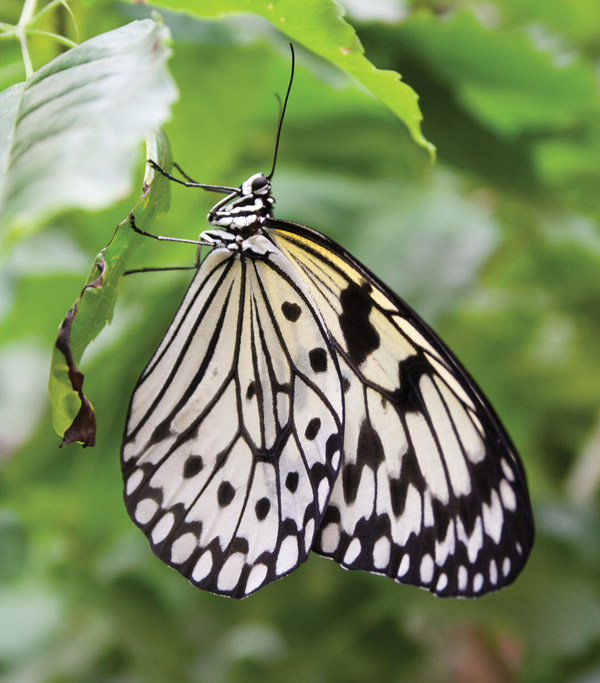
For this work I used Photoshop CS5 and CS6 Extended. After opening my shot of a butterfly (#1), I selected File>Automate>Perfect Effects. This brings up the screen with a large preview in the center, a tool well at the upper left and a column with the Navigator, Effects Stack (Layers) and Zoom and Pan controls on the right (#2). Scrolling out along the bottom are thumbnail previews of the effects available, below a bar of 15 categories. As you go through the thumbnails, each one you click on will be rendered full size. To keep an effect, click Add to add it to the stack. Then explore and add more effects to taste.
All Photos © Howard Millard
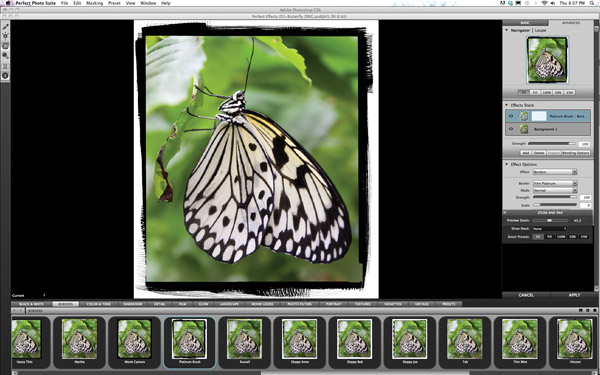
After clicking on the Borders option, I chose Platinum Brush, which consists of black brushed edges that result from hand coating platinum paper, a process I have worked with in the past. Clicking the Add box below the Effects Stack (#3), added a strong graphic border.

Next, I went to a new category to change the color and tone of the color original. Under Darkroom, I tried “Subtle Selenium”; it looks to me like the tones of a platinum print, as well as its namesake selenium toned silver print. Clicking Add in the Effects Stack completed the image I sought. Clicking Apply at the lower right processes the effects (3-5 seconds) and takes you back to Photoshop CS6, where the effects appear combined on a single layer (labeled Background 1) above the original background layer in the Photoshop Layers palette. The bold but harmonious final result is seen in (#4).

Portrait Effects
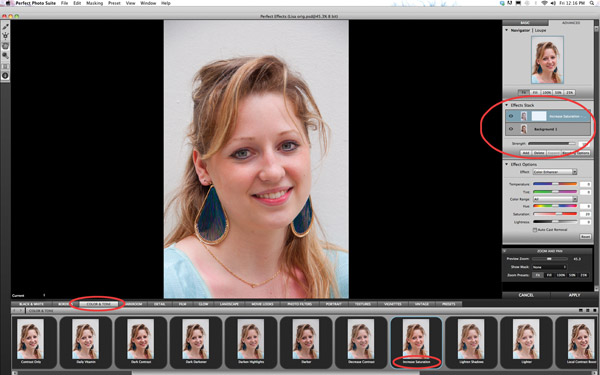
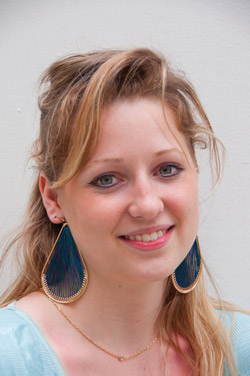
PE3 offers many options for portrait enhancement. Working this time in Photoshop CS5, I started with my shot of Lisa (#5), photographed outdoors in open shade on an overcast day. As a result of this lighting, the image is rather low in contrast and color saturation. For this image I selected the Color & Tone category along the bottom, and then chose Increase Saturation (#6). Note that in the upper right under the Effects Stack, you’ll find Effects Options (#7), where you can fine-tune the color Temperature, Tint, Color Range, Hue, Saturation and Lightness. This gave a nice boost to the skin tones, hair, eyes and lips while maintaining a realistic look (#8).


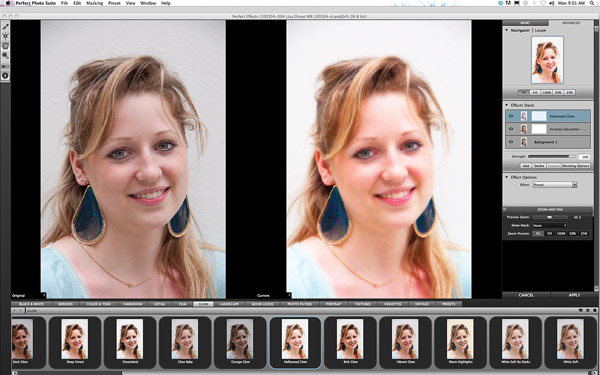
Tip: In PE3, you have a number of preview options at your disposal. You can see only the preview of the effect in the center screen and toggle between it and the original with Cmnd-P (Mac) or Ctrl-P (Windows). Under the View menu, you can also choose to see both the original and the effect preview side-by-side (#9) or in split screen or top and bottom. These different Preview modes can also be selected from the View menu, as well as the next to the bottom icon in the toolbar at the upper left of the screen.
Further, if you hover over one of the effects in the row of thumbnails at the lower edge of the screen, a small pop-up preview will appear with a very brief written description of the effect. However, I usually prefer the larger preview options because they draw very quickly and allow you to see more detail.
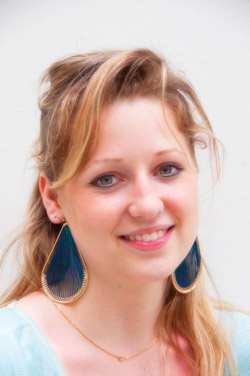
Next, to try a softening or diffusion effect, I went to the Glow category. Angel Glow and Black Soft worked subtly and well with this portrait. To best show the effect in magazine reproduction, I chose a more exaggerated effect than I normally would, Hollywood Glow. Next, I dialed back the effect by moving the Strength slider, immediately below the Effects Stack, from 100 to 75. The result is seen in (#10).
Back To The Past
Next, I wanted to create the look of a 19th century Daguerreotype from my photo of an elegant wooden church building (#11). This time I used the standalone version of Perfect Photo Suite 6. The interface is exactly the same, except that on the top right you choose which module you want to use, in this case Effects for PE3. After dragging my photo onto the Perfect Photo Suite icon, I selected Effects, went down to the Borders menu and hit on Movie Camera. To my eye this border looks exactly like the edges of cases that Daguerreotypes were displayed in, so I clicked Add below the Effects Stack, and then Apply (#12).
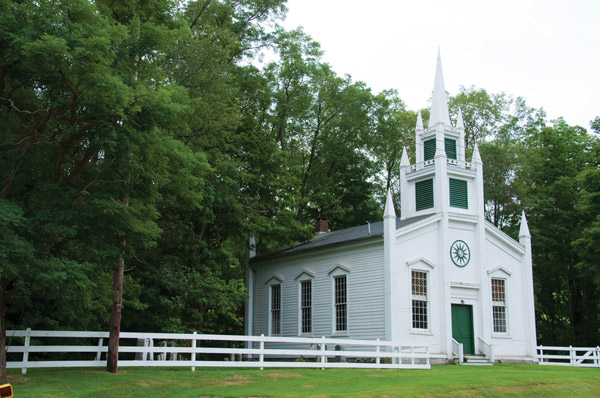
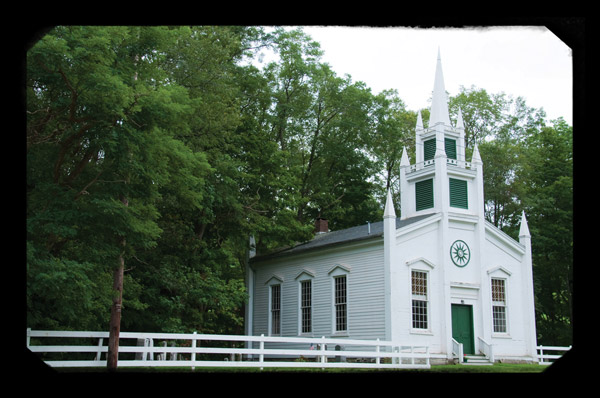
Daguerreotypes are monochrome images on a highly polished silver surface. To emulate this effect, I headed to the Darkroom category and selected Sabatier BW. The Sabatier effect involves a reversal of tones, which you can see in a Daguerreotype when held at different angles to the light. PE3’s Sabatier BW really came through with the look I wanted, nicely reversing the tones on the facade of the church (#13). The church has now become an intriguing graphic image, but I wanted more.

In fact PE3 has a Daguerreotype effect within the Vintage category, but I saved this for the last layer in the Effects Stack, because the border effect and the Sabatier effect first contribute to the illusion of the real 19th century process. As the last touch, the Sabatier BW adds a faint purplish coloration around the edges as well as a distressed, mottled appearance most visible in the image borders and the building façade (#14), elements you might expect in a photograph that is over 170 years old.

Postcard From The Desert
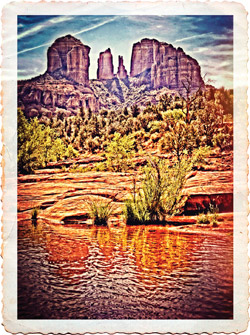
In every seminar and workshop I’ve ever attended, (except my own) you are always cautioned, “You have to start with a good image.” Balderdash! What’s the point of having all these great special effects if not to occasionally enlist them to revive a decrepit picture? So, armed with Perfect Effects 3, I scrounged through my files for a shot taken on a less than ideal day in Sedona, Arizona (#15). The sky is washed out, the water is brown and the Cathedral Rock formation is bathed in a grey haze—the perfect candidate.
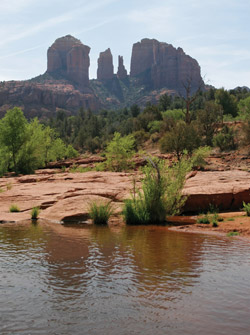
First, I wanted to see if I could coax more detail out of the rocks, then I wanted to add color and saturation to the sky. In the Color and Tone category, I successively applied Lighten Shadows, Tonal Contrast, Daily Vitamin (the pic feels much better now, thank you), Auto Fix, Auto Color, and then for that sky, Darken Highlights—this I applied twice to get some color and detail in the heavens.
Speaking of Detail that was the next category I traveled to, stopping at the Texture Booster. On to Landscape, where Magic Sunset added warmth and color. At Vignettes, I added Big Softy Blur, which focused attention on the important central parts of the picture and covered much of the bland foreground water. As I worked, I realized my goal had become a 1940’s or 50’s postcard feel, with unrestrained, exaggerated colors. So, for even more color and warmth, I called on the Vintage category and chose Nicely Toasted. (At first I thought many of these effect names were over the top, but after working with them for a while, they have become my friends. They often do what they say, as in this case.) After Nicely Toasted, the landscape couldn’t take any more warmth and color. Here’s a shot of the top end of the Effects Stack by this point (#16).
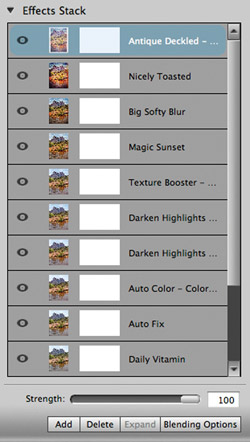
It was time to finish things off with a Border. Antique Deckled framed my idea nicely, but the default was too bland with the wonderful deckled edge fading into obscurity in the white background. Moving down to the Effect Options below the Effects Stack, I tried the different Blend modes available and settled on Hard Light (#17), which both gave definition to the edges and added the feel of aged color. Here was my 40’s postcard, with colors that make you want to put on your sunglasses (#18), all salvaged from a very dreary original.

So, whether you want to enhance a fine original to take it to a new level or you need to salvage a shot taken under less than ideal conditions, Perfect Effects 3 offers a candy counter full of goodies, each easily available with a couple of clicks.
System Requirements: Windows XP, Vista or 7. Mac with OSX 10.6 or 10.7. Both platforms: Intel Core 2 Duo, Xeon or better processor.
Host Requirements: Works as a Standalone application or with: Adobe Photoshop CS4, CS5, CS6; Elements 9 or 10; Lightroom 2, 3 or 4; Aperture 2.1 or 3 (Mac only).
Perfect Effects 3 lists for $99.95 with an upgrade price of $69.95, but check the website for specials. Online or physical delivery as well as many helpful free examples and videos can be found at www.ononesoftware.com. Not only can you try the full version free for 30 days, OnOne is giving away Perfect Effects 3 Free Edition that contains 25 of the effects found in the full version.
- Log in or register to post comments


