Made Easy
Digital Sepia Toning
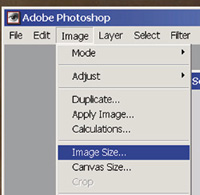
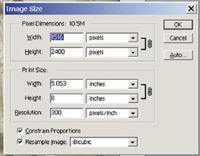
In the old days, in a wet darkroom, we frequently sepia toned our black and white prints. The real goal of sepia toning a print was to alter the chemicals in the emulsion to improve the life of the image. But, of course, many folks simply liked the look of a sepia-toned print. Sepia toning a print in a wet darkroom was a multi-step procedure involving some chemicals that were a bit toxic to work with and had a distinct, unpleasant odor. Today, when we work in the digital darkroom (or lightroom as some folks call it), we can still produce black and white prints that look as though they have been sepia toned. There's no toxic chemicals to work with and the whole job takes only a few moments. Here's how we do it in Photoshop. First, compose your picture and be sure that the electronic file has a resolution that maximizes your printer output. An ideal resolution is 300 ppi, but some printers produce equally good prints at 240 ppi. Test to see which works best for you. To check the resolution, go to Image to Image Size. See Figure 1. Notice in Figure 2 that the image has a Width of 5.053", a Height of 8", and a Resolution of 300 ppi. Higher resolution levels will probably not improve the appearance of your finished image, but much lower resolution levels will definitely cause a deterioration in the appearance of the image. |
|||||
Just as in the old days with a wet darkroom, the black and white digital print should be correctly set up so that it is the correct density and contrast and looks good as a regular black and white print. See Figure 3. Since this is a black and white image, we have to convert the electronic file to RGB before we can add the sepia (brownish-yellow) color. So, next, go to Image to Mode to RGB Color. See Figure 4. By clicking on RGB Color the computer will convert the electronic file into one that can then be colorized. Since there is no color information in the electronic file at this time, after you convert it to RGB Color it will still look the same as before--black and white. Now it's time to add the sepia color. Go to Image to Adjust to Hue/Saturation. See Figure 5. That will bring up the Hue/Saturation dialog box. See Figure 6. Be sure to click on Colorize in the lower right-hand corner. And, be sure to click on Preview so that you'll be able to see the effect of the color changes that you will be making. Then set the Hue setting to about 40 and set the Saturation to about 20. You can adjust these two settings a little to obtain the exact shade of sepia tone that you prefer. When you have the color just right, simply click on OK and your picture will be officially sepia toned. See Figure 7. |
|||||
Your picture is now a color picture and will have to be printed on a color ink jet printer with the color settings adjusted to produce the highest, photo-quality results. If your printer and monitor are correctly calibrated, your picture will print out exactly as it appears on the monitor screen. If it does not print out exactly as it appears on the monitor screen, then you need to calibrate your system. Setting up color calibration on a computer system is not all that difficult. But, it is a bit beyond the scope of this article. If you are having problems, send me e-mail care of: editorial@shutterbug.net and I'll try to help. |
|||||
|
|
|
||||
- Log in or register to post comments


