Lowepro’s DryZone Rover; The Outdoor Photographer’s Dream Daypack—With Hydration System Page 2
 |
|
|
Staying Hydrated
As anyone who hikes, runs, or bikes knows, it's important to stay hydrated.
By splitting the pack into an upper and lower tier, this also allowed Lowepro
to conveniently tuck a Hydrapak hydration system with a 50 oz reservoir into
the bag's upper compartment. The tubing snakes out of the top through
a partially concealed aperture. The upper tier is unpadded, but quite roomy--and
entirely sealed off, so if anything should spring a leak, it won't get
to your valuable gear below.
This was my first experience with a hydration pack. I brought along the instructions,
but when push came to shove, I was glad I'd also brought along my trusty
canteen. There were a few things I had to consider. Containers filled with cold
water sweat when in a warm environment. Next to the hydration pack I had a point-and-shoot
camera, my portable storage device, and other sensitive items--plus papers,
all of which don't like moisture. And I didn't have time to wait
for the bag to dry before heading out to take pictures. Also, I had plenty to
schlep as is and 50 oz of water would only add to the burden (and make working
out of the lower tier even more difficult)--my canteen could clip on to
my belt. And then there was the matter of something sharp accidentally puncturing
the reservoir. After all, I wasn't just carrying trail mix up there.
There was one more thing. To be safe and prevent bacterial buildup, the water
reservoir should be removed, emptied, turned inside out, and allowed to dry
each and every day. I didn't have anywhere I felt comfortable setting
it down. At home, I'd use paper towels. Here I had none and wasn't
about to spend precious time shopping for them.
Does this mean I would leave the Hydrapak home the next time? No. I would just
plan better. At the end of my trip, I'd discovered that my canteen was
missing. Since the Hydrapak resides inside the bag, there's no worry about
losing it. So the next time I take this bag on a trip, I'll pack along
some paper towels as well, and fill the reservoir up the night before to allow
it to acclimate. Hey, you can't think of everything before a big trip.
(For more information on the proper use and maintenance of the hydration pack,
go to www.hydrapak.com.)
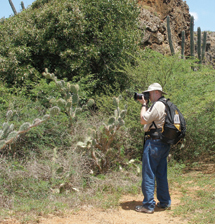
After a week under Curacao's sun, carrying around just under 20 lbs of
gear and accessories in this fashionable yellow-and-black Lowepro DryZone Rover,
my shoulders and back did not complain; I could easily have gone another week.
The bag proved as comfortable as the Nature Trekker, if not more so--and
I had thought the Nature Trekker would be a tough act to follow. Also, the closed
bag's low center of gravity means Rover stands up on its own (but it doesn't
fetch), so I didn't have to worry about it toppling over when it was set
on the ground. And to think, I almost opted for another bag on this trip. The
DryZone Rover proved its mettle. It will be accompanying me on many more adventures.
What The DryZone Rover Carried In Curacao
The padded insert housed a Canon EOS 5D with EF 24-105mm f/4L IS lens attached,
fisheye lens, 100mm macro, EF 70-200mm f/4L, 1.4x matched converter, short extension
tube, a 77mm Heliopan circular polarizing filter, Canon 430EX flash with off-camera
shoe extension, compact binoculars, and lens/body caps. The upper compartment
held a point-and-shoot camera, Sekonic meter, Wolverine MVP portable storage
device, and remote controller for the digital SLR--in individual pouches,
plus various papers and instruction manuals. Extra batteries and lens shades
were tucked wherever they fit. Extra memory cards went inside a Digital Foci
Memory Card Travel Case, and this was tucked into one of two outside mesh pockets.
A hideaway tripod holder was available as well. Bag dimensions/top: 11.8x7.3x12";
camera compartment: 11.8x6.9x8.7". The upper level may bulk out when filled,
so measure the bag at home, well before boarding the plane (ascertain carryon
dimensions/ regulations in advance from the carrier).
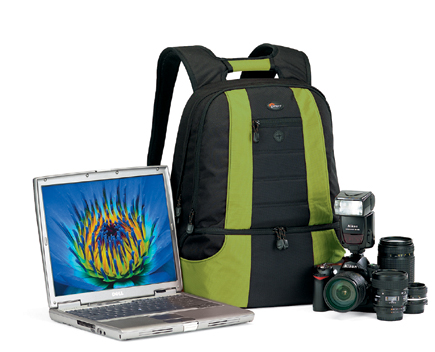
The Lowepro CompuDaypack
The CompuDaypack benefits from an excellent design strategy, which allows you
to access your camera gear in the lower level without having to open the "mouth"
all the way back, hence maintaining the bag's stability and balance. The
computer pack's more modest size is better suited to smaller, less assuming
optics. The much smaller 28-105mm fit well attached to a Canon EOS 5D. While
the computer bag had lots more pockets than the Rover, it was not designed for
hiking, especially over rough terrain. Granted, the shoulder harness is very
comfortable, but the bag lacks a chest (sternum) strap and waist belt--two
important features in a hiking pack. For short hops here and there, it's
fine. By the way, while the bag is said to hold even a 17" notebook, all
I had was a tiny iBook. No complaints there.
 |
|
|
Why A Photo Backpack?
When hiking or traveling, I prefer a backpack over a shoulder bag or sling bag.
Backpacks do a better job of distributing the weight during long hauls. But
more importantly, a properly cinched photo backpack will wear comfortably, without
causing undue fatigue. Moreover, it will stay put, without shifting, and help
you maintain your balance as you negotiate difficult terrain. And it helps that
photo packs are less recognizable as camera bags.
For more information, contact Lowepro, 1003 Gravenstein Highway North, Ste. 200, Sebastopol, CA 95472; (707) 827-4000; www.lowepro.com.
- Log in or register to post comments


