Do It Yourself
Build An Ultra Wide Shift Camera Part 2
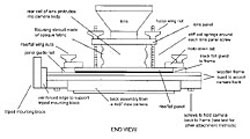
Last month we covered the concept of this undertaking, building a pancake-like camera with considerable lateral movement for ultra-wide angle photography on 6x7cm, 6x9cm, 6x12cm, and 4x5" formats. This month we will go over the assembly and finishing, but remember that the project is intended for workshop savvy readers who already have a spare 4x5" camera back and/or a short focal length view camera lens. Also, the design illustrated here is just a starting point that will probably have to be modified to work with these existing components. I have devoted most of our space to drawings, which I feel are more useful than text in this case, so I will mention only a few key points. |
|||
Cyanoacrylate or white glue can be used to assemble the body, and while the former dries very fast, I am a big fan of the latter because of its ability to fill large gaps. Also, applying a narrow, continuous bead along the edge of a joint and coating the fully dried glue with two coats of flat black paint is an excellent way of sealing out light. The length of the rise/fall panel should be approximately 1.7 times that of the guide rails. |
|||
The frame can be drilled to match the screw mounting holes in a back cannibalized from a 4x5" press camera. If you use a removable back and do not want to deface it, consider mounting with adhesive-backed magnetic strips applied to both the body and back. Double-sided foam tape makes a very strong bond, but it can take paint and chunks of soft wood with it when removed. The back can also be attached with miniature C-clamps, woodworking clamps, office binder clips, and other primitive but effective methods. Be sure to seal the back/body junction with black tape if such schemes are used. Veteran workers may want to fashion a toggle-action lock using more parts from a defunct press camera. |
|||
The focusing mechanism, made of four No. 8 machine screws inside fairly stiff coil springs, moves the lens back and forth when the four wing nuts on top of the panel are turned. If you use the hyperfocal focusing method described, replace the wing nuts with elastic stop nuts to lock the panel in place. The focusing shroud is an opaque fabric sleeve, an inch or so long, glued between the lens panel and the rise/fall panel. However, when the shroud is fully extended, the distance from the front of the lens panel to the film surface must be about 40 percent greater than the flange focal distance of the lens. I used a vinyl-coated fabric, but remnants of an old changing bag or two layers of tightly woven black cloth will suffice. |
|||
All of the body materials are off-the-shelf hardware or hobby and craft items, but look for hold-down tabs in the "screen door hardware assortment," a collection of odd-shaped clips and fasteners that can be used directly or with slight modification. Make the tripod block from a sturdy piece of wood to which a 1/4-20 or 3/8-16 T-nut or brass insert has been added. Black photo tape is best for lightproofing, but black cloth (not vinyl) utility tape also works. Avoid electrical tape which does not readily absorb glue or paint. |
|||
Give the wood a coat of primer/ sealer, then finish all interior surfaces with two coats of flat black paint. Be careful to fully cover highly reflective internal objects such as screw heads, as well as beads of glue used to fill and seal joints. Install the lens, focus as described and make some test exposures to check for light leaks. Polaroid 31/4x41/4" pack or 4x5" sheet film (exposed in Polaroid 405 or 545 film holders, respectively) makes this step quick and easy. If fogging occurs, recheck the light seals at the focusing shroud and at all joints. Test the camera with the lens at its zero position as well as both extremes of shift. Turning one focusing wing nut more than another will tilt the lens panel with respect to the film surface. Be sure to check for sharpness in all corners of the ground glass with a loupe (and tweak each nut as required) every time you refocus. Another approach is to set the focus to hyperfocal distance, a "pre-focused" position that maximizes depth of field at a given aperture. Hyperfocal distances are found in tables published in photo reference books or purchased from Shutterbug advertisers. For example, a 47mm lens, permanently focused at 12', yields a depth of field of approximately seven feet to infinity at f/11 on the 6x7cm format. Stopping down from f/11 increases depth of field, opening the aperture decreases it. |
- Log in or register to post comments


