- REVIEWS
Camera Reviews 
More Reviews Mobile Reviews Photography Reviews - GALLERIES
- VIDEOS
- BUYER'S GUIDES
This CRITICAL Error Will Ruin Your Photos: Here's How to Avoid It (VIDEO)

Greek storyteller Aesop once said, "It is possible to have too much of a good thing," and that's the motto of today's Lightroom tutorial as it pertains to over-sharpening images. In other words, if you go overboard with this task, or do it wrong, you'll end up with too much of a bad thing and spoil your work.
According to instructor James Feaver, "most modern lenses are really sharp and provide a great balance between sharpness and creamy out-of-focus bokeh." With that in mind, he demonstrates how three Lightroom sliders will prevent you from creating a crispy mess.
The key to finding the right balance, says Feaver, is understanding Lightroom's Texture, Clarity, and Dehaze tools and how far to push these simple sliders before image quality begins to go sideways. Beginners tend to cross the line, just as they often do when oversaturating photos to the point of absurdity. The point is that a subtle approach delivers images with a realistic look.
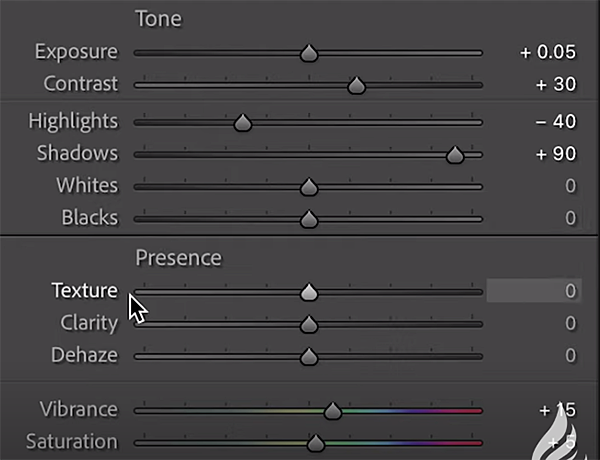
The three "Presence" sliders that Feaver recommends are found within the Basics panel just beneath the Tone array. The Texture, Clarity, and Dehaze sliders work in a similar ways, and the difference is a matter of degree and where they affect the image.
As the name suggests the first tool discussed is used to increase or decrease the attribute known as texture, while still retaining fine details. Moving the slider to the left reduces unwanted, medium-sized details. Move it to the right and the opposite effect occurs.
The Clarity tool is used to control the appearance of edge contrast in a photograph, and unlike with Texture it's intentionally biased towards the midtones of an image. It also affects luminance and saturation is a greater way than does the Texture slider.

Lastly, Lightroom's Dehaze technology is based upon "a physical model of how light is transmitted, and it estimates light that's lost due to absorption and scattering through the atmosphere." With this tool there is relatively little change in highlight areas, while the shadows are more dramatically altered as the slider is moved.
With all this theory out of the way, Feaver walks you through a practical process for putting these siders to work—individually or in tandem. Bottom line: the next time you attempt to sharpen a soft photograph, think back to Aesop and take a subtle approach in the manner Feaver recommends
Feaver's instructional YouTube channel is full of basic image-editing lessons like this one, so take a look and improve your workflow.
We also suggest watching last week's tutorial from another expert who demonstrates how to take advantage of an underrated Lightroom tool to instantly improve your photographs.
- Log in or register to post comments


![]()
Get the Latest Photo Tips, News & Reviews from Shutterbug!
| Camera Reviews Other Reviews | Mobile Reviews Photography Reviews Columns | News | Features | How-To | Resources |
 © 2024 Shutterbug
AVTech Media Americas Inc., USA
All rights reserved