Coming Of Age
A Professional Photographer Wins Clients With Digital Photography

Red shoes.
Photos © 1999, Jay Abend, All Rights Reserved

If you have been reading Shutterbug for some time, you're no doubt aware of the constant drumbeat of the digital photography industry. The products used to fall into two categories--expensive cameras that take frightfully bad pictures, or frightfully expensive cameras that take excellent pictures. It may seem like a no-win situation for the old school film guys, but the scene is changing fast.

With the recent release of the highly acclaimed and tough to find Nikon CoolPix 950, Canon Powershot Pro 70, and Olympus C-2000 Z, the casual snapshooter and the quick and dirty studio guys have found cameras that can just about replace film. Why, you may ask, would I want to spend a cool thousand bucks to buy a camera that replaces a $79 point-and-shoot? The advantages are many, but speed, instant gratification, and ultimate cost savings are the best. Most home users find the ability to make prints on their desktop and heavily edit images themselves to be slam dunk reasons to go digital. While the really good stuff is still tens of thousands of dollars, there is now a reasonably priced way to get started.

For me, digital imaging has become my career. When I went digital several years ago, it was basically out of a desire to make prints in my studio. I just figured that a digital camera and dye sub printer would satisfy a few clients I had who needed C-prints every now and then. The big ticket price tag would be passed on to the client, and everyone would be happy. Today I have two different kinds of clients, the ones who hire me for my photography ability, and the ones who hire me because I'm a digital guy. I'm happy receiving work from either client, just as long as that phone keeps ringing.

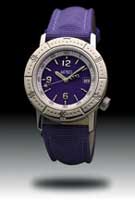
Blue watch.

While a lot of Shutterbug readers have complained about the creeping digitalization of the magazine, a lot of you are starting to get hip. To give you a good idea why a pro would want to be fully digital, Shutterbug asked me to take a few recent assignments and explain how I shot them, what I did to them, and how you can get similar results. Here goes...

Red Shoes. Here is a shot that would be very expensive to do the old-fashioned way. A retoucher and a few C-prints would have been the traditional method, but with a digital camera and a good image-editing program you can do it yourself.

I shot the foreground shoe with a Leaf DCBII, the rear shot with a Leaf Lumina. Each was silhouetted using the pen tool, and shadows added. To satisfy the client a number of different colored backgrounds were inserted and small "For Position Only" JPEG files created. These were e-mailed to the client, who instantly placed them in the layout to decide which color was best. Once selected a high-res copy was made and burned to a CD-ROM.

Blue Watch. The client wanted the watch floating in midair with a visible drop shadow. Like you, I figured that digital manipulations would look fake, so I started rigging some armature to shoot the image on 4x5 film. After a few hours of messing around, I decided to devote the rest of the day to "Photo-shopping" it to see what I could do. Rather than wait for the film to come back from the lab I grabbed a shot of the watch in a custom-made watch stand with a Leaf DCB digital camera back. I interpolated the 2048x2048 pixel file up to about 3500 pixels square. Using Photoshop's pen tool I painstakingly created a path around the outside of the watch band and face. Once completed I converted the path to a selection and deleted the background.

Now I had a watch with no background. I then added two layers with nothing in them. On layer two I added a black to white gradient, trying different gradients till I got one that I liked. On layer three I drew an oval selection, filled it with black, and then deselected it. Then I applied a 30 pixel Gaussian Blur to the oval shadow, then moved it under the watch. Once all the elements were in place I used the blue channel of the watch layer to create a mask, then I was able to adjust the color and saturation of the band and watch face without altering the tone of the watchcase. Once done I flattened the image and made a few prints. I've had this shot in my portfolio for a while and clients always respond well to it.

Guy at window.

Guy At Window. Here is a tough assignment that I received only because I was known to this ad agency as "The Photoshop Guy." They didn't even care if I shot it on film, they just knew the look they wanted, and realized that it had to be created in the computer.

I have found that fantasy images, like the businessman with wings and the flying alarm clock, are easy to pull off, since you have no visual frame of reference. Images like this that must appear real are hard. To build this creation I started with the guy in the suit standing against a blue background from two different angles. I then shot the steel window frame on location, four different shots of bricks, and three different angles of the factory floor.

Once all of the 6x7 Fuji Velvia images were drum scanned I began assembling. The guy was easily knocked out using Cinematte from Digital Dominion, and the edges fine-tuned with the excellent edge blender tool in Extensis Mask Pro 2.0. The same was done for the reverse angle that would provide the faint reflection in the "glass." The window frame was knocked out using a simple selection, then the bricks were composited in a series of layers to create the three-dimensional effect. I combined the bricks and window frame to create the body of the image, then inserted several factory shots behind the frame. By resizing using the scale tool, I was able to combine the shots to look like one, then convert the image to a duotone for that dreamy sepia effect. Once I positioned the man in front of the frame and his reflection behind the frame I could adjust the opacity of the reflection down to 18 percent so it would really look like a reflection. I added a few more layers of faint shadows to add depth and that was that.

At one point this image was 13 layers deep and 110MB big, but it got the job done.

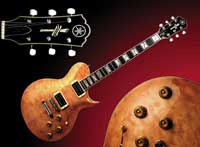
Guitar.

Guitar. Here is a great example of how seamless a digital composite can be. Each of the three main shots was captured with a Leaf Lumina scanning camera, then they were silhouetted using Extensis Mask pro. The background gradient was created in Photoshop, then the elements were brought into position. I resized some of the elements to make them fit correctly, then color corrected the entire image. There is no convenient way to do this with film and still maintain the gradient background.

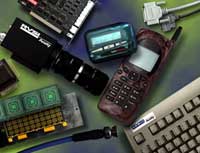
Montage.

Montage. Here is an image that was made possible by digital imaging. In the old days I would have meticulously propped these products to match the Art Director's comp, shot 4x5 film, and delivered the chromes to the client. They would then pay big bucks to have the logo added to the black camera body. Now they can come to me and I can do the entire project.

Each product was shot individually using a Leaf DCBII camera against a blue screen and knocked out. Each silhouetted object was assigned its own layer, and a faint drop shadow was created. I linked the objects with their shadow layers so the shadows would follow as I moved them around. In cases where the shadow was to fall on another object the shadow was actually painted away using the eraser tool where it crossed the second object, then a new shadow layer created at a slight offset.

A job like this required tons of RAM and lots of patience. Once all of the objects, layers, and shadows were in place, the mottled background was created in Kai's Power Tools (a must have). The final step was to take the "Acuity RVSI" logo from the client's floppy disk and make it look correct when applied to the black camera. The client approved the position and I fine-tuned the color and density, and that was that.

Wine bottle.

Wine Bottle. You can easily shoot this shot with a film camera, as I did in a previous Shutterbug article, but it's so easy digitally. Rather than meticulously position the lighting, bottle, and camera and work for hours to get it all right, I simply shot the bottle laying down against a white background and did the rest in Photoshop.

Once the bottle shot was cleaned up I silhouetted it using the magic wand tool to select the background. Then I created a duplicate of the bottle layer, flipped it over (Rotate-Flip Vertical), and dialed the opacity to 20 percent. I positioned it to look like a reflection, then added a new layer. I filled the new layer with this smooth black to white gradient and we were done.

The Verdict. Digital imaging has revolutionized the advertising industry completely, and it is about to completely change every other aspect of photography. I changed my skills and my business model to compete, and so far so good. If you make money with a camera and you don't yet know your way around a digital camera or an image-editing program like Photoshop, you'd better get busy or risk being left behind.

While I still shoot several hundred rolls of film a year, I know that every single shot will eventually be scanned and edited digitally. By offering these services to my clients I not only make more money, but I retain more control of the creative process, and these are two things that I care about deeply.

X