Apple Aperture How To
![]()
Apple Aperture How To
by George Schaub
Apple's Aperture offers an all-in-one digital photography program that can be used to download, view, edit, organize and output images. I've been working with Aperture for a few months now and thought I'd share some of the interesting features it offers. One is the Light Table, a sort of freeform layout screen that can help you group images and consider arrangements and sets in a whole new way.
Light Table is a freeform layout tool that lets you play with images and their relationship to one another. It works right out of the Browser as an Album that you create. It can be used to create layouts and image combinations for books, web pages, wedding albums or portfolio presentations. It is designed after a typical studio light table, where you lay out slides for editing and perusal. The difference is that Aperture's Light Table lets you resize each image as you go and align them for output, right from the screen setup.

Light Table allows you to play with images and is a great way to contemplate groupings, page layouts, web presentations and even prints for display and albums.
Light Table Albums
To work in the Light Table you need to create an Album in Aperture. The Album
becomes the repository of all the images you want to work with in the Light
Table workspace. To create a Light Table Album select the Project heading under
which you want the new Light Table Album to be placed. Go to the Add to Library
pop-up menu and choose a New Empty Light Table and an untitled Light Table Album
appears. Once you name the Light Table you can simply drag images from the Browser
to the album, or use it as the destination for Imports.
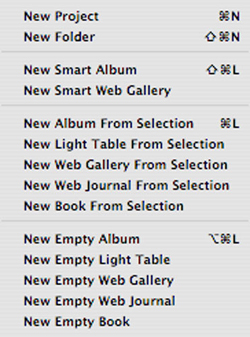
To create a Light Table Album, use the Add to Library pop-up menu and either select a group of images and create a New Light Table From Selection or create a New Empty Light Table and drag images into it from a Project Browser.
Alternately, you can work in the Browser and select whatever images you want
to sit in the Light Table Album. Once you have them gathered use the Add to
Library pop-up menu to create a "New Light Table from Selection."
You then name the Light Table Album.
Once you have a Light Table Album you can simply drag the images from the Browser
into an open Light Table. If you put an image in and then decide to take it
out, use the Put Back Button located in the upper left of the Light Table screen.
Note that when you do this it simply places the image back in the Browser--this
is not an overall delete button.
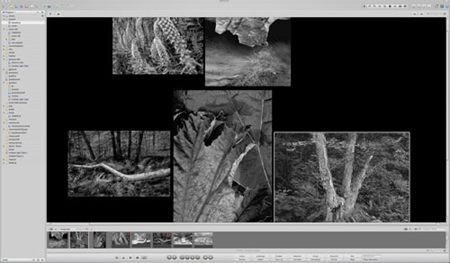
As you resize and move images around the Light Table may become too large to
fit on the workspace screen. Keep in mind that the Light Table will expand as
you add images and will grow as you move images toward the edge of the screen
workspace.
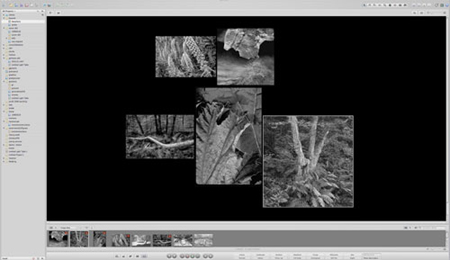
To fit the images to the working space use the Scale to Fit All Items button
or the resize slider, both located in the upper right margins of the image workspace.
As you work with the Light Table you can check the Browser for images that have and have not been used. A number will appear on those that have been already placed. Alternately, you can click on the Show Unplaced Images button, located right above the Browser pane. If you want to use the Browser to see all the images in the Light Table (which excludes the unplaced ones) click on the Show All images button, also above the Browser pane.
Working in the Light Table Environment
The fun and functionality of Light Table comes from the ability to move images
around and to play with sizing, positioning and, perhaps as important, the juxtaposition
of those images. Moving images around is easy--simply select the image
and drag it where you wish.

Click inside an image and "grabbers" appear. Use these to resize
the image by grabbing a handle and moving it in and out.
As you move images in and around the screen you probably will want to resize them as well. This works much like any window manipulation function; all you need do is move the cursor over the image and grab one of the handles and move it in and out. If, after resizing you want to return it to its original size all you need do is Command-Z (or use the slower Edit>Undo Resize command.) If you want to resize the image again click inside the image and the handles reappear.

When you select an image for the Light Table a number appears superimposed on
the image in the Browser. This can be very helpful if you are working with many
images in a project.

This screen shows the Browser on the left side of the workspace. The Show Unplaced
Images (a button in the upper right margins of the image workspace) was clicked.
As you work through your layout you can place images freeform or have them aligned with one another, or with a select group of other images on the screen. To align two of images first select them, then Control-click just one of the images, then choose Align from the menu that pops up. There's a sub-menu that allows you to choose the type of alignment you'd like. Another option is to align a group of images; select them and then Control-click the group selected, then choose Arrange from the pop-up menu. If you want to expand the size of the Light Table you simply drag an image to the border; the Light Table will automatically expand in size.
Screen size can be an issue when working in the Light Table; if you work with lots of images in one layout eventually you will have images overlapping others. If this becomes an issue you can simply push the Uncover button, located in the upper left portion of the screen.
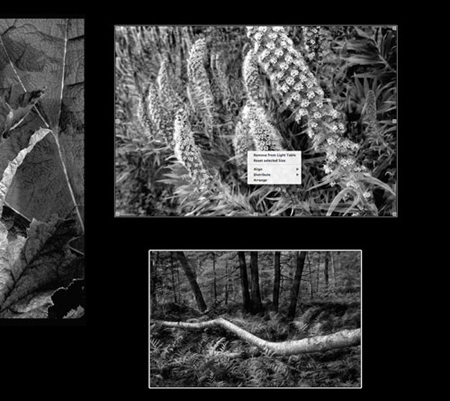
If you want to align images in various ways first select the images you want
to align then Control click to make the Alignment Pop-Up menu appear.
The screen size issue can also be addressed if the Light Table becomes larger than the screen size. True, you can scroll up and down to view the entire screen, but this can become bothersome. Much like a `fit to screen" command in other programs, you can use the Scale to Fit All Items button on the Light Table Zoom control. You can also use the slider tool in the same control panel to zoom back and forth. If you want to return to 100% viewing just click on a blank portion of the screen.
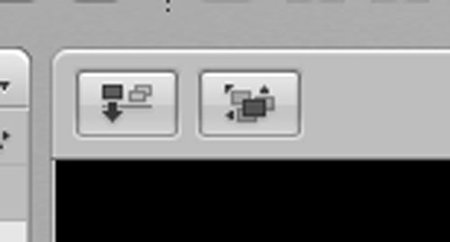
These small buttons appear in the upper left of the Light Table workspace. The
left button is used to remove an image from the Light Table (but not the Browser.)
The right button uncovers images that may have been covered over during addition
or resizing operations.
Output
You can output the Light Table as a PDF, HTML page or as a print.
Summary
The Light Table is an enjoyable way to work with images, as it allows you to
preview layouts and possible image juxtapositions. It is aptly named as it emulates
the experience of laying transparencies out on a traditional lightbox. However,
it differs in that you can resize images as you work.
You can create Light Table Albums and simply work freeform from the Browser. While you can align images in many ways perhaps the most fun is dragging images around the screen and resizing them to explore many possible combinations.
Think of Light Table as being as much an editing tool as it is a layout tool. When considering images for submission or client approval, often the best course is to put all the images together and then see how they work together as a visual team. This can be an excellent way to make the final cut before presenting images to clients, classes and associates.
- Log in or register to post comments


