Apple’s Aperture; Digital Camera Image Management, Processing, Editing, And Output—All In One
With so many digital SLR cameras sold in the last few years it was inevitable that programmers would put together solutions to serve all of the needs of photographers in a comprehensive application. That Apple would be out front with their slick and powerful Aperture application, I think, caught some off guard. But considering all the independent activity in conversion support software for raw digital camera files, some of which I have reported on recently, Aperture should have been no surprise. Regardless, it is probably a good move for Apple, and it provides both professional and serious enthusiast photographers with capabilities that may ideally suit their needs.
Importing Images |
|
 |
|
|
So what is Aperture? It is an application designed to provide photographers
with the tools and processes for dealing with digital camera files. In a way,
Aperture's tools and processes are designed as a digital metaphor to what
photographers have done for years after shooting and processing film.
Even though Apple presents a single, integrated application using the same interface,
there are different views that relate to each of the steps in the process. The
first of course is download or acquisition from the camera or card reader or
even a CD or DVD. The second view and function is possibly the most elaborated
and complex; it deals with the selection, editing, inspection, and evaluation
of images, plus the culling of images that are not keepers. Appended to that
function is a database for rating and identifying images. This uses metadata
that's associated with the image file but also can use keywords and classifiers
added by the photographer for search and identification/organization purposes.
Once a selection of keepers is made, identified, re-named, and organized from
a shoot, which Apple calls a Project, each individual image can be viewed large
individually, comparatively, or in groups. There are also a host of Aperture
editing tools in a free-floating box that can be used to optimize the images
to their fullest potential.
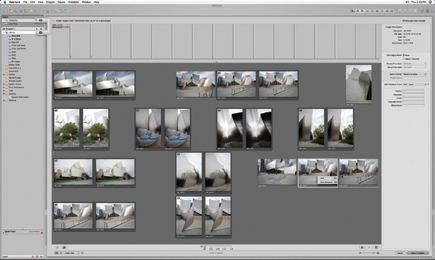
Another Aperture work space view emulates a large light table for slides and
transparencies. It provides the ability to select from the thumbnails in a browser
environment, from which you can arrange, size, and lay them out in freeform
fashion. The Light Table arrangement itself can be a kind of output in the form
of a print, an Acrobat PDF, an e-mail, or web page in HTML.
Work Space |
|
 |
|
|
Aperture supports a full range of output options. It can be used as the communications center for clients or associates or as an output center. It can generate individual prints, a slide show, or even a press-printed book using Apple's online Aperture support services.
Using Apple's Aperture
For purposes of this review Apple also sent an Apple G5 Quad (four processor)
computer and two 30" Apple Cinema Displays. The G5 came loaded with Aperture
and all kinds of sample image files. Two really big LCD displays side by side
is an impressive way to show off what Aperture can do, but it overwhelmed my
modest workroom and I did most of my evaluation using the G5 Quad and one 30"
display, as well as my own year-old G5 with a 21" CRT with Aperture installed.
Of course the Quad and the big 30" LCD Cinema Display was incredibly fast
and impressive, which I am sure was Apple's intention, but Aperture functioned
as effectively and not all that much slower on my more modest G5.
With the digital camera raw conversion utilities previous to Aperture, you had
to first convert from the proprietary format to a standard RGB image file format
like Adobe PSD or TIFF to be able to work with the images, that is, to edit
and correct them. Aperture functions a little differently. In Apple's
words, "Raw images are maintained natively throughout Aperture without
any intermediate conversion process...Aperture's nondestructive image
processing engine never alters a single pixel of original photos."
So what you are actually seeing on screen and editing is a proxy so-to-speak, and what you change is recorded as an instruction attached to this proxy. This is only incorporated in an export of the now-changed file, which is called a Version, or in output like a print of Acrobat .PDF. This unique way of working in an application with raw camera image files explains why Aperture acquires downloads and puts them into its work space unusually fast, especially with a four-processor G5, but also with my older and less powerful Mac.
Time, of course, is the essence of Aperture. It is highly efficient in gathering a collection of exposures, and then in aiding you in selecting keepers. It is also very fast in batch re-naming, if desired. One way that you do this culling is by applying a star rating system to individual images. From my perspective the rating system works well with big, redundant collections of exposed frames, I have my doubts, however, that adding keywords and other identification data for searching will be worth the effort unless you are doing a stock photo library, or you are a pro with a very large volume of images and an assistant to do the keyboard pounding. Otherwise, the time invested is just an overhead expense that detracts from the bottom line and takes one away from being behind a camera.
Adjustment HUD |
|
 |
|
|
With raw format digital camera images, the core of the processing is color
correction and the adjustment of image values to produce an optimal image file.
Apple, I believe, assumed correctly that professionals and serious enthusiasts
prefer to make the corrections and adjustments to their own unique, individual
requirements and do not want an automated cookie-cutter solution just because
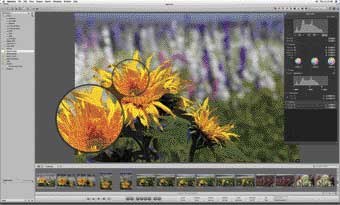
it is easy. Apple has provided a floating control window, a HUD (Heads-Up Display),
included in the Inspector window that displays image and metadata information.
The adjustment controls include the usual "list of suspects," such
as the basic adjustments of Levels, Exposure, Highlights & Shadows, White
Balance, Sharpen, as well as utilities to correct for redeye, spot and patch,
straighten, crop, reduce noise, and a monochrome mixer to convert to black and
white, plus a sepia option.
There are also auto functions that provide quick short cuts to adjust Exposure
and Levels. The Exposure adjustment essentially moves the raw image gamut to
an ideal center of the work space gamut, and the Levels auto adjustment senses
the image gamut and expands it if smaller to fill the Aperture color space.
With the latter a Histogram provides the user with the ability to adjust the
limits and select any clipping that is desired, as well as moving the midpoint
gray value to adjust image brightness. In addition, the Levels/Histogram interface
offers a quarter-tone option that also supports adjusting the midpoint between
gray and black and gray and white points.
The HUD also offers a single pixel eyedropper to select the white, black, and
mid-tone gray points so you can bring them to a neutral color balance. You can
also shift that color balance to any desired value in the color range, with
three circular spectrum displays with a center adjustment node. The remaining
adjustments are by means of sliders. An adjustment of one image can be saved
or applied automatically to any selection of images in a Project. To make the
perceptual function of the HUD adjustment effective, Aperture provides the option
of performing the task in full-screen mode.
- Log in or register to post comments


