How to Choose the Right Aperture for Your Photos Every Time (VIDEO)
If you're a beginner photographer who has gotten bored with shooting everything in fully automatic mode, you've likely thought of experimenting with your camera's manual settings. And the first setting you've probably considered adjusting is the lens' aperture.
Many beginners, however, tend to stop right there. We call this "F-stop anxiety."
How do you get over this affliction so you can get more creative with your camera? Watch the video below from Mango Street, which gives you tips on how to choose the right aperture for your photos every time.
"One day after you've been shooting photography manually for an extended period of time, you won't give much thought to what aperture or shutter speed you're shooting, because it will just be muscle memory," says Rachel of Mango Street. "But until then, things like choosing the right aperture can feel a little overwhelming, so let's fix that today."
Watch below as Rachel and her husband Daniel break down aperture simply and clearly so you can better understand it for your photography. In the video, Rachel and Daniel cover the two main uses of adjusting the aperture of your camera/lens.
#1 Letting in more or less light
"Simply put, your aperture is like your eye's pupil. The wider your aperture is, the more light you're letting into your camera," Rachel says. "Inversely, the tighter your aperture is, the less light you're allowing into your camera. The only thing you have to remember is the smaller your aperture or f-stop number is, wider your aperture is, which feels counterintuitive."
#2 Changing the depth of field
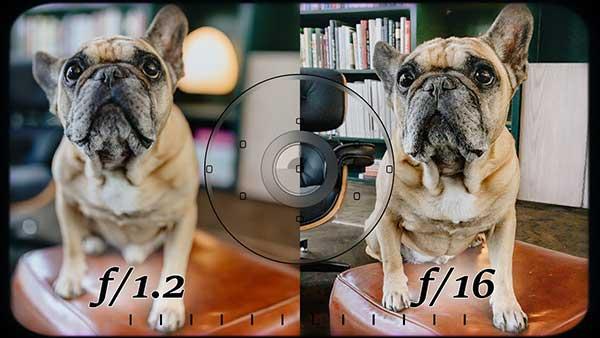
"Maybe the main thing a beginner photographer is excited about when it comes to aperture is changing the depth of field," Daniel says. "The smaller your f-strop is the shallower your depth of field will be, which means blurry backgrounds."
- Log in or register to post comments


