Soft Focus Revisited, Digitally; How To Make Your Own Soft-Focus Lens Like The One I’ve Used For 40 Years
There's one lens that's part of my 35mm/digital SLR system that I have used longest, continuously now for about 40 years. It is a homemade single-element soft-focus lens inspired by the Rodenstock Imagon lens for large format cameras. There are more images in my library of photographs made with this lens than any other. But why in this modern, high-tech world of digital photography am I writing now about an antique anomaly that an optical engineer would likely ridicule? Thank our fellow contributor Roger Hicks, who recently had his hands on a very rare, pre-World War II Leitz Thambar, the much fabled Leica 35mm soft-focus lens. A Leica lens that's not sharp? Yes, in the early days of 35mm still photography using what then was referred to as a miniature camera became popular in portraiture, and because a 35mm film frame is so small retouching the negative was impossible, thus making softer images was an easy alternative. And, a special lens was much better than shooting through a piece of black silk stocking stretched over the front of a lens.
|
|
|
|
When I mentioned my old homemade soft-focus lens to our editor and that I was now using it with a digital SLR body, he suggested I do an article about the lens. I agreed, but only if, after 40 years, I could find all of the essential components. Obviously they are still available, as I am writing this, and I will list the parts and where to get them as I go along.
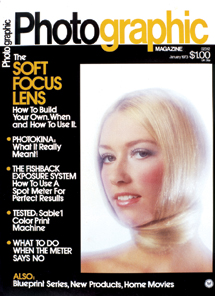
But I must also mention a bit of history, because I might not be writing this article or any other articles were it not for this homemade soft-focus lens. Before I first began writing articles for photo magazines in 1972, I called on Paul Farber, then editor and publisher of Petersen's Photographic, and showed him some of my work, which contained several photographs made with my soft-focus lens. At the time, Photographic included features on how to make all kinds of photo gear. So once he was aware some of my photos were done with a lens I made myself, Farber gave me my first assignment to write about how to make a soft-focus lens. In January '73 my article appeared as the lead feature with one of my portraits made with the lens on the cover. Several more articles and a couple of books later, I was invited to join the staff of the magazine in '75.
|
|
|
|
How A Simple Soft-Focus Lens Works
Many different kinds of soft-focus, usually portrait, lenses have been made during much of the 20th century, mostly for larger format cameras like the 10" Wollensak and the 12" Kodak. In the last part of the century a number of companies have offered soft-focus lenses for smaller format cameras, including Mamiya and Canon.
There were essentially two design approaches to soft focus. One was controlled optical aberration, which amounted to a standard lens design including an element that introduced a softening effect. With some designs this abberation was variable, controlled by a floating element that was moved by a ring or lever on the lens barrel. The other soft-focus effect was first introduced by Rodenstock with their Imagon lenses, available in different focal lengths. The effect with the Imagon was achieved by an unusual aperture disk instead of the typical adjustable diaphragm. This disk aperture had a central fairly large aperture surrounded by a ring of many much smaller apertures. The Rodenstock Imagons were supplied with three aperture disks providing a selection of effective f/stops and softening effects. Later, after the Rodenstock Imagon patent expired, both Fuji and Mamiya produced soft-focus lenses using the multi-aperture disk concept. What follows are the components and construction that draw inspiration from the past.
|
|
|
|
The Soft-Focus Optical Element
The soft-focus lens I made for 35mm SLR cameras was a simple adaptation of the Rodenstock Imagon design. It consisted of a single +10 diopter element and a close-up "filter" adapter, available from filter manufacturers in various Series and millimeter screw-in sizes and intended to extend the close-focusing range of a standard camera lens. I used a Series VII +10 diopter close-up lens, but Series size filters and adapters are now rare, so I would suggest instead a 55mm screw-in size. Currently B+W brand manufactures these close-up "filters" and I found they are available through both Adorama (www.adorama.com) and B&H (www.bhphotovideo.com). If I were to build another new soft-focus lens today I would probably choose to use two +5 55mm close-up filter lenses stacked together instead of the single +10 diopter. I'll explain why shortly. With a 35mm SLR, a +10 diopter single-element lens provides an effective focal length of about 100mm.
The Soft-Focus Aperture Disk
Other than the lens element, the other optical portion of this soft-focus lens is an aperture disk. I have made my disks using a number of different materials, including old, damaged dark slides from 4x5 cut film holders, but the best material is a sheet of very thin aluminum or brass, usually available from hardware or auto parts stores. You first inscribe a perfect circle about 52-53mm in circumference, and use some shears to cut the disk out of the sheet. Then locate the exact center of the disk and mark it to cut a central aperture hole of from 6-12mm in diameter. If you use an electric drill to cut this large a hole in thin metal or hard plastic you have to go slow and be very gentle. Then you should make a pattern of small 1.5-3mm holes drilled in a ring surrounding the large central aperture hole.
|
|
|
|
The smaller the hole size of the ring of secondary apertures, the more holes that must be drilled, and the smaller the size, the smoother the softening effect. If you have made your aperture disk with stiff black plastic, you are done and ready to use it; if made from metal, you'll need to get a small can of matte black lacquer spray paint and apply the paint to both sides of the aperture disk. The effective f/stop value of the disks I have made range from f/5.6-f/8, with most having a value of f/6.3. To attach and locate the aperture disk as close as possible to the lens element, you can use an old screw-in filter threaded on both sides, knock out the glass and glue the disk inside the metal ring, and screw it behind the +10 diopter close-up lens filter. Or, if you did as I suggested as an alternative and used two +5 diopter close-up lens filters put the aperture disk between them.
- Log in or register to post comments


