Skin Tone And Lighting Techniques: Fair & Balanced
Ashley
In the studio with strobe lighting you have the most control. With Ashley (#1), I positioned two strobes, one on the left and the other on the right, each shooting into a white umbrella. A third strobe was pointed directly at her shoulders as a backlight. All of the strobes were set to half power and the spill helped illuminate the seamless backdrop, making the light even throughout. (Nikon D700, 24-120mm Nikkor lens, f/14, 1/250th, ISO 2000, White Balance 5500° K.) Shooting with strobes, I wanted a deep depth of field and a higher shutter speed. Upping the ISO helped to make this a reality.

All Photos © Chuck Gloman
Danielle
Moving outdoors with Danielle, I selected a shady spot with the full intensity of the sun in the background (#2). Her perfect completion lent it to flatter light with the on-camera flash compensation set to minus 1.7 EV, added to bring a bit of sparkle to her eyes. A 24” gold reflector was used for a little extra warm ambient fill. (The same exposure information as used in image #1.)

Pete
Pete has piercing blue eyes and skin that refuses to tan even under full sun. By placing him in the shade of the yellow leaves of autumn and shooting very close, his pale skin and dark hair were a nice contrast (#3). (Nikon D700, 24-120mm Nikkor lens, f/25, 1/150th, ISO 1600, White Balance 6500° K, Flash Return Light Detected minus 1 power.) Slightly overexposing Pete’s skin created a slightly greater contrast. A deep depth of field and a 120mm lens kept all of his features sharp but still blurred the background.

Tia
Moving up the challenge scale slightly is Tia with her blonde hair, blue eyes and fair skin. Choosing our next location to shoot, Tia walked into the direct sunlight, backlit by the golden rays and I realized I had the perfect photo opportunity (#4). Although I don’t relish the idea of shooting into the sun, I had an assistant hold the reflector over the lens hood to shield it. Not using the flash at all, I relied totally on the light in the environment and allowed her face to be underexposed by a stop and a half and letting her hair overexpose. You can still see detail in Tia’s hair, but her underexposed skin actually darkens the paleness of it. (Nikon D700, 24-120mm Nikkor lens, f/7.1, 1/200th, ISO 200, White Balance 6500° K.) By underexposing Tia and upping the color temperature, it allowed her skin to appear warmer and more toward the tan side but still calling attention to her golden locks.

Traveling to a shady area, it appears as if Tia’s hair darkens when not in the direct rays of the sun (#5). Because the flash is so weak (minus 1.5 EV), Tia has no flash shadows but her eyes still sparkle. Subtlety is more important here for a natural look. (Nikon D700, 24-120mm Nikkor lens, f/11, 1/125th, ISO 200, White Balance 5500° K, Flash Return Light Detected minus 1.5 power.) In the shade, the slightly cooler color balance darkens her skin tone and hair, also making her blue eyes pop.

Alyssa
Alyssa’s alabaster skin and raven hair make her both a walking reflector (her skin) and a light magnet (her hair). I adjusted my color temperature setting slightly toward the “cool” side (about 900° K +); her skin is light and her hair is much darker, so I preferred a cooler look (#6). Hair color helps me choose the color temperature for fair-skinned people. Lighter hair needs more warmth and darker hair should be cooler. Of course you can always change this when shooting Raw, but I find this set-up works best for me. (Nikon D700, 24-120mm Nikkor lens, f/14, 1/250th, ISO 1000, White Balance 5500° K, Flash Return Light Detected minus 1.7 power.) A cooler color temperature helps Alyssa’s snow-white features stand out.

Katie
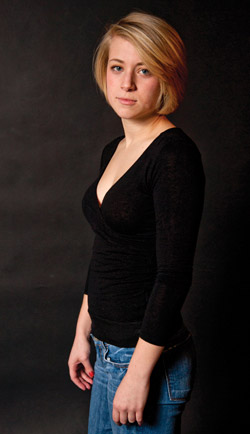
Blonde hair, blue eyes and fair skin indoors are not a challenge unless your model is dressed in black. Katie, dressed in light absorbing black, was placed in front of a charcoal grey backdrop (#7). Wanting her headshot to be darker and more foreboding, I chose 2 quarter powered strobes bouncing into white umbrellas and a Mole-Richardson Inky (www.mole.com) to provide a tungsten backlight, which warmed her hair in the process. (Nikon D700, 24-120mm Nikkor lens, f/6.3, 1/160th, ISO 200, White Balance 5500° K.) Lower power strobes provide even illumination while still giving a slightly darker appearance to Katie.
Phoenix And Ashleen
What happens if you need to light someone with fair skin together with someone with dark skin? That should not pose a challenge if you light and position them correctly. I placed Phoenix on camera left and Ashleen on the right (#8). Since a darker skin tone absorbs light, I put the key light, a Colortran 750 watt softlight, on Phoenix’s left and had Ashleen stand closer to the Mole-Richardson 200 watt Inky fill light. Although the key was pointed at Phoenix, her skin absorbed most of the light. Ashleen received some of the key and the lower part of the Inky was scrimmed so less illumination would fall on her lighter skin. To achieve a realistic balance without darker skin tones appearing too dark and a lighter skin too light I prefer putting someone with darker skin closer to the light. Like I said, indoors you have total control of the lighting situation. (Nikon D700, 24-120mm Nikkor lens, f/6.3, 1/250th, ISO 1000, White Balance 3200° K.) Using tungsten light as the source, this image required no doctoring in post. Lightening the darker skin and brightening fairer skin looks phony if not done correctly.

Erika And Jess
What happens if you don’t have the luxury of photographing light and darker skinned subjects together under less controllable lighting conditions? The image of sisters Erika and Jess presented that challenge (#9). Fair skinned Jess wanted a portrait with her tanned sister outdoors, so I had to “level the playing field.” I first found a shady area because the light is more even. It does not matter who is on the left or right when using ambient fill as the key light source. Positioning a gold reflector beneath them, the warm color temperature deepened the color of Erika’s skin while it added warmth to Jess’s skin tone. The trick here is not to add too much light to Jess because she will lose detail if overexposed. By angling most of the reflector toward Erika, Jess is getting little of the supplemental lighting and relying more on the fill from the ambient light surrounding her, creating a pleasant contrast. Their close proximity to each other makes it slightly more difficult. (Nikon D700, 24-120mm Nikkor lens, f/5.6, 1/160th, ISO 200, White Balance 6700° K, Flash Return Light Detected minus 1.2 power.) The flash did little except brighten the models’ eyes, whereas the reflector delivered the extra illumination where it was needed most.
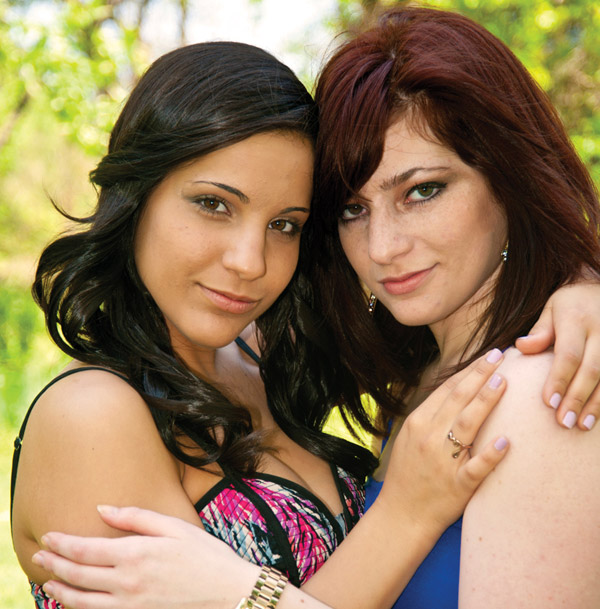
When the sisters were a little farther apart, the lighting was easier (#10). Simply divide the frame in 2, add extra light to the darker skinned subject with supplemental lighting or a reflector, while shading the fairer skinned person. In this case, I let the light filtering through the trees illuminate Erika and used the reflector to diffuse and partially keep the light from falling on Jess. (Nikon D700, 24-120mm Nikkor lens, f/8, 1/125th, ISO 200, White Balance 6700° K, Flash Return Light Detected minus 1.2 power.) Reflectors can also be used as diffusers or flags, which is what I did in this case for Jess (camera right).

Chuck Gloman is an Associate Professor and Chair of the TV/Film Department at DeSales University. He may be reached chuck.gloman@desales.edu.
- Log in or register to post comments


