Printing Large: How Big Can You Go?
The Problem
One of the biggest challenges to printing large images is getting a quality
enlargement. Sure, you can print any image at 13x19", or even larger,
but is it going to look good? Without the proper technique you're liable
to end up with a pixely (that's a technical term for "gee that's
one ugly digital picture!") mess that isn't going to look anything
at all like the original photo. So, how do you take that digital image from
your 4 or 5-megapixel camera and turn it into a large scale printed work of
art?
The Solution
Luckily today's software makes it easier than ever to get a quality enlargement.
If you use Photoshop or Photoshop Elements, you have a wealth of choices for
enlarging your photos. Most of the plug-ins discussed here also work with other
image-editing programs that support the Photoshop plug-in standard. Examples
of this are Microsoft Digital Image Pro and Jasc PaintShop Pro. In addition
to the built-in resizing feature, popular options include Extensis pxl SmartScale,
LizardTech Genuine Fractals, and Shortcut PhotoZoom, along with Fred Miranda's
Stair Interpolation Pro.
Using What Adobe Gave You
Photoshop and Photoshop Elements have always supported image re-sizing and have
typically done a better job of it than most of the other applications available.
In fact, unless you've wanted to print really big--and I'm
talking poster size or larger--the image re-size function in Photoshop
will do the trick quite well. In order to re-size your photo in these applications,
simply select Image>Image Size. You'll see the dialog box in #1.
 |
|
|
There are two key options in this dialog that will control the quality of your enlargement (or delargement--yet another technical term. This one means reducing the image). The most important of these is the Resample Image option shown in #2.
 |
|
|
The second option to look at is the resolution. If you're enlarging
an image, it's safe to decrease the resolution. Why? Since larger photos
(or any other artwork for that matter) tend to be viewed further back, lower
resolution files give the same appearance of detail as the higher resolution
version of the same file at a smaller size. For a 13x19" print, I'll
typically lower the resolution to 240dpi. The other advantage of lowering the
resolution is that less physical re-sizing of the image is needed.
To re-size your image with Photoshop, start out by selecting Image>Image
Size. If you'll be enlarging the image, change the resolution to 240dpi.
Make sure the Resample Image check box is checked and select Bicubic Smoother
from the drop-down list. Next, select the critical dimension for your image
size--either height or width. Click OK and Photoshop will re-size the image
as requested. Need your image to be a specific size, like 11x14 or 16x20? The
easiest way to accomplish this is by using the Crop tool. Did you know that
you can set specific measurements in the Crop tool? If I want a 16x20 print,
I set those dimensions, shown in #3, and then drag out the crop area as large
as possible. This lets you easily define the area of the image to keep and gives
you the exact dimensions you want for the final print.
|
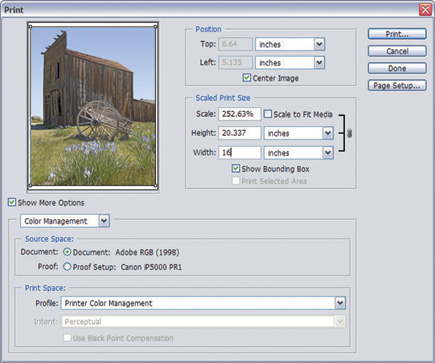
The other approach to re-sizing is through the Print With Preview dialog shown in #4.
 |
|
|
Add-On Options
All of the following options claim to do a better job at enlarging images than
Photoshop's own tools. Prices range from the very affordable Stair Interpolation
Pro (SIPro) #5 by Fred Miranda ($19.90) and Shortcut PhotoZoom, about $50 to
the high end LizardTech Genuine Fractals ($159) and Extensis pxl SmartScale
($199.95).
 |
|
|
SIPro works by using a popular method claimed by many to give better results.
These folks claim that enlarging an image in 10 percent increments gives better
results than re-sizing in one step. In earlier versions of Photoshop this was
certainly true but the new Bicubic Smoother re-size gives results just as good.
If you use an older version of Photoshop, Photoshop Elements, or one of the
compatible image-editing programs, I highly recommend this plug-in as a cost
effective way to re-size your images.
PhotoZoom is a new version of an old favorite, S-Spline. Sporting a new easier
to use interface, PhotoZoom #6 is an excellent option that works as well as,
and in some cases better than, its more expensive competition.
 |
|
|
Genuine Fractals and pxl SmartScale use their own proprietary re-sizing methods and claim that enlargements of up to 1600 percent with no visible loss of quality are possible. Of the two, I've had the best results with pxl SmartScale. The familiar Photoshop style interface and the ability to use regular TIFF files--Genuine Fractals requires you to convert to their own format--all fit into my workflow naturally. I haven't tested SmartScale to its limits, but prints up to 24x96 on the HP 130nr look great with no obvious image degradation. Both of these programs make it easy to set a specific print size which helps keep the image re-sizing optimized #7.
 |
|
|
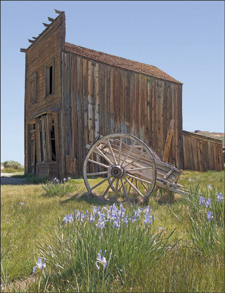
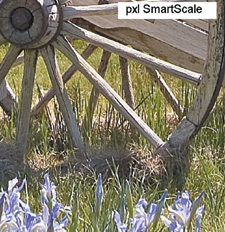
For this story, I enlarged the same image using all of the applications mentioned
earlier #8 & #9. The source image was a
5-megapixel JPEG enlarged to 16x20. pxl SmartScale gave me the best results
but only by a small margin. This shows the original image used and a full-size
section of that image from each of the programs.
 |
|
|
Conclusion
So, are these programs worth it? As usual, it depends. If you use Photoshop
CS or Elements 3.0, I'd use the built-in re-sizing function. If you regularly
print poster size or larger, then I recommend pxl SmartScale. Users of older
versions of Photoshop, PaintShop Pro and Digital Image Pro should be happy with
Stair Interpolation Pro or PhotoZoom.
 |
 |
|
 |
 |
|
 |
||
|
||
Jon Canfield is the co-author of "Photo Finish: The Digital Photographer's Guide to Printing, Showing, and Selling Images," and the author of "RAW Confidence." Jon also writes the Output Options column for eDigitalPhoto.
Contacts
Extensis
www.extensis.com
Fred Miranda
www.fredmiranda.com
LizardTech
wwwlizardtech.com
Shortcut PhotoZoom
www.shortcutpublishing.com


