- REVIEWS
Camera Reviews 
More Reviews Mobile Reviews Photography Reviews - GALLERIES
- VIDEOS
- BUYER'S GUIDES
Photoshop's Radial Zoom Blur Filter: Photos with a Sense of Speed (VIDEO)

This interesting post-processing tutorial demonstrates how to use Photoshop's Radial Blur filter with the option of Zoom to accentuate motion in a way that conveys a dynamic impression of speed. As instructor Pablo Garcia says, "this is a great choice for giving our photos a sense of movement towards the inside of the image."
We regularly share Garcia's tutorials that are valuable for beginners and more experienced shooters alike. As you'll see, Photoshop's Radial Zoom Blur filter is super effective in two situations; the first, alluded to above, is when the sense of motion we desire is toward the inside of the frame. The technique also works wonders when the motion in moving directly toward the camera.
There are a couple of minor issues that must be addressed to achieve realistic results, and Garcia demonstrates an easy step-by-step procedure for getting the job done to perfection. It's all about understanding how to use the Radial Zoom Blur filter with Photoshop's Content Aware Fill.

Garcia captured his demonstration image by the Rio Grande River with New Mexico's snow-capped Sandia Mountains looming in the background. As you'll see, there were four geese flying in his direction. He explains that "Photoshop's Motion Blur filter didn't give me the results I wanted, but I was able to use the Radial Zoom Blur filter instead."
The first step is duplicating the background layer, then Garcia created a copy of the original shot and eliminated the geese. Doing this made it easy for him to convincingly apply the Zoom effect without the quartet of birds getting in the way.
The process of erasing the birds is both simple and precise thanks to the power of Photoshop's Content Aware Fill, and Garcia explains the best settings to use. At this point is time to apply the eye-catching zoom effect, and Garcia demonstrates how it's done—beginning with turning this layer into a Smart Object.
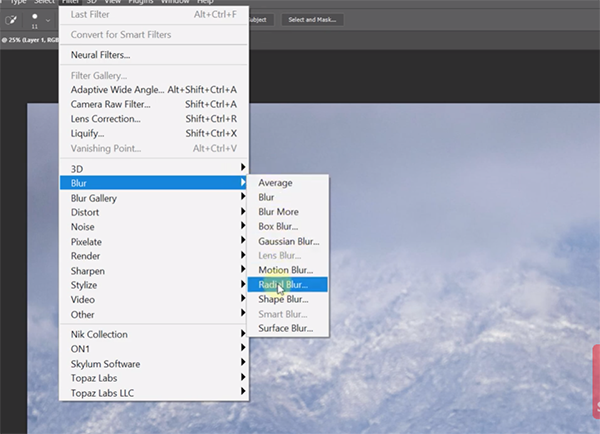
Once you select the Radial Blur option from Photoshop's Neural Filters panel there are a few settings to make. Garcia quickly runs through the list and explains the specific values that he recommends for this particular effect.
At this point you're only halfway through the lesson, and the remainder discusses a few other important considerations as well as how to put everything together for a very impressive final result. Once you're done watching take a look at Garcia's instructional YouTube channel where there are many more tips and techniques to be found.
And don't miss the tutorial we featured recently with another top pro who demonstrates how to shoot and combine multiple photos to "cheat" the perfect moment when you can't get it in a single shot.
- Log in or register to post comments


![]()
Get the Latest Photo Tips, News & Reviews from Shutterbug!
| Camera Reviews Other Reviews | Mobile Reviews Photography Reviews Columns | News | Features | How-To | Resources |
 © 2025 Shutterbug
AVTech Media Americas Inc., USA
All rights reserved