Photoshop Power Tools
Photoshop Compatible Plug In Roundup

Photoshop Power Tools

Model Kimberly Thea Goetz uses this image on her zed cards; it showcases her style and beauty while providing a different look to catch the eye of casting directors.

You can build a house with hand tools but it'll go much faster if you use more power. I believe in using power tools for digital imaging, and, for me, the digital equivalent is Photoshop plug-ins. You don't need to own a copy of Adobe Photoshop (www.adobe.com) to use plug-ins. Adobe Systems defined the standard, but compatible plug-ins can be used with many other image-editing programs including Ulead's PhotoImpact (www.ulead.com), Corel's Painter, Dabbler, and PHOTO-PAINT (www.corel.com), Jasc's Paint Shop Pro (www.jasc.com), and MicroFrontier's Color It!, Enhance, and Digital Darkroom (www.microfrontier.com). Other graphics programs, such as Adobe's PageMaker, Deneba's Canvas (www.deneba.com), and Macromedia's Director and FreeHand (www.macromedia.com) accept compatible plug-ins as well.

There are eight types of plug-ins: Color Picker, Import, Export, Filter, Format, Selection, Extension, and Parser but for us real-world users there are really only four kinds--Acquire, Enhance, Manipulate, and Output. What plug-ins let us do is accomplish effects that Photoshop either cannot do by itself or may require many more additional steps. That's why plug-ins make you more productive while allowing you to experiment with ways to enhance your digital images. Here are a few new ones that I've found useful or just a lot of fun.

Auto FX Software's Dream Suite Series Two provides many presets for their "Film Frame Art" plug-in that lets you separate an image into many different film frames and control the effects on each individual item.

Give Digital That Film Look
Digital photographers appear obsessed with making their images look like "real" film-based images. One of the most interesting power tools I've found for creating this effect is Auto FX Software's DreamSuite (www.autofx.com). Since their first series of plug-ins were introduced, the company has launched Series Two and the Gel Series. Series One contains frames that provide a film-like look, including everything from Polaroid prints to slide mounts, but Series Two lets you separate an image into multiple bits of film--even different film formats--and individually move them around!

Who says you can only use one plug-in at a time? Although shot at the Canon EOS D60's fluorescent setting, there was still some cyan color in the image, so I used Pictographics' iCorrect Professional (www.picto.com) color correction plug-in to tweak the color to be more neutral before applying noise reduction.
Photos © 2002, Joe Farace, All Rights Reserved

Like all Auto FX plug-ins there's an almost infinite number of controls allowing you to tweak effects, but first time users can choose from one of many presets and use the slider controls to fine-tune the finished image. Be advised that recent Auto FX plug-ins require more modern operating systems and CPUs to extract the maximum performance and minimum annoyance. For Mac OS users, one trick is to reduce the amount of memory that Adobe Photoshop uses. Auto FX claims that Photoshop can operate efficiently on 50MB of memory while you work in DreamSuite, which then uses all of the rest of your memory. Like all plug-ins, play with the controls and watch what happens!

Clean Up The Noise
Digital noise creeps into an image from many different sources including high ISO settings, slow shutter speeds, CCD color noise, JPEG color artifacts, and even color fringing. While there are a growing number of noise reduction products available, the two that seem to do the best job of eliminating noise without turning the image into mush are both available from The Imaging Factory (www.theimagingfactory.com). The Noise Reduction plug-in takes care of all of the common factors that create digital noise and costs less than $40. The $99.95 Noise Reduction Pro does all of the same things the non-Pro version does and includes additional sliders for correcting luminance noise as well as color noise, but I gotta tell you I use it at the default setting most of the time.

This image of an elegant Talbot automobile was made at Clive Cussler's private car collection. The lighting was thin fluorescent tubes and I had to kick up the ISO setting on my Canon EOS D60 camera to 1000, plus add 2/3 of a stop of exposure compensation to get a proper exposure. Noise was neatly handled by applying The Imaging Factory's Noise Reduction Pro plug-in.

Both plug-ins are available for Mac OS and Windows and the Pro version supports Mac OS Classic and OS X. Which one is best for you? You can download fully operational (for 30 days, anyway) versions of both plug-ins from the company's web site and use them on your own images to see which one delivers the best deal penny for pixel. While visiting the site be sure to check out all of the other practical and creative plug-ins available from The Imaging Factory.

Making Waves
Without a doubt the one single plug-in that gets the most "oohs and ahs" during my plug-in presentation at Shutterbug's Digital Photo Workshop Series is Flaming Pear's Flood (www.flamingpear.com). What this inexpensive plug-in does is inundate the landscape and submerge your friends with digital water, creating lakes, ponds, rivers, and even oceans where there was none before--think of it as digital terraforming. In addition to adding quantities of water, sliders give you control over watery reflections, wave height, ripples, and even perspective.

Flaming Pear's Flood filter is the most digital fun you can have for $20. You can use the sliders to set horizon, perspective, offset, and altitude, and then use the rest to set the characteristics of the water and waves or just click the "digital dice" and watch what happens.

You use the first set of slider controls to set the water level, then the rest to establish the water's specific visual characteristics. For me, the best approach is to use the digital "dice" which throws random numbers at the controls and then use the sliders to tweak the final look. I just keep clicking the dice until I see something that I like. Flood is available for Mac OS and Windows computers and a free trial download is available on the company's web site so you can try it yourself. At $20, Flood is a bargain and site licenses cost only $100. While at Flaming Pear's web site download some of their freeware plug-ins and try them out and peruse the wide assortment of other inexpensive plug-ins that are available.

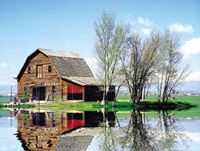
How many plug-ins can a plug-in plug if a plug-in could plug in? The original image was opened and slightly tweaked with LaserSoft's SilverFast Photo CD (www.silverfast.com). Then the image was cleaned up with Pictographics' iCorrect Professional and The Imaging Factory's Noise Reduction Pro before increasing canvas size (Image>Canvas Size) to provide additional space for the "pond." Then the image was sharpened using nik multimedia's Sharpener Pro (www.nikmultimedia.com), before opening in Flaming Pear's Flood, where I clicked the dice until I got the results I wanted.
Photos © 2002, Joe Farace, All Rights Reserved

Out, Out Redeye!
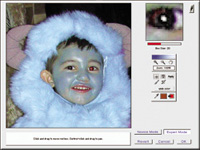
I have always found it amusing that Adobe Photoshop has no redeye removal tool and the much less expensive Photoshop Elements does! Oh, there are forty-leven (sic) ways to use Photoshop's toolbox to remove redeye, but none are as quick and easy as was provided by the late, unlamented Live Pix. Here comes Andromeda Software (www.andromeda.com) to the rescue, making RedEyePro available for all Photoshop compatible plug-in users. RedEyePro is simple to use; no User's Guide required. You click on the "eye" icon, select the offending eyeball in the large preview window and click the Apply button. That's all there is to it. The Mac OS and Windows compatible plug-in offers Novice and Expert modes and works just as well with RGB images as it does with CMYK files. It fixes both human and non-human eyes and easily cures noncircular redeye problems, while retaining the eye's glints and reflective details. Everybody needs Andromeda's RedEyePro.

RedEyePro is simple to use; no User's Guide required. You click on the "eye" icon, and use the Hand tool to place it over the eye of cute little Justis Aragon, dressed up in his Monsters Inc. Halloween costume, and click the Apply button to remove the redeye!

Plug-In Potpourri
As some of you have already discovered, not all special effects camera filters work well for digital capture. That's why one of my favorite filter plug-ins for adding a little mood to a photograph is The Imaging Factory's Graduated Fog filter. London not foggy enough when you get there? Add some fog in varying intensities to the shot with this fun plug-in.

One of my favorite filter plug-ins for adding a little atmosphere to an image is The Imaging Factory's Graduated Fog filter which lets you add some fog in varying intensities to your shots. Adding a bit of moody morning fog enhanced this fall shot of the famed "Dickeyville Ducks" in Baltimore, Maryland.

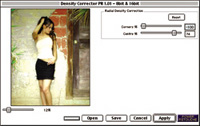
I know that Shutterbug contributor Rick Sammon likes to "burn in the corners" of his digital images to focus viewers attention on the subject but I use PowerRetouche's Radial Density Corrector (www.powerretouche.com), which was originally designed to reduce darkening at the edges for images created with wide angle lenses. Some cameras, such as the Hassleblad XPan offer proprietary ND camera filters that correct this problem, but Radial Density Corrector does it faster and cleaner. It can be used to darken the edges on an image and lighten the center at the same time. While at the PowerRetouche site, check out the awesome Sharpness Editor.

PowerRetouche's Radial Density Corrector was originally designed to correct images created with wide angle lenses but can also be used to darken the edges on an image and lighten the center at the same time. Here it's used to good effect in this photograph of Kylene made at CJ's Film Studio in Phoenix.

You gotta love a product called Sucking Fish Series, a Japanese import that I downloaded from one of the many plug-in web sites on the Internet. (See sidebar "Where To Find Plug-Ins.") There's a lot missing from this package of plug-ins: There's no Preview Window, few--if any--controls, but they can be a lot of fun on a rainy day.

Plugging-In
I use one or more plug-in for every image I open in Photoshop, even if the net effect is that the final printed image isn't even manipulated. Instead, it has been "enhanced" in ways not too dissimilar from the kind of machinations we used to pursue in the traditional wet darkroom in order to create the best looking print. The only difference is that now we're using Photoshop compatible plug-ins instead of chemicals and an ink jet printer instead of an enlarger.

One of the more interestingly named plug-ins in the Japanese import Sucking Fish Series. The Midnight TV plug-in provides scan line effects and with a little extra color and density.

Where To Find Plug-Ins
Much as the Joker asked of Batman, "Where does he find these marvelous toys," readers are always asking me where I find my collection of plug-ins. Here's a short list of some of the sites I check on a regular basis to find out what's new in the world of Photoshop compatible plug-ins. Heck, I even found a Format plug-in for the long lost and now unloved FlashPix format on PlugPage.

Computer Arts (UK): www.computerarts.co.uk
DesktopPublishing.com: www.desktoppublishing.com/graphutilfilt.html
PlugPage: www.boxtopsoft.com/plugpage/
ThePowerXChange: www.thepowerxchange.com/adobe/
The Plugin Site: www.thepluginsite.com

X