Photo Mechanic; Pro-Level Image Organization
 Exceptional photographic software reveals its true nature over time. In the case of Photo Mechanic—which is a pro-level image organizing tool from Camera Bits—there are seemingly insignificant features that provide a smooth workflow, especially for photo journalists working with IPTC data. For IPTC work, this application is a godsend when you must add the data for agency work and for editorial submissions, or even for those who just need to add this info to help organize images. Knowing beforehand that this tool is a pure organizer and not an editor, and that the interface lacks the polish of more expensive organizers, you can make the most of this low cost tool.
Workflow Considerations
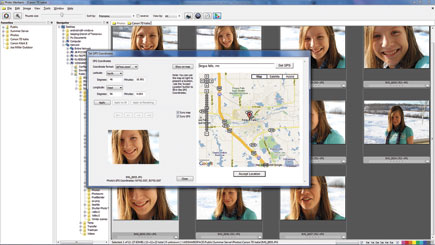
It’s important to realize what Photo Mechanic is not—even before grasping what it is. You won’t find any image correction filters, and the application does not work with Photoshop plug-ins. The product is not intended to compete directly with Aperture and Lightroom. Essentially, it is a pure organizer, similar to Microsoft’s Expression Media in that it emphasizes speed, tagging, GPS location, and IPTC data.
Photo Mechanic uses a contact sheet model, so the workflow begins and ends there. When the program starts, you select a folder to use as a primary contact sheet. Thankfully, Photo Mechanic does a good job of warning you if images are on multiple contact sheets as a way to keep you organized, especially if you are working with thousands of images. Instead, you can create a contact sheet for folders (and all subfolders) as a way to organize your collection. Once you create a contact sheet, you can name it and manage these sheets as part of the workflow. I set up contact sheets for new car photos and was able to organize each photo shoot into a logical flow. Then, when it came time to use these photos I had them all at the ready, named by car make and model.
 |
|
|
Image support is exceptional. I tested a Canon EOS 7D and several hundred shots, both in Raw and in JPEG, and never had any trouble with opening the photos or viewing EXIF data. I also tried importing images from a second Canon camera I had tested previously and had no trouble.
The program uses an “ingest” feature that reads images directly from your camera. Once again, I had no problems reading Raw files from the Canon EOS 7D directly into the program. You can also ingest images from other sources, such as USB drives or network drives. (Camera ingest is called “live” ingest.)
 |
|
|
Working With Images
Photo Mechanic does not bother with a fancy interface, light boxes, or even a color treatment for the program. It’s just plain vanilla, but that is arguably a better way to organize photos because you never think about the windows and dialog boxes around your photos, you just think about the photos. That said, the program feels a bit like working in Windows 2000 before the days of better designed applications and websites that seemed worth the expense. One obvious perk: Photo Mechanic is exceptionally fast. I maintain about 10,000 images on a server and archive photos onto external disks (which I mount onto the server when needed). For the main image archive, I could create one contact sheet for all images in less than 30 seconds—using an admittedly fast Intel i7 desktop with 6GB of RAM and an Intel 64GB SSD hard disk that is plenty speedy in its own right.
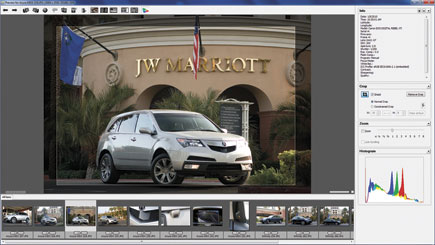
Every click was responsive: you can open any thumbnail on a contact sheet in a simple preview window that shows EXIF data and a histogram. This preview window is nothing too special—it really just shows you the image, has a zoom control, a filmstrip of images below the main screen, and a few basic options for rotating the shot. You can crop and control which window panes are shown. Actually, there is more to it than that—whether in preview or contact sheet mode, you can always right-click to perform the basic workflow process. New users might not even realize that the right-click menu is available unless they find it by accident.
So, what does the right-click menu offer? A few key tasks. You can quickly see the list of EXIF data (although you can’t edit this info here). You can apply a color class and rating, apply IPTC settings (more on that in a moment), perform file management tasks (such as rename and delete photos), and view GPS data if you have added it or if the image contains this data already.
- Log in or register to post comments


