Package Printing
Many Options In Photoshop

#1
Photos © 2001, Darryl C. Nicholas, All Rights Reserved

For those of you who do pro or semi-pro shooting, you probably already know about package printing. It's when you send a negative to a lab and ask them to make up an order from it that would be something like (1) 8x10, (2) 5x7s, (2) 4x5s, and (8) wallets, all from the same negative. The lab then prints that order on a special automated machine that uses roll paper. The special machine lays the order out on the roll paper so that the various pictures fit together as closely as possible so as to not waste the paper. Then the paper, with all the exposures on it, is processed all at one time. This results in all the pictures being exactly the same color balance and the same exact density. It is a "package" that is then die cut to yield individual prints. Photographers who shoot school, sports team, or family reunion pictures use this type of printing a lot. And, of course, many non-pros use this type of printing when they have a favorite picture that they want to share with family and friends.

Since the great majority of package printing never involves pictures larger than 8x10, the 8x10 size is frequently referred to as a "unit." Therefore a unit can be: (1) 8x10, (2) 5x7s, (4) 4x5s, (8) wallets, or various combinations of those sizes. Labs will typically price out their package printing by quoting a unit price without any regard as to just what combination of sizes are printed on the unit.

Now that many of us are into digital imaging and doing our own printing via our computers, using 8x10 ink jet printers, it is useful to know how to imitate package printing with our desktop darkrooms.

#2

The Photoshop Way
If you are interested in doing any type of digital imaging, I urge you to invest in Adobe's software called Photoshop. It is the ultimate software that you will ever need to handle all of your photographic needs on your computer. Yes, it is a tad expensive for the beginner and I suppose that it can be very overwhelming at first glance. But try to get past that and recognize that if you expect to interact with others doing digital imaging, Photoshop is the most widely used piece of software in the world. You will always find lots of folks who can answer questions and help you with Photoshop problems. If the cost of Photoshop is a bit too much for you in the beginning, then start out with Photoshop's little brother, Adobe Elements, which is very similar to Photoshop, plus it contains tons of Wizards that will help you to learn how to use the various Photoshop tools. The current version of Photoshop is called Version 6.0.1. That is what I have used for this article.

Creating A Package
In Photoshop, first open your picture file and be sure that it has been set to a resolution of 300ppi. That resolution is useful for any and all ink jet or dye sub printing.

#3

Then, go to File to Automate to Picture Package (see #1). That will open
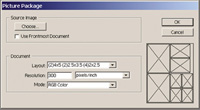
up a window as shown in #2. Be sure that "Use Frontmost Document" is checked, and then click on the arrowhead for Layout (see #3). From the Layout menu you can select the combination of images that you want to make. A little drawing of the combination that you select will then be displayed in the lower right corner of the Picture Package window. After that simply click on OK and Photoshop will perform the magic of taking the picture that you had originally opened and re-sizing it into the many different sizes that are needed. It will lay everything out for you. The whole process takes less than 5 sec on my computer. See #4. After that, simply send the results to your printer, and you will get beautiful pictures!

#4

Combo Printing
If you want to do package printing, but want every different size to also be a different picture, then you must do things in a more manual way. But, Photoshop allows you to do that very nicely. In order to use different pictures and print them all at once, you first have to create a blank canvas that will fit on the paper that you are using. For example, if you are printing onto 8.5x11" paper, then you would create a blank canvas that is 8x10". Be sure that the blank canvas is set to 300ppi and in RGB mode. After that, open each picture that you want to print. Be sure that it is sized and cropped the way you want it. All pictures should be in RGB mode and 300ppi in resolution. Next, copy each picture to the clipboard, and then paste the picture back into the blank canvas that you have created. Each picture will come in on its own layer. This will allow you to drag it into position so that you can place as many different images on the blank canvas as you have room. If you need to rotate a picture for it to fit into position better, you can use the rotate function found under Transform. After all the images have been positioned, it is a good idea to flatten the layers before sending it to the printer. Otherwise, it will take a tad longer for it to print.

If you'd like more details on how to do this, send me an e-mail and I'll send the instructions back to you via e-mail. The instructions will be in an Adobe Acrobat file format as an attachment to my return e-mail. So, be sure that your ISP will allow you to receive attachments with your e-mail (some ISP services do not permit attachments) and be sure that you have the free "Reader" version of Adobe Acrobat installed on your computer (you can get it from www.adobe.com). Because these kinds of instruction sheets contain pictures, they take a little while to download to your computer if you are using 56K dial-up e-mail service. So, be patient when you receive the file. If you need help with your color printing problems, you can send an e-mail to me at: editorial@ shutterbug.net, or write to me care of Shutterbug.

X