A New B&W Inkjet Option; Using An Epson R800 Or R1800 With B&W 100 Percent Carbon MIS Ink Page 2

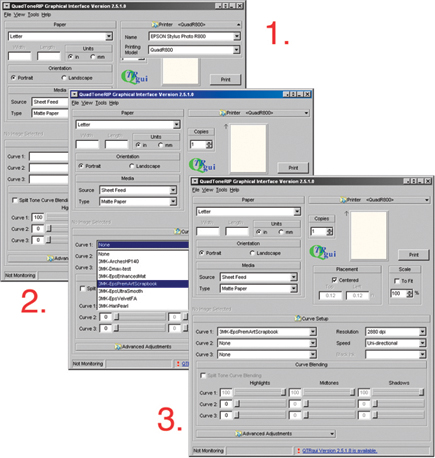
To make a black and white print with Windows you do so by launching the QTR GUI program (below). Then from the File menu open the .TIF image file you want to print. Select the paper size from the drop-down list under Paper at the upper left of the dialog. And below that choose whether the Orientation is Portrait or Landscape. The Source should be Sheet Feed normally and the Type: Matte Paper. Then on the right under the thumbnail preview you can Center the image, and Scale it by adjusting the percentage value. Then click on Print.

With an Apple Mac you can print from any application that supports image files and ColorSync, but you will find that Photoshop CS3's Print preview dialog and controls (and the similar Print dialog window in Photoshop Elements) are most convenient and effective. They provide an interactive preview of how the print should look when printed. With a gray scale .TIF image, first click on the Page Setup tab.

The Page Setup Format drop-down list will have a list of available printers, so select QuadR800/R1800-3MK, and then your print paper size and orientation.

Too much information is seldom a complaint in a landscape, but this grove of cross-lit trees always seemed to elude being printed effectively until I tried using this new R800 MIS/QTR black and white option.

Printing a black and white using QTR is essentially the same as using the Print preview dialog. I would suggest using generous borders, especially with thicker matte papers, to assure a clean, precisely printed image. Be sure the Options section of preview is open and the Color Management tab is turned on. Under the Print heading, the Document (profile: QTR - Gray Matte Paper) should be confirmed. Then under Options, Color Handling, make sure that "Let Photoshop Determine Colors" is selected, and the Printer Profile from the drop-down list is QTR - Gray Matte Paper. I prefer the result obtained by selecting the Perceptual Rendering Intent with Black Point Compensation clicked on.

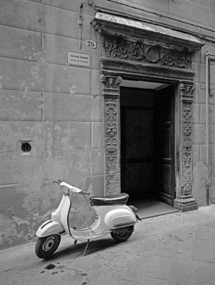
On a walking exploration of Savona, Italy, the contrast of a motor scooter in front of an ancient residential doorway caught my eye. Reproducing both detail in the white scooter and the deeply recessed doorway was a challenge met using the Epson PremierArt Scrapbook Paper and this new black and white printing capability.

When you click Print in the Print preview dialog the Print driver dialog appears on screen.

At the top of the dialog be sure the Printer is QuadR800/R1800-3MK, then go down to the third drop-down selection button and select QuadTone RIP to obtain the QTR selection/setup dialog. The Mode should already be QuadTone RIP, so move down to Curve 1 and using its drop-down list select the 3MK profile file that corresponds with the paper you have selected to make your print. In most cases the Paper Feed should be the default Sheet Feed, and the profile should set Resolution as 2880dpi, and Speed as Uni-directional; but if not be sure those settings are inserted to make your print, and then click on the Print button.

Windows Installation
These days many if not most applications work almost the same on a Windows PC as they do on an Apple Mac. But when it comes to a print driver application like QTR there are significant differences. So I will begin with the Microsoft Windows version first.

Once you download and install the clearly marked Windows version from the QuadToneRIP download page, go to the Start button (lower left) and click to open the dialog. Then go to Programs and from the list choose QTR GUI, and click on it to run the application. The QTR GUI dialog window will open on screen.

At the upper right corner of the QTR GUI dialog window there are two Printer drop-down menus. 1. First click on Name and select from the drop-down list either Epson Stylus Photo R800 or R1800, whichever printer you have. Then click on the Printing Model drop-down arrow and from the list select QuadR800-3MK or QuadR1800-3MK. 2. Then, on the left side of the QTR GUI dialog window, go down to Curve 1: click on the drop-down arrow and the 3MK profile list will appear so you can select the one that matches the paper you are printing on. 3. The Curve/Profile for each paper is made for printing at 2880dpi Resolution with Speed set at Uni-directional. Confirm both of these settings or change them if they are different before printing.

COMMENTS
marjabeckers's picture

Dear David,

Thanks very much for your article. I haven´t tried it out yet, but I assume my sleepness nights are over ;o)

I understand the process for matt and (full)glossy papers, but what about semigloss papers like Epson Premium Semigloss or Epson Premium Luster?
Is it possible to print on these using the MIS inks process?

Hope you can help,

Kind Regards,
Marja Becers

X