- REVIEWS
Camera Reviews 
More Reviews Mobile Reviews Photography Reviews - GALLERIES
- VIDEOS
- BUYER'S GUIDES
LR BASICS: Using the Presence Sliders to Create Dynamic Photos (VIDEO)

Shutterbug readers are always enthusiastic about Julieanne Kost's post-processing tutorials because of her vast knowledge of all things Adobe and her uncommon knack for simplifying seemingly complicated concepts and task. In the next four minutes she demonstrates a foolproof method for enhancing images with Lightroom's Presence Sliders.
Today's episode introduces a streamlined technique for harnessing the power of Lightroom's Texture, Clarity, and Dehaze tools without any complications. As Kost says, "all three of these sliders add contrast to an image, but they do it in very different ways." So the trick is understanding when and how to use the right tool for the job.
Kost's demonstration photo of a polar bear looking toward the camera is nicely composed but looks a bit flat, and she begins the rehabilitation process by zooming in and giving the Texture slider a try. This tool looks for edges, and when it finds them it will either increase or decrease Contrast of these edge depending upon the direction you move the slider. In either case, the image will still retain small details.

When taking this approach, the effect is achieved along a very small radius of pixels. Kost illustrates this important fact by looking at Lightroom's Histogram as she moves the Texture slider back and forth to boost or reduce the effect.
The Clarity slider also looks for edges in an image and will increase or decrease Contrast in the edge, but when it applies the effect it does so to a broader range of pixels than you just saw with the Texture Slider. Because the Clarity effect is spread out over a wider area it creases a softer transition. Another thing to keep in mind when employing tool is that "it affects the midtones of an image more so than the highlight and shadow areas.
Another point of differentiation is that Clarity also affects Luminance and Saturation much more than the Texture slider. Now when you look at her Histogram it's clear that the adjustments are far more pronounced. This is why you want to use this particular slider with caution and avoid taking things too far.Kost explains that Lightroom's Dehaze technology is based upon a physical model of how light is transmitted, and "it tries to estimate light that is lost due to absorption and scattering through the atmosphere." So moving the slider to the left will decrease the amount of Dehaze—making the image appear as though it has more atmospheric perspective.
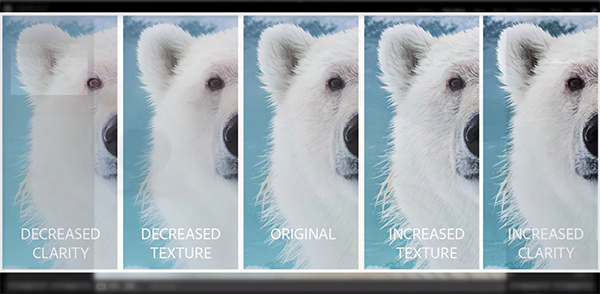
Thus, colors will be less saturated and detail rendition will take a step back. Moving this slider to the right does the opposite as though you're cutting through the haze. Once again, Lightroom's versatile Histogram provides the proof of the pudding. So here's the takeaway: all three sliders have their place and it's simply a matter of knowing which to use when.
Kost's instructional YouTube channel is a great source of information for Lightroom and Photoshop users, so be sure to take a look and elevate your editing skills.
We also suggest watching the tutorial we posted earlier from another post-processing expert who demonstrates how to rid photographs of "impossible-to-remove" objects when Generative just makes matters worse.
- Log in or register to post comments


![]()
Get the Latest Photo Tips, News & Reviews from Shutterbug!
| Camera Reviews Other Reviews | Mobile Reviews Photography Reviews Columns | News | Features | How-To | Resources |
 © 2025 Shutterbug
AVTech Media Americas Inc., USA
All rights reserved