- REVIEWS
Camera Reviews 
More Reviews Mobile Reviews Photography Reviews - GALLERIES
- VIDEOS
- BUYER'S GUIDES
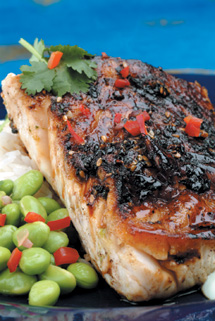
An Insider's Look At Food Photography
"If You Can Shoot Food, You Can Shoot Anything!" Page 2
Most of the ice cubes you see in drink shots are hand-carved acrylic, and almost all of the splashes in drink shots are free-form acrylic made by a model maker. Yes, the photographer blasts the drink with compressed air or additional liquid to make droplets fly, but the primary splash above the glass is acrylic. Most alcoholic beverage shots have water added to them to make them more transparent so the backlighting will work better. Other drink shots are diluted tea or coffee, or just water with food coloring added.
Shooting Style
If you are shooting for a client, or shooting for your portfolio hoping to get
a client someday, you should shoot the "safe, expected" images first,
and get them out of your system. Maybe capture the overall shot from above,
then standing height, then table height. After you are comfortable that you
have captured what the client expects, start exploring. Look at the food arrangement
like a landscape and you are a part of the Lewis and Clark team exploring the
Pacific Northwest. You are looking for the most beautiful angle and the part
of the arrangement that is the most appetizing. Get in tight with a macro lens,
then shoot with a wide angle both up close and then from farther back. Shoot
with a small aperture and everything tack-sharp, then reduce your lighting power,
open up your aperture, and shoot with the background items out of focus. Find
an image that you love, that makes you feel something. Make a shot that makes
your mouth water and makes you hungry. Shoot what you feel and you are developing
a style--people will pay you for your eye. Only shoot what the client asks
for and expects and you are a camera operator.
 |
 |
||
|
|
Tools Of The Food Photographer's Trade
· Tweezers are used for moving and placing small food items.
· Cotton-tipped swabs are used for picking up crumbs and small liquid
spills on plates.
· Epoxy glue and super glue are used for assembling stubborn food items
that won't stay in place.
· Fun tack is a type of sticky modeling clay that is used for placing
under small items to keep them from moving.
· Dulling spray is used on chrome or reflective items like silverware
to create a soft, even reflection without showing your softboxes or umbrellas
in the reflection. It can be found in larger photography stores.
· Sandwiches, pastries, and pies are often held together with toothpicks.
The toothpicks may actually be photographed and later removed in Photoshop.
 |
|
|
Lighting Tips
Food photography is generally done with studio strobe lighting, rather than
tungsten or incandescent. The reasons food photographers use strobes is that
they are cool and do not affect the temperature of the food. Some digital food
photographers use HMI or daylight-balanced fluorescent lights, but strobe is
still the most common light source. I shot about 85 percent of a recent cookbook
project with strobe and 10 percent with daylight coming through diffused skylights
or windows, and controlled by reflectors or diffused by tracing paper. The final
5 percent was with the tungsten modeling lights built into my strobes. I used
tungsten when I wanted to show movement with a long exposure, or when I wanted
to match the warmth and color a fire.
Light that is diffused, directionless, and shadowless is flat and lackluster.
That's one reason that overcast, cloudy days are not as cheerful as bright,
sunny days. Light needs to have direction and cast shadows to be interesting.
Many uncreative photographers place one large softbox directly over their subject
and shoot. Although this certainly cuts down on hot spots and specular highlights,
it is also boring.
 |
|
|
- Log in or register to post comments


![]()
Get the Latest Photo Tips, News & Reviews from Shutterbug!
| Camera Reviews Other Reviews | Mobile Reviews Photography Reviews Columns | News | Features | How-To | Resources |
 © 2025 Shutterbug
AVTech Media Americas Inc., USA
All rights reserved