HP Photosmart 7960 Printer

Exclusive to HP, PhotoREt technology consists of a process that combines up to 32 individual drops of ink in each dot and controls the amount of ink ejected onto each area of the paper for consistent, even coverage. The possible combinations of 8 ink colors allows the HP 7960 to reproduce a vast range of colors: 72.9 million versus 1.2 million in six color printing. Gray tone reproduction is impressive too: 4097 printable levels versus 17.
 |
|
|
Basic Print Making
After taking the HP 7960 out of its box, I found the ten minute setup process,
including software installation, to be straightforward, thanks to the simplified
guide. I decided to load some 8.5x11" Premium Plus glossy paper and opened
some images in Photoshop, previously optimized and sized for printing. The HP
software set the paper type (through automatic detection) and the suitable print
quality level, "Best", ideal for photos with high resolution, snappy
contrast and richly saturated colors. I selected the "borderless"
option, clicked on the OK button and waited 5.5 minutes for a color photo print.
The process was fairly quiet although the HP 7960 made a loud (and incredibly
annoying) grinding noise when loading paper through the internal path and later
when ejecting.
 |
|
|
Printing from Memory Cards
Some people hate the hassle of downloading images to a computer, so the HP 7960
allows for direct printing from memory cards. Pop a card into a slot and scroll
through the pictures using the preview monitor. The process is a bit slow with
cards containing many high resolution images because the HP 7960 has only 16MB
of RAM memory. Select an image; adjust brightness and remove red-eye if necessary,
using the Enhance option; set the desired print size, press the PRINT button
and the machine will make a print, up to (borderless) 8.5x11".
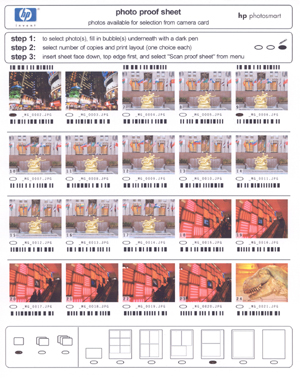
There's another cool feature that's exclusive to HP and works like
this. Make a "proof print" of the best pictures on a memory card,
using plain paper. With a pen, designate the images that you want to print,
in a specific size and layout. Insert the proof sheet into the paper holder
and the HP 7960 will scan it to determine your "order"; after a
delay of a few minutes, the printer will automatically produce the desired prints
completing a process that's both convenient and foolproof.
 |
|
 |
|
 |
|
|
Because the HP 7960 offers so many options for direct printing, it's
worth reviewing the instruction manual and trying the various tools in order
to become proficient with the most valuable amenities.
Advanced Print Making
Let's return to making superior prints from images in a computer. After
re-sizing and optimizing an image in Photoshop or other software, explore the
options provided in the HP software. These include various quality levels that
will control the color richness, the amount of ink used and the printer resolution.
At the "Best" setting, resolution (2400dpi) is plenty for making
exhibition quality prints. The "Maximum dpi" setting activates the
4800x1200 optimized dpi mode that produces no visible benefit but doubles printing
time and increases ink consumption. For quickly printing snapshots, or when
using lower grade papers, the "Normal" (1200dpi) setting works well.
It uses less ink and reduces printing time by about 50% but produces weaker
color saturation and contrast with Premium Plus paper.
 |
|
|
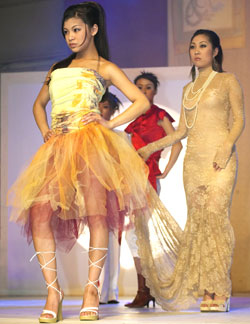
The HP software automatically enriches colors, boosts sharpness, increases shadow detail, and corrects color balance. I was usually pleased with the results, particularly with the attractive, slightly pink skin tones. Occasionally, a print was less than ideal, with an inappropriate level of color saturation, color tone or brightness; that problem was easy to solve, using the pertinent slider controls in the HP software "Color" screen. A +1 or -1 adjustment level generally produced a second print that was closer to my creative intentions. There's no control for moderating the automatically-applied sharpening, but that's not necessary, in my estimation. Anyone who finds that their HP 7960 prints are excessively sharp should simply set a lower level of sharpening in-camera or in their image editing software.
 |
 |
|
|
||
The HP software includes a feature that I found valuable: Color Space selection. The default setting is sRGB, ideal for most images made with digital cameras. If you work with images converted (in Photoshop) to Adobe RGB 1998 color space, be sure to select this option for optimal color, contrast and brightness. Surprisingly, the HP software does not provide some of the additional user-selectable tools and the color management features available with some other printers. During the test period, I managed nicely without those more advanced options. In long term use, however, advanced imaging enthusiasts might miss the "extras", but I'll bet that 90% of HP 7960 buyers will be quite satisfied.
 |
|
|
Some reviewers have complained that HP makes fewer types of paper than some other printer manufacturers. That's not a huge problem because the HP 7960 accepts aftermarket media with a maximum thickness of 11.5 mil., including my favorite matte papers, Concorde Rag and Enhanced Velvet. The "Normal" quality level, plus a -1 saturation adjustment, produced the most pleasing photos on the textured media. For maximum print longevity however, HP Premium Plus Glossy or Matte photo paper must be used. These include a "swelling polymer" layer for maximum ink absorption and for protection from light, humidity and air pollution.
 |
|
|
Thanks to the new photo gray ink, the HP 7960 is also an ideal printer for
making black & white photos, particularly on Premium Plus Glossy photo paper.
Start with a neutral image -- not sepia, for example -- and your prints should
not exhibit any apparent color cast. There's no need to make any adjustments
-- using trial and error experimentation with various types of paper -- as with
some other printers. My best monochrome prints match the level of quality that
I expect from a pro lab, with rich dark blacks, luminous whites and accurate
mid-tones.
Although some other brands of printers offer higher speed, more types of media
plus extra functions, the eight-color HP Photosmart 7960 is easy to use and
produces stunning color and monochrome prints. This is also the most affordable
"archival" printer on the market, great for making photos that will
last for many decades. The built-in monitor, plus the many direct printing capabilities,
also make it a "best value" in its price category. If you have never
considered an HP photo printer before, be sure to ask for a full demonstration
of this model while shopping. Expect to be impressed with the versatility, overall
ease of use and with the superb photo quality that this printer can deliver.
A long-time EDP and Shutterbug contributor, stock photographer Peter K. Burian
is the author of Mastering Digital Photography and Imaging. This 270 page book
covers all aspects of the topic and provides a great deal of practical advice.
Hewlett-Packard, (650) 857-1501 www.hp.com
- Log in or register to post comments


