Here's How to Pick the PERFECT Locations for Portraits: 7 Tips
(Editor's Note: Exploring Light is a monthly Shutterbug column featuring tips, tricks, and photo advice from professional photographers in Canon's Explorers of Light education program. This month's column is by David Bergman with seven tips to pick the perfect portrait place.)
Whether you’re photographing a newly married couple, a rock band, or your family and friends, where you place your subject can have a huge impact on the quality of your final images. It’s usually up to the photographer to select the shoot location, and a great outdoor space can turn a photo from ordinary to extraordinary.
But how do you pick the best spot?

I’m a Canon Explorer of Light and have photographed people and events around the world for nearly 30 years. Of course, it’s nice to work in exotic locations, but you can also make beautiful images closer to home at a local park, an urban alleyway, or even your own backyard.
Here are the top seven things to consider when picking a location for portrait shoots.
1. The Light
Whether you’re shooting only with the sunlight or using flash, you still need to deal with the existing ambient light. If you can shoot at “golden hour” (the first hour after sunrise or the last hour before sunset), the light will be directional and usually a warmer color.
If you have to shoot in the middle of the day, the overhead sun will be harsh, so you should look for a shaded area to put your subject. You can also bring some simple gear like a pop-up reflector to manipulate the sunlight.


I wanted to photograph Marisa in front of this solid wall, but at the time we were there, the sun was directly overhead. This created distracting, harsh shadows on her face. Because I knew we would not be in shade, I brought a reflector and put it over her head to block some of the light. That softened the sunlight hitting her and I was able to make a more flattering image.
2. Wind Intensity and Direction
You might have found the perfect background, but if it’s a very windy location, it could make things difficult. Is that location prone to heavy winds? Are there buildings around that create a wind tunnel?

If you have to shoot in the wind, try to face your subject so the air is blowing into their face. Otherwise, it will be a constant battle for your subject to control their hair.
3. Background Distractions
I have said how important the location is, but the focus of your images should literally be on your subject. When picking a location, make sure you find an area that’s relatively private, so you don’t have other people wandering into your shot.
This can be especially tough in tourist-heavy areas but look for a section where you can concentrate on your subject without worrying about people stepping into your scene. You can also zoom in tighter so that only a portion of the area is actually visible in your shot.
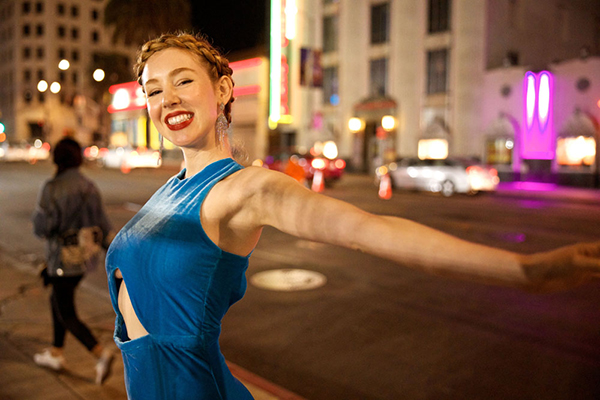

The streets of Los Angeles made it difficult to photograph Marisa with people and cars constantly going through the background. So, I backed up and zoomed my lens so I was only seeing a smaller area of the background, putting the focus squarely on the model.
4. Relation to Your Subject
Try to think about how the location connects to your subject. Some situations might be obvious, while others might make your photos more interesting because of an apparent mismatch.

A newly married couple on a hotel rooftop in front of a sunset makes perfect sense and always works well.

Putting death metal band Behemoth in a forest seems to go against conventional ideas, but that’s what makes this image work. If I had simply put them against a graffiti covered wall, it would have made sense, but this combination of subject and background makes the image memorable.
5. Use What You Can
On first glance, a location might not look like much, but if you really look around, you might be able to find a creative way to use something you would otherwise not notice.

I photographed rock band Soraia on a construction site that was filled with distracting elements in every direction. You can usually see a reflection in puddles, so I placed the band right next to this one and held the camera about an inch above the water line.
That gave me an interesting reflection and also put the clean sky behind them, eliminating the other distractions.
6. Legality
Make sure you check to see if there are any restrictions against photography in your location. Many major cities issue permits for photography - sometimes free and some for a fee.
Don’t assume that all public places are OK as rules vary wildly from place to place. If you don’t check online before the shoot, you might be kicked off the property or even face a heavy fine.

I did my research before photographing the band InnerPartySystem in the middle of New York’s Times Square and knew that it was OK to shoot there as long as I did not put down any stands or a tripod. So, I had my assistant hold the light and walk with the guys in the intersection (on red light’s only!) so we could get the shot.
7. Other resources
It is always helpful if you can visit potential locations in advance to limit surprises on your shoot day, but there are plenty of resources you can use without leaving the comfort of your home. Online resources like Google Maps and dedicated photo scouting sites will help you get a feel for the place, determine the direction of the sun at different times or day, and let you know if there is a major event happening on the day you want to shoot.
Also don’t be afraid to ask other photographers, whether in person or by using online photo groups.

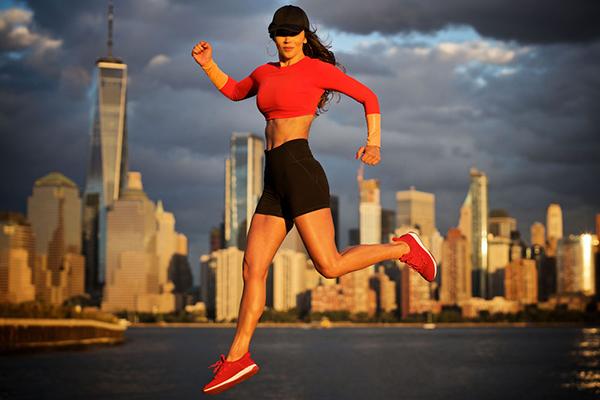
I wanted the New York City skyline in the pics for Cris Syrios' fitness business. A photographer friend tipped me off to a fantastic location in New Jersey that was quiet and had an unobstructed view. We spent the entire afternoon making images at this location without any issues whatsoever.
Don’t underestimate the importance of a good location for your portraits. Research locations, visit ahead of time if you can, and anticipate issues before they arise. Once the location is set, you can put all your energy into getting the best out of your subject. The combination of subject and background is key to making a memorable image.
To learn more from David, visit his workshop page to see his latest offerings.
David Bergman Bio
Canon Explorer of Light David Bergman is a New York-based commercial photographer and photo educator who specializes in portraiture, music, and action. As the official tour photographer for Bon Jovi and Luke Combs, he has documented bands on stage and on the road in more than 30 countries and shares his experience with photographers of all skill levels at his unique "Shoot from the Pit" live concert photography workshops.
In addition to his many celebrity clients, Bergman has 13 Sports Illustrated covers to his credit and has photographed numerous Olympics, World Series', Super Bowls, NBA, and NCAA Championships. Noted as a pioneer with the GigaPan, Bergman's multi-shot, high resolution panorama of President Obama's first inaugural speech was viewed by over 30 million people.
Bergman is an engaging and passionate public speaker and hosts the weekly web series, “Ask David Bergman” on the Adorama YouTube channel. Before moving to New York City in 2001, Bergman was a photojournalist on staff at The Miami Herald and covered news and sporting events around the world.
You can find out more about Bergman at the links below:
Website: http://www.DavidBergman.net
Workshop: http://www.shootfromthepit.com
Instagram: https://www.instagram.com/davidbergman/
Twitter: https://twitter.com/davidbergman
- Log in or register to post comments


