GrayScales
B&W From A Color Printer
A few years ago the manufacturers of ink jet printers were struggling in order to make printers that could lay down very tiny dots--very close together. During those days if you tried to make a black and white print, it tended to look a little grainy compared to color prints made on the same printer. To deal with the problem, most of us would convert the black and white image file back into a RGB film, then send the image file to the printer as a RGB file. The printer would use all four of its inks (Cyan, Magenta, Yellow, and Black--CMYK) to print the image. By using four inks, the printer would lay down more dots and the dots were closer together than if the printer had attempted to print the same image using only black ink. This resulted in an image that had smoother tone gradations and less grain. The only problem was in getting a pure neutral, black and white image. When a black and white image is created using colored inks, it is necessary to have the printer calibrated absolutely perfect. If the printer is the least bit out of calibration, the black and white image will have a slight color cast. Such a slight color cast might go unnoticed in a color picture, but in a black and white picture even a slight color cast becomes noticeable. Still, it was only a couple of years ago that printing black and white images with color ink was the best way to get the best quality image. |
||||
We do a lot of restoration
work and sometimes customers want black and white prints as well as sepia-toned
prints. If we group black and white and sepia-toned prints on the same
8x10 sheet, we print the whole thing as a RGB file. In such a case, the
black and white images that are on the sheet are created with colored
inks--just like in the "old" days--a couple of years ago.
Be careful using this technique. Some ink jet papers have coatings that
absorb the four inks (CMYK) at different rates. This means that after
such an image has "cured" for a few days, one of the four
inks might continue to soak into the coating more than the others, which
can cause a slight shift in color balance two or three days after the
print was made. I'm only talking about a shift in color of 2-3cc,
but such a shift will show up in a black and white print. |
||||
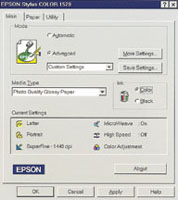
Ink jet printers do the things
that they do because of the special software that comes with them called
a "driver." Not all printer drivers are created equal. There
are vast differences between drivers for different brands and models of
printers. Generally speaking the "better" printers ($300 and
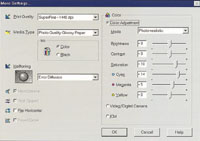
up) have better drivers. Figures 4 and 5 show the options that the driver
for the Epson Stylus 1520 printer offers. Notice in Figure 5, I have set
the slider-bars for specific values. This is how I "calibrate"
my printer to my monitor, so that what I see on the monitor is what I
get from the printer. |
||||
If you are converting a color
picture to a grayscale image, Adobe's Photoshop will perform the
conversion automatically for you using a predetermined set of gray values
for the various colors. |
||||
Highlight the channel with
the most pleasing distribution of tone values and convert to grayscale
by going to Mode: Grayscale. When the "discard color information"
dialog box appears, click on OK. It is also possible to combine the effects
of two or three different channels, in a different ratio from the Adobe
automatic selection noted above, but the explanation for how to do it
is a bit lengthy for this article. |


