Do-It-Yourself
Build A Monopod Shoe For Sharper Pictures

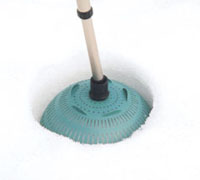
A monopod snowshoe is easily made by fastening a crutch tip to the top of a plastic colander with a short carriage bolt. Cut the lip of the colander away with a hot knife, coping saw, or Dremel tool, then sand the edge to remove plastic shavings. Use a brass wing nut to keep the hardware from rusting together. Friction of the monopod tip against the inside of the rubber crutch tip keeps the column from twisting.
Photos © 1999, Tom Fuller, All Rights Reserved

Contrary to popular belief, mediocre quality is not the only cause of unsharp pictures. Inaccurate focusing, sloppy depth of field control, and poor film flatness all contribute, but the most destructive is camera movement during exposure. While a sturdy tripod immediately solves this problem, it creates others by seriously limiting the photographer's mobility and spontaneity, and at many public events, barring him from taking pictures at all.

A good compromise is the monopod, merely one leg of a tripod topped with an adjustable ball head. It affords a good amount of camera stability, even at relatively slow shutter speeds, and lets the user nonchalantly compress the four or five leg sections and carry the rig in swagger stick fashion past museum security. The addition of a quick-release plate speeds up the trick even more by allowing the camera to be removed with the flick of a lever.

The colander base keeps the monopod from sinking while the crutch tip lets the column flex as needed for proper lean angle on uneven surfaces. This shoe also works well in marshy earth and loose sand. Carry a spare crutch tip, drilled with a 1/4" hole, for field replacement.

To use a monopod properly, extend it until the camera is just below eye level, securely tighten all sections, place the rubber tip against the floor about 18" in front of you, and angle the column slightly inward. Adjust the head for desired composition, spread your feet about 18" apart, and bend slightly at the waist. Gently lean into the column for a rigid, three-point stance, place one hand on the camera and the other around the top section, relax, and smoothly release the shutter.

However, when long lenses are used, or when the camera is turned for a vertical composition, the tip often twists on its surface and lets the camera pivot in a panoramic arc. When the monopod is used on snow, sand, or mud, this action is compounded by an irritating tendency for the column to sink. Additional downward pressure does little to counteract the twisting motion and can make matters worse by introducing muscle-induced vibration and/or cause the column to collapse. An easy solution is this month's inexpensive do-it-yourself project--a pair of ground-gripping, anti-twist monopod shoes.

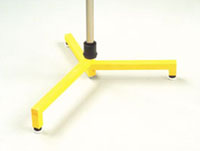
The collapsible "Bigfoot" multipurpose shoe eliminates twisting with heavy cameras and spreads the weight of the monopod over a large area for better stability on all surfaces. The rubber leg bumpers can be replaced with sharpened bolts for use on ice.

First try increasing the surface area of the monopod tip by sliding a soft rubber (not plastic) crutch tip over it. Bring the monopod to a drugstore and find a tight-fitting tip with a large, flared bottom surface. This may be all that is needed to stop twisting with smaller cameras. To keep the monopod from "skating" on hard earth, make an accessory spike by boring a hole through another crutch tip and fastening a short 1/4x20 carriage bolt through it with a brass wing nut on the outside. File or grind the bolt end to a dull point.

The accompanying illustrations will guide you through the assembly of my multipurpose "snowshoe" and "Big-foot" accessories. Each costs only a few dollars and can be built in a couple of hours by anyone with basic workshop skills and ordinary hand tools. While carrying and using any camera support puts a damper on capricious hand holding, I think the increase in image quality is well worth the small inconvenience.

X