Darkroom Magic
Black And White Toning Primer
Now that summer is behind us and there are fewer daylight hours for shooting we're naturally spending more time in the darkroom. But when was the last time you went through your negative files and tried to find new ways to interpret some of your images? You know, blow the dust off and see if you can come up with some new wrinkle. Well, I'd like to suggest something for you to try next time you're putting in some lab time, toning. For some of you this could be something you haven't tried before and for others, myself included, it's a familiar technique that maybe has been neglected for a while. There are several reasons for toning a black and white print: to make the photograph more permanent; to increase the D-max and/or contrast; to give more realistic skin tones to a print that is to be hand-tinted; or to alter reality and create a fantasy vision of the world. Oh, and there's one more, play. Yeah, that's right, just because it's fun. You can take a bunch of black and white images and spend hours trying different toning solutions and methods and just let it all take you where it will. Some techniques will work, others won't, but you'll have fun the whole time and you may even find some new directions for your work to take. |
|||
There are no rules to toning, I've even known photographers to use coffee, tea, or food coloring as toning solutions, but there are some guidelines that will help you achieve reliable and repeatable results. As with many darkroom chemicals, toning agents can be hazardous if handled carelessly. Good lab practice, read cleanliness, is paramount to guaranteeing successful results and to help prevent allergic reactions. Adequate ventilation, proper handling, such as the use of rubber gloves, and careful mixing of chemicals are stressed in the toner instruction sheets and with good reason. Since I've mentioned the "I" word let me emphasize the importance of reading the instructions. Just because one toner from a particular manufacturer requires certain processing steps don't assume they all will. Some will be single bath types while others will require separate bleach and toning steps. Also, similar toners from different suppliers can vary in the required steps as well so read the instructions and keep them handy as a reference while you're working. |
|||
One thing that can cause more disappointment than any other is inadequate washing. Resist the temptation to shorten print wash times as any residual fixer left in the paper will assuredly lead to staining and/or uneven toning. I highly recommend the use of a wash aid, Orbit Bath, Kodak Hypo Clearing Agent, or a similar product, after fixing the prints. Also make sure that your print washer is doing a good job; if you're not sure a print washing test kit can tell you for sure. Speaking of fixing, it's a good idea to use a non-hardening fixer if you know you will tone the prints later. You can mix your own from scratch, purchase a non-hardening fixer from a photo chemical supplier such as Photographer's Formulary or, if you use a liquid fixer with a separate hardener, simply omit the hardener. If you are toning prints that were previously fixed in a hardening fixer you can use a product such as Berg's Dehardener Solution before toning. It's also important to make sure you keep all your lab ware, trays, print tongs, graduates, etc., meticulously clean as the slightest bit of contamination can ruin a whole day's work. Some photographers will even keep a set of darkroom trays that are reserved for toning and nothing else. I think this might be overkill but cleanliness can't be overemphasized. |
|||
One last thing to remember, most toned prints will revert or at least partially revert to a non-toned image if they are heated. So, you should air dry them using drying screens or a blotter book and if you wish to mount them use photo corners or a "cold" mounting process. Heated dryers and hot dry mounting presses are verboten. My first test was from an old negative of an historic adobe and it was printed on Ilford Multigrade IV FB paper and untoned. Then I toned the same image in Kodak Rapid Selenium Toner. The differences in image tone between the untoned and toned print are subtle but the blacks, the D-max or maximum densities, are stronger, the contrast is slightly higher, and the edges of objects a little better defined. The overall tint is a richer silver gray rather than the slightly green-gray typical of many papers. This is my standard paper and toner combination for archival printing and the selenium toning followed by a thorough wash results in a print that will last indefinitely. |
|||
Enough with subtle you say? You want some toning that will wow them at the camera club? The Kodak Poly-Toner or Kodak Brown Toner gives a rich antique look to an image. The portrait of Kara (Photo 1) was also printed on Ektalure paper but I took it a bit further. Just for fun I used liquid friskit, a liquid masking material used for air brushing, and masked the eyes so they wouldn't tone in the ST20 Toner. Then, after toning and washing the print, I peeled off the friskit and using a fine brush toned just the eyes with Berg Brilliant Blue Toner. As a comparison I also made a similar portrait (Photo 2) on the Ilford Multigrade paper and toned it in Fotospeed ST20. You can see how the paper itself can affect the tones you get. Another image that I used the friskit masking technique on was the photo of the two rowboats (Photo 3). I carefully masked the boats and then toned just the water using Berg Brilliant Blue Toner. I chose to leave the boats in the original gray tones but I could have used other color toners, watercolors, or color retouching dyes to add more color if I had wished. There's practically no end to the creativity you have with this process. |
|||
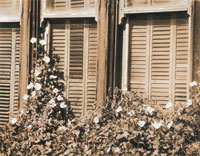
The image of the overgrown homestead (Photo 4) was printed on Ilford Multigrade IV and toned in the Fotospeed ST20 toner. I really like the warm antique brown and feel it lends itself nicely to subjects like this that you want to appear old. I then used Fotospeed RT20 Copper/Red Toner on another print of the same subject (Photo 5) and achieved a much redder brown tone. With this toner you can vary the tone by varying the time from 30 sec to 10 min. The longer you tone the more the tone goes toward a metallic copper tone. The image will also begin to take on the appearance of a solarized print with some tones reverting to their original gray tone. The Berg Brown/ Copper Toner gives very similar results as the Fotospeed Red/Copper Toner.v Resin Coated (RC) papers generally do not tone to the same degree or depth as fiber-based papers but Berg offers Rapid RC Sepia Toner intended for RC papers. The two portraits of Kimi (Photos 6 and 7) made on Ilford Multigrade RC paper compare untoned and toned results. |
|||
Some of the available toners are shown in the image (Photo 8). There are of course many others that you can experiment with. In preparing the sample prints for this article I rediscovered the excitement, creativity, and fun that toning can add to black and white photography. Perhaps you will, too. Manufacturers/Distributors |
|||
Eastman Kodak Company |
- Log in or register to post comments


