Another Option
Dodging And Burning In With Photoshop
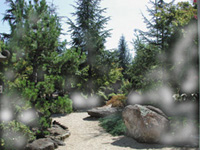
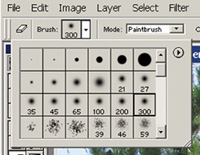
| Back in the old days when I spent most of my life in a conventional darkroom, I used to do a fair amount of dodging and burning-in. For some strange reason almost every picture needed some slight adjustments. As long as I was working in black and white there was no particular problem. But, when color printing became popular, it was no longer so easy to do dodging and burning-in. The overall color balance of a print is, in part, a factor of the total exposure time. When you make a change in the exposure time, the emulsion in color printing paper reacts in a way that causes the three dye layers (cyan, magenta, and yellow) to respond a little differently than they had at the other exposure time. The different response of the emulsion creates a slight shift in the color balance requiring a slight change in the enlarger's filtration to re-establish the correct color balance. This change in the performance of the emulsion, that results from a change in the exposure time, is called reciprocity failure. That is, the emulsion failed to respond in a true reciprocal manner. Reciprocity failure was always a chronic aggravation when making color prints. One of the great joys of making color prints on a computer is that you can do all of the dodging and burning-in that you want and never have to worry about correcting for reciprocity failure because there isn't any such thing in the wonderful world of digital imaging. In fact, just to make it easy to do such techniques, Adobe has built special tools into Photoshop that allow you to do all sorts of dodging and burning-in. And, you can perform the techniques with far greater precision and repeatability than was ever possible in a wet darkroom. But, in this article I want to show you a special technique for doing dodging and burning-in that is a bit different. I'm using Photoshop Version 6.0 in this example, but almost any version of Photoshop will allow you to perform this technique. First, let's take a nice picture that can use a little modifying. See #1 below. Notice that there are large areas of the foliage that are in deep shadows. The shadows are so deep that the areas have gone almost solid black in many places. The next step is to "save" an exact copy of the picture under a different name. Now, open both copies of the image in Photoshop. Click on the "copy" that you saved under a different name to make it the active image. We are now going to adjust the brightness and contrast of this copy so that the deep, dark shadows will look really good. Of course, when we do this, the mid tones and highlights will get all washed out and blown away. That is OK. All we are trying to do is to make the deep shadows a whole lot lighter and brighter. Go to Image to Adjust to Brightness/Contrast. See #2. In this case, I have set the Brightness control to 60 and the Contrast control to 60. Your particular images might require a slightly different setting. The #3 shows the results of having increased the brightness and contrast. Compare #3 to the image that we started with, #1. Next we want to put a copy of our dark image on top of our lighter image. So, click on the darker image (#1 in our example) and go to Select to Select All. Then go to Edit to Copy. Next, click on the lighter image (#3) to activate it and then go to Edit to Paste. That will bring a copy of #1 in on top of #3. Since both images are exactly the same (except for the brightness and contrast changes we made in #3) the two images will align perfectly. Now we are ready to begin the magic. Go to the Tool Bar and click on the Erasure Tool. Since we are going to be making changes in large areas of deep shadows, we need to select a fairly large, fuzzy-edged brush. Go to the Brush Pallet and select a large brush. I have selected a 300 pixel brush. See #4. We want to use this brush to erase the deep, dark shadows in the top layer so that the brightened shadows in the bottom layer can show through. In order to be able to better blend my erasure work I need to set the Opacity of the Erasure Tool to a low setting. In #5 I have selected 25 percent. Now, place the Erasure brush over an area of deep shadows and click. In #6 you can clearly see the outline of the brush as it is positioned over an area of deep shadow. Continue clicking on all of the shadow areas. As you click, you will see the lighter detail from the underneath layer showing through. When you have erased all the dark shadow areas, and all the nice, light detail is showing through, your picture is finished. The #7 shows what the top layer looks like after I erased holes all over it to allow the lighter detail underneath to show through. To see the top layer (as it appears in #8) go to the Layers Pallet and click Off the little eyeball that is just to the left of the bottom layer. When your picture is finished, it is time to flatten the layers and print it out. Go to the Layers Pallet and select Flatten Image. See #9. The #10 shows the finished picture. Compare it to the picture we started with. It took me about five minutes and I didn't even need to turn the lights off. I had no color reciprocity failure, and the picture was letter perfect the first time I printed it. If you'd like help with your Photoshop work you can send an e-mail to me care of: editorial@shutterbug.net or write to me care of Shutterbug. |
|
|
|
|


