- REVIEWS
Camera Reviews 
More Reviews Mobile Reviews Photography Reviews - GALLERIES
- VIDEOS
- BUYER'S GUIDES
Alien Skin’s Snap Art; Turn Photos Into Art In A Snap
 Have
you ever wanted to transform your photos into traditional art media such as
oil paint, pastel, pen and ink, watercolor, or even the comic book style of
pop art? Whether you want to expand the services you offer to clients, or explore
your own artistic expression, Snap Art from Alien Skin Software enables you
to do it, in a snap. Since Snap Art is a plug-in, to use it you must have Adobe's
Photoshop CS or later, Elements 4.0 or later, or Corel's Paint Shop Pro
Photo XI or later. Snap Art does not require, nor offer, drawing by your own
hand. Everything is done for you by the software. Hundreds of preset effects
are only a mouse click away. You do, however, have the option to control, via
sliders, some variables such as brush size, color saturation, contrast, light
direction, and more.
Have
you ever wanted to transform your photos into traditional art media such as
oil paint, pastel, pen and ink, watercolor, or even the comic book style of
pop art? Whether you want to expand the services you offer to clients, or explore
your own artistic expression, Snap Art from Alien Skin Software enables you
to do it, in a snap. Since Snap Art is a plug-in, to use it you must have Adobe's
Photoshop CS or later, Elements 4.0 or later, or Corel's Paint Shop Pro
Photo XI or later. Snap Art does not require, nor offer, drawing by your own
hand. Everything is done for you by the software. Hundreds of preset effects
are only a mouse click away. You do, however, have the option to control, via
sliders, some variables such as brush size, color saturation, contrast, light
direction, and more.
10 Art Media Styles
Whether you run it on Windows XP or later or Mac OS 10.3.9 or later, Snap Art
couldn't be easier to use. Simply open a photo in one of the host programs,
then choose Filter>Alien Skin Snap Art. You'll be presented with 10
art media styles to choose from: Color Pencil, Comics, Impasto (thick textured
paint), Oil Paint, Pastel, Pen and Ink, Pencil Sketch, Pointillism (inspired
by Impressionist paintings), Stylize (this creates posterized or silkscreen
looks), and Watercolor. Selecting one will open the preview window. On the upper
left you see a list of settings--variations within the style you've
chosen. There may be 15-30 of these--click on one and the progress bar
at the lower right will indicate that the filter is being applied to the preview
in the image window on the right.
 |
|
|
You can change the size of the preview by clicking on the magnifying glass
icon at the top middle of the window, then click within your photo's preview
to enlarge it, or alt/option-click to shrink it. I like to start out seeing
my entire photo. Unfortunately, there is not an option to set this as a default,
although settings for a particular style (brush size, color saturation, etc.)
can be saved as "User Settings" in the box at the lower left of
the preview window.
For all the examples in this report, I began with a 6MB, 4x6", 300dpi
native Photoshop .psd file. Because Snap Art always opens it at 100 percent,
I had to quickly click on the magnifying glass and then the alt/option-click
several times to downsize the preview so I could see the entire image. While
it is a good idea to check the filter effect at 100 percent, that's not
the first step in my workflow.
 |
 |
||
|
|
I hope a future version of Snap Art will offer a button and a default option
for "Fit in Window."
A feature that is extremely handy is the Preview Split, just above the photo
preview. It allows you to split the image to show half of the original and half
of the filter effect in eight different ways (side by side, top and bottom,
or diagonally). Or, you can choose to see the filter effect on the full image
in the preview and toggle between it and the original by clicking and holding
the icon to the left of the hand next to the magnifying glass icon.
Multiple Choices
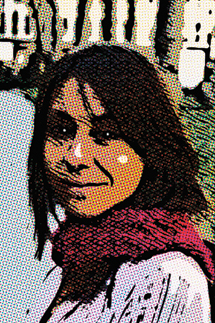
Here's how to apply a pop art effect: First, I opened my portrait in Adobe's
Photoshop CS2. Next, I chose Filter>Alien Skin Snap Art>Comics. The preview
window opens and the software immediately begins to apply the factory default.
If you like the result, click OK at the upper right and wait while the effect
is applied to your original photo. If you don't like the effect, try one
of the other presets. Here I settled on the "Assorted, exaggerated"
setting, after trying several. The portrait is now totally screened with large
color halftone dots, and thick black lines have been drawn. Overall, the result
is effective, but the eyes need highlights. To add them in Photoshop, I selected
a small paintbrush and painted with white on a new blank layer.
 |
 |
||
|
|
Check Your Speed
As far as performance, Snap Art is a bit slow on a 3-year-old computer (equivalent
of about 1GHz processor speed). It took about 10-15 seconds to render the effect
on the preview, and then an additional 30-45 seconds to apply the effect to
the 6MB original after clicking OK, even longer for the Pastel and Watercolor
options. For an enthusiast, this may be insignificant, but if you're doing
commercial production work, it is a consideration. Check out the trial version
on your machine to make an informed decision. Another bottleneck arises whenever
you change the preview size--the filter preview starts redrawing from scratch.
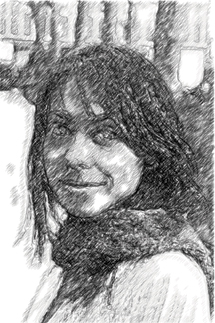
Instant Sketch
If you can't draw to save your life, but you'd love to convert some
of your photos into line drawings, Snap Art has a solution. Starting with the
same original portrait in CS2, I chose Filter>Alien Skin Snap Art>Pencil
Sketch. After experimenting with several of the effects, I settled on the "Portrait,
more coverage" option for the look shown here. To increase the contrast
and make the lines darker, I added a Levels adjustment layer in CS2 and found
that the Levels sliders offered a lot of control over how light or dark the
pencil effect appears.
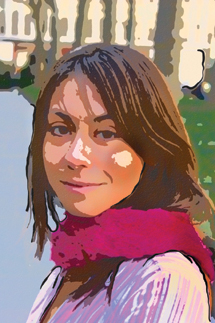
Stylize It
If you'd like to achieve a look of contemporary illustration, try Snap
Art's Stylize filter. Here I chose the "Small lines, rough paper"
setting. To increase the color saturation, I added a Hue/Saturation adjustment
layer in CS2 and cranked the saturation up to +30. You could also do this within
Snap Art under the Color Tab, described later.
 |
|
|
 |
|
|
|
| |||||||||
- Log in or register to post comments


![]()
Get the Latest Photo Tips, News & Reviews from Shutterbug!
| Camera Reviews Other Reviews | Mobile Reviews Photography Reviews Columns | News | Features | How-To | Resources |
 © 2025 Shutterbug
AVTech Media Americas Inc., USA
All rights reserved