ACDSee 7
A Step By Step Guide To Digital Workflow
All Photos © 2004, Joe Farace, All Rights Reserved
 One
of the few problems with digital image capture is you tend to shoot more photographs
than if you had to pay for processing them. (You really have to pay for all
these extra images--there is no free digital lunch--but that's
a topic for another story.) If you're gonna shoot lots of pictures, you're
going to need software to manage them.
ACD Systems' ACDSee 7 software for Windows supports more than 40 different image file formats, including raw formats from Canon, Fuji, Kodak, Konica Minolta, Nikon, and Olympus. The program also supports the MPV and HighMAT (See "Yikes, Not More Buzzwords?") standards that let you burn image and media files onto a CD-R/ DVD-R and produce slide shows that can be played on any DVD player.
One Approach To Digital Workflow
The following steps should give you some ideas of how ACDSee 7 fits into one
possible digital workflow solution, beginning with image capture and ending
with archiving the best images onto writable CD-R/DVD-R media.
 |
|
|
Step 1: Get rid of the dogs right away. During a break in shooting take time to chimp your photographs on your camera's LCD screen, erasing those that don't make the grade. Don't be hard on yourself (unless you don't have many memory cards) and keep marginal ones for later critical evaluation. "Chimping," if you're not familiar with the term, is the behavior that digital camera owners exhibit when looking at pictures on those very same LCD screens. Oooooh, ahhhhh, ooooooh...know what I mean?
 |
|
|
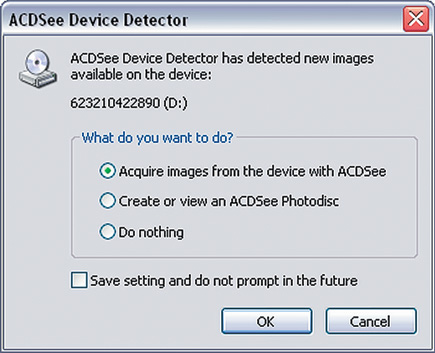
Step 2: Copy the files from the memory card onto your computer's
hard drive. When you insert a memory card into a card reader or even a CD into
one of the drives, ACDSee 7 automatically opens a dialog box allowing you to
acquire the images, view them, or do nothing.
Tip: Unless you're using a USB 2.0 or FireWire device,
transferring images via a card reader can be slow. USB 2.0 readers are inexpensive
and fast but make sure your computer has a USB 2.0 connection, not just one
that's "USB compatible." That means the port is really USB
1.1 and is 10 times slower than 2.0. You can inexpensively add USB 2.0 ports
to your computer, so just do it. You have better things to do than wait for
files to be moved.
 |
|
|
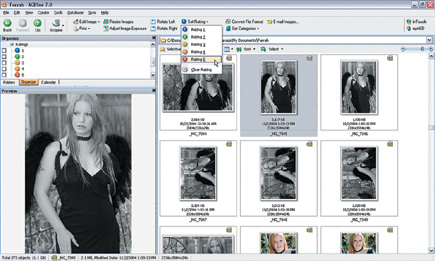
Step 3: ACDSee 7 has a context sensitive toolbar, so after selecting an image or set of files, it displays the most commonly used operations for that selection, eliminating the need of digging through stacks of menus to find what you want. In its default view, ACDSee 7 shows re-sizable thumbnails of all the images you captured and control sliders let you make the thumbnails any size. Thumbnail size ultimately depends on screen size and I use 175x131 pixels for a Samsung SynchMaster 173mw LCD widescreen monitor that lets me see more and larger images than traditional 17" 4:3 ratio monitors.
 |
|
|
Step 4: It's time to edit anything missed during the chimping process. When you click on any thumbnail in ACDSee 7, a larger version appears in the Preview window. Use this feature to look for people with partially closed eyes, the inevitable telephone pole "growing out of their heads," and stuff like that. Right clicking displays a long menu that includes Delete. Use it. Fewer files demand less hard disc space or fewer blank CD/DVDs. Although ACD Systems says that ACDSee 7 is "renowned for its speed," I wasn't wowed by its performance on a 2.2GHz AMD-powered Windows XP home computer. It seems slower than previous versions.
 |
|
|
- Log in or register to post comments


