Nice tips from the experts. This is a useful idea to follow to have a good photographic works. - Dennis Wong YOR Health
Posing & Lighting; Tips To Help Flatter Your Subject—Part 2
The impact and success of a studio portrait is often the combined result of lighting, composition, body language, lens choice, camera angle, clothing, color, texture, and even luck. With a few portrait techniques under your belt, however, your luck will improve dramatically. There are many portrait-making methods that can help you develop your own style over time and ultimately make your work unique.
Studio Setup
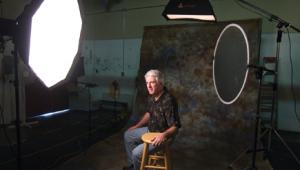
For these head-and-shoulder portraits, we used a 3-foot OctoDome as a main (key)
light, a boom-mounted HalfDome as a hairlight, and our fill/rim light was either
a 3-foot OctoDome or a 32" White/Silver LiteDisc (#1).
 |
|
|
Narrow (Short) Lighting
Many people will benefit from narrow lighting and positioning, especially
if they have a wide or round face. A classic example of broad lighting, with
the face turned away from the key light, is shown in #2. Notice how the main
light almost exaggerates the broadness of the face. As you might expect, broad
lighting is typically more successful with people who have narrow faces.
 |
|
|
By contrast, #3 shows the model with her face turned toward the key light, causing the right side of the face to be on the shadow side. Although this example is subtle, this change of positioning has the effect of narrowing the face.
 |
|
|
Note that if you wanted to narrow the face even further, you would simply
move the main light farther to the left.
The 3/4 View
In #4, we see the subject's head positioned halfway between a profile
and 3/4 view. Notice how the nose breaks the cheek line, giving a somewhat distorted
view of the face. This is a great example of why you need to think in two-dimensional
terms when posing your subject. Shapes can be controlled by your positioning
and lighting, and if there are interruptions in these shapes, it can disrupt
the flow of the overall shot (#4).
 |
|
|
On the other hand, #5 shows a much more graceful and engaging result. The subject's head is now more at a 3/4 view. Note that the light position is the same as it was in #4, but the effect due to the change in position is significant.
 |
|
|
In addition to narrow lighting such as this, having your subject jut their chin slightly forward can be a simple way to flatter your subject. There's that old photographic saying, "The camera adds 10 pounds." Well, these techniques can help to counteract that unflattering phenomenon.
- Log in or register to post comments


