Tabletop Photography
Controlling Shadows And Contrast With Light Tents And Cocoons

A studio flash was positioned to the left and rear of the set, with shimmering Mylar as a backdrop for these peppers. The lighting inside the Lastolite Cubelite is quite soft. There is some light falloff on the right, but nothing that couldn't be corrected with a white bounce card.
Photos © 2003, Jack Neubart, All Rights Reserved

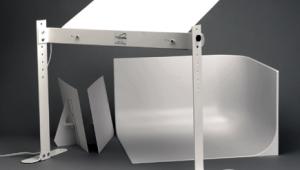
When it comes to lighting tabletops, professional photographers often opt for the sweep table. A sweep table looks like an oversized chair, but, instead of cushions, it comes in an assemblage consisting of an upward curving, or
"sweep-back," milk-white Plexiglas sheet supported on a frame that stands at a comfortable height for shooting. The idea behind the sweep table is that light can come in on the subject from any of many possible directions, including underneath. And because the background sweeps up behind the subject, it is continuous, doing away with a sharp horizon line intersecting the picture at some point. Also, the sweep design allows the background to gradate, doing away with the need for a graduated backdrop.

With only the studio strobe, the lighting is harsh, with burnt-out highlights and fairly deep shadows. Note the loss of definition on the underside of the pepper hanging off the dish. Interestingly, the Mylar has more color saturation here.

While utilitarian, sweep tables have their limitations. They are often expensive, bulky, inflexible, and not portable. They are not necessarily the best or most expedient solution for tabletop subjects with shiny and highly reflective surfaces, unless you don't mind all the added work that would be required in tackling these problems. Simply stated, there is a simpler way to light some otherwise difficult tabletop setups.

Enter Light Tents And Cocoons
Available from various manufacturers, these devices surround the still life set with a translucent white diffusion material. The resulting lighting, whether from available light, flash, hot lights, or fluorescents, is relatively soft and the all-white interior usually bounces back enough light to prevent harsh contrast.

The typical light tent is conical, resembling a teepee, and is constructed of nylon. It might require a separate support rod (not supplied with the tent) at the top to hold it erect and in place. The cocoon, on the other hand, is self-standing and rectangular, and constructed of a milk-white Plexi-like plastic. There is also a hybrid design, which is also self-standing, but cubical and constructed of nylon. The conventional light tent and the hybrid design both collapse down to a flat, circular (pie-to-wheel-size) shape convenient for carrying. The smaller conical light tents are perhaps the most portable lighting solution, as well as being most economical. Each design has its advantages, with some tradeoffs.

The Lastolite Cubelite is spacious and will accommodate larger sets than a cocoon or conical light tent. One light was enough to light these peppers, but a white fill card on the right would have helped to reduce contrast further. Caution: be careful not to position hot lights or powerful strobes too near a nylon or plastic surface.

The Westcott Conical Light Tent
This light tent very conveniently springs into shape from its collapsed form, giving you a nylon, cone-shaped enclosure that some may find especially suitable for soft lighting of small subjects indoors or out. Because of its small diameter and restricted working space, the light tent may limit what you photograph and some subjects may have to be photographed from a higher camera angle than would be optimal. (Larger sizes may open up additional options.) The Westcott 21x26" Light Tent I worked with had a touch fastener opening that went from top to bottom. Because of the confined space, I found it necessary to position the camera at a higher angle, closing the tent flaps around the lens. Admittedly, the subjects I chose for my comparison views worked better with a rectangular enclosure, such as a cocoon, than with this type of tent, although using a light tent did lead to a different take on things.

These ceramic figurines were lit by a studio strobe, from the left. The RedWing Cocoon produces a soft light, without glaring highlights or harsh contrasts.

Because of its upward tapering design, the tent won't accommodate sweeping backdrops. That doesn't mean that you can't fashion a usable solution. This tent has a touch fastener opening at the apex--normally for the lens, for a straight-down view. Instead, I used the top slit as an anchor point, pulling Mylar material up through there, then draped the material around the subject.

While F.J. Westcott, the tent manufacturer, recommends ironing out wrinkles, I chose to leave the fabric crinkly, since this tent would be opened and packed away again and again. Besides, you won't have an iron when using the tent in the field, so get used to the wrinkles. They didn't seem to bother anything. You might even say it's a different wrinkle on lighting.

The same light has a similar effect inside a conical light tent, the key difference being the restricted working space resulting in a higher camera angle.

The RedWing Plastic Cocoon
The milk-white, Plexi-like material that forms the self-standing, quasi-rectangular envelope, or cocoon, of the RedWing Cocoon 70 is a very efficient diffuser. However, this device tends to be bulky, considerably heavier, and not as portable as a simple light tent, rolling up into a cylindrical shape that fits inside a duffel bag.

The RedWing Cocoon features four distinct sections, which must be fastened together with touch fasteners and zippers. So it's a bit more labor-intensive than a fully collapsible light tent. But it's fairly easy to take apart and pack up.

Available in several sizes, the overall enclosure is roomier than the conical light tent. And the sweeping backdrop and flat floor that are integral components render this a largely self-sufficient studio accessory. Because this is a semirigid material, not a pliable nylon, you can't simply stick a lens through and close a zipper around it. Each lens opening is a precut aperture, and that is one drawback: Dust can enter and the holes allow the "outside world" to be reflected on shiny surfaces. As a precaution, cover openings with white paper.

Because the bare floor is plastic, it reflects back what's being photographed. If that bothers you, drape some fabric or other material over the floor. By unzipping the side panels at the base, you can slide a sheet of poster board through and use that as a backdrop. And because the base is fairly rigid when assembled, this cocoon can be draped over supports and be lit from underneath. In fact, the lighting possibilities are practically endless.

Take away the light tent and the cocoon and you get a very harsh picture. Highlights practically burn out.

The Lastolite Cubelite: Self-Standing, Yet Collapsible
While some may call this a "light tent," the Lastolite Cubelite is constructed of light-diffusing nylon fabric in a collapsible cube-shaped design. Essentially, the Cubelite springs open and collapses like any folding diffuser/reflector, which makes it eminently portable--while occupying considerably more space when open. Opening it, I found, is a much simpler chore than folding it back down to its original size, but, with practice, it became easier.

On this design, there is a removable front panel that allows you to introduce the various items into the set's interior. When opening or removing this panel (which is secured by a touch fastener all around), make sure to hold the cocoon firmly in place, or anything inside will go flying as you try to "rip" apart the hook-and-loop material. The front panel has zippered slits (vertical and horizontal) for the lens to poke through.

A studio strobe was all that was needed to light a set of ceramic figurines inside this RedWing Cocoon, which zips open at the base to admit a red poster-board backdrop. Caution: be careful not to position hot lights or powerful strobes too near a nylon or plastic surface.

The very thin fabric efficiently allows light to pass through, while at the same time bouncing light back onto the enclosed subject. So, on the one hand you have a soft light; on the other you have bounce light filling in shadows. Having said that, the roomy interior, especially on the 3-foot model I used, does not reflect light as well. That means bounce cards may be called for. On the other hand, the spacious interior also allows you to set up black cards to pull back some of the light and add subtle contrasts of tone. Larger cocoons generally serve best with larger subjects. I found the 3-foot size a bit much for my needs. Unfortunately, the 2-foot size wasn't available in time for this story. That would have been my ideal choice.

The Cubelite provides clips at the rear to support a sweeping backdrop, so you're not stuck with an all-white background all the time. Because of the seams, an added backdrop is almost invariably a necessity. Suitable backgrounds range from black velvet to poster board to roll paper cut to size. I personally prefer shimmering Mylar, which may appear opaque but is actually translucent. While you can light from the sides and back, this type of cocoon does not lend itself to lighting from underneath--the bottom is too pliable and will not support any weight on its own, unless placed on a table.

Select models of the Cubelite may feature a removable bottom, making it more tent-like in character. With such a design it's possible to lower the structure over an immovable subject to isolate it from cluttered surroundings.

Advisory: To prevent damage to a tent or cocoon, and avoid a possible fire hazard, keep hot lights and high-wattage modeling lights, as well as powerful studio strobes, clear of the fabric and plastic surfaces. Moreover, excessive exposure to light may lead to discoloration of the color-neutral materials.

A Guiding Principle
When it comes to translucent cocoons and light tents, follow this dictum: The farther your light source is away from the diffusion surface, the softer the light enveloping the subject inside. Put your light closer to the surface, and the result is a harder, more contrasty light hitting your still life.

Helpful Resources/Light Tents & Cocoons: Where To Get Them (Or Find Out More About Them) Online
Note: The same or similar products may be sold under different names.
· Bogen Photo Corp. (www.bogenphoto.com)
· Bowens International Ltd. (www.bowensinternational.com/pdf/table_top_studio_guide.pdf)
· F.J. Westcott Company (www.fjwestcott.com)
· Greenbatteries Store/EZCube (www.store.yahoo.com/greenbatteries-store/tabtopstudac.html)
· Lastolite Ltd. (www.lastolite.com)
· Plume Ltd. (www.plumeltd.com/cocoon.htm)
· RedWing (www.redwingphoto.com)
· R.T.S., Inc. (www.rtsphoto.com)
· Sell-It-On-The-Net.com (www.sell-it-on-the-net.com/online_store/Pro-line_cocoon_tents.htm)

X