Using Fill Flash
A Little Extra Light Can Make A Big Difference
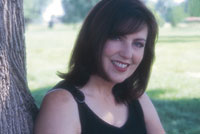
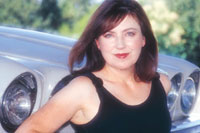
Have you ever looked at someone's outdoor vacation photographs and wondered who the subject was? The face was so dark you couldn't tell if it was your best friend. And don't you just hate those "raccoon eyes" portraits? You know what I mean; the ones with big circles of shadow under your subject's eyes? This can really be a problem with outdoor portraits made with the sun shining behind your subject, directly toward the camera. If you took photographs outdoors at the beach, on the ski slopes, or anywhere else for that matter and didn't use a flash, chances are the subject's face was too dark or had harsh shadows under the eyes. A Myth Is As Good As A Mile. To flash or not to flash, that is the question. Legend has it that old school photojournalists would never use flash to illuminate the subject because it would be intrusive--disrupting that decisive moment even further than the presence of the photographer--and alter the scene by adding extra light that was not already in place. Of course this is just myth. In Jim Hughes' book about W. Eugene Smith, Shadow and Substance, he explains that one of the biggest packages that Smith lugged around with him, even during battles in World War II, was flash bulbs. Modern day photojournalists, portraitists, and photographers have gotten beyond the myth and know that fill flash, when used properly, can make a big improvement in their portraits. |
|||
Daylight is not always enough to illuminate your photographs and a brief burst of light from a portable electronic flash can add sparkle to the eyes and soften harsh shadows, but like any artificial light is best applied in small doses. Fill flash photographs made in the 1940s and '50s were often done using large flash bulbs and 4x5 cameras. All settings were manually controlled by the photographer and the amount of light was hard to control: the resulting pictures sometimes had that "over-flashed" look with too much light on the subject. The trick to successful fill flash photography is to apply the same principal Goldilocks used when she went into the cottage owned by The Three Bears. At every encounter in the Bears' home, one item was too much, a second was not enough, but the third was "just right." When you get the fill flash ratio just right, your images will snap into life. They will become photographs, not just snapshots. |
|||
A literal definition of fill flash is simple: Adding light via an electronic flash to supplement the existing light that is present in the scene. Before the through the lens flash era, this was a difficult process. Complicated formulas were available to help you incorporate the power of the flash, the speed of the film, the f/stop, and the distance to subject to calculate proper exposure, but no more. You can use fill flash with any camera from a recyclable 35mm to the most expensive digicam. In outdoor portrait situations, all you have to do is turn the flash on. It's that simple! Most 35mm cameras with built-in flash or those that accept dedicated flashes will automatically adjust the flash output so the fill is just right. Most point-and-shoot models usually sense the brightness and the flash won't fire unless it's dark. You can override this by setting the flash to fire all the time. |
|||
If you have a 35mm camera with a dedicated flash, just set it to TTL mode but you should experiment and adjust the amount of the fill flash to suit your taste. Most dedicated flash units have plus or minus settings or use the camera's exposure compensation dial to control the amount of flash. Generally, bright sun photos require more fill flash in the shadow areas than images taken in shade or on an overcast day. John Leyba, a staff photographer at The Denver Post has been using the Nikon D-1 digital camera since its introduction. He often uses it with the dedicated SB-28x flash for fill. He's found that images taken this way tend to be a bit "hotter" than when using film. That's why he powers the SB-28x down anywhere from 1/3 to a full stop less light than when using film. Shooting subjects with a lot of white in them are the toughest. "You can't always tell by looking at the LCD screen on the camera back either," Leyba says. "The image on the camera sometimes appears darker than the image once it appears on a desktop monitor." Again, the best advice is make your own tests with your own equipment. There's a certain amount of art to this fill flash technique, but work with it until you get results that suit your taste and style of working. |
|||
Larger Formats. Medium format images can benefit from fill flash as well. Cameras, like the Hasselblad, synchronize with electronic flash units at shutter speeds up to 1/500 of a sec, and using fill flash with leaf-shutter cameras has always been easier than in 35mm, but that's changing. Newer 35mm cameras have higher synch speeds than previously available SLRs and when used with complimentary flash units usually have automatic built-in fill flash capability. Metz and other flash manufacturers make modules that allow their units to dedicate to specific models of medium format cameras. That makes the fill flash technique work with them as well. If you don't have that luxury, don't despair. Photojournalist Barry Staver has used older model Nikon flashes with a Bronica SQ-A for years. With the flash set on automatic, not TTL, he simply dials the exposure from one to three stops less light than the ambient light used for the exposure. The results, he tells me, are "fantastic." |
|||
No Secrets. So what is the secret of good fill flash? Basic photo books are full of rules to follow that help you obtain the mathematically correct ratios of daylight to flash, but I feel only you know what looks best. All you need to do to find out is shoot a single roll of your favorite type of transparency film and bracket like crazy. Shoot a few frames with the flash set on manual, but be sure to try all your flash's automatic settings. With automatic cameras and sophisticated flashes, you can also bracket by changing the camera's exposure compensation dial in whatever increments the camera permits. For each frame you shoot, keep records of what your camera and flash settings were, and have the film processed but not mounted so you can make side by side comparisons. (You save a few bucks, too.) Compare your notes with the processed film, and you should find the answer to what's the right balance for fill flash right on your own light box. |
|||
Do yourself a favor and make me a promise that the next time you're photographing people outdoors, you'll turn on your camera's built-in flash. It doesn't matter if you're using a 35mm point-and-shoot, an Advanced Photo System, or even a digital camera, the results will surprise you. Prove it to yourself, make one frame with the flash off, one with it on. I think you'll discover, like I have, that, more often than not, fill flash can often make the difference between a good shot and a great one. Manufacturers/Distributors |
- Log in or register to post comments


