onOne Software’s PhotoTools 2: Pro Edition; Bringing Out The Best
 As a photographer, I’m often looking for the essence of a photo. My goal is to avoid making images look digitized or overworked but to still bring out their potential by increasing color depth, enhancing skin tones, and bringing out what made me snap the shutter in the first place.
onOne Software’s new PhotoTools 2 Pro Edition seems to have a clear mission that aligns with those aims—to bring out the best in an already appealing photo. It’s a program that forces you to think about color and detail; it’s actually hard to make images look digitized. With the help of Kevin Kubota (a professional wedding photographer) and Jack Davis (a Photoshop guru) who both contributed ideas to the software, PhotoTools 2 makes me want to shoot more photos just to use the effects it supplies.
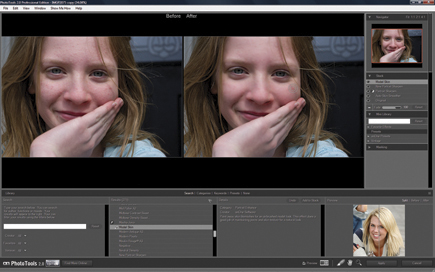
What I like best about PhotoTools 2 is that it streamlines my workflow. I can spend hours in Photoshop trying to get just the right color balance when editing a large collection of images from a shoot. Once I have organized my images in a program such as Adobe Bridge and installed PhotoTools 2, I first open the image I want to edit. On the Photoshop (or Lightroom, or Aperture) menu bar, there is a new menu called onOne. The plug-in is only accessible from this new menu. After using the PhotoTools 2 plug-in to apply effects, it creates a new layer in Photoshop along with the new image—or a new version of the file in Lightroom or Aperture. In Photoshop, I can delete the old layer and save the new edited file, or export just the new layer.
 |
|
 |
|
|
PhotoTools 2 does not include any effects under the Filters menu in Photoshop, Lightroom, or Aperture. This keeps the effects all in one place (in the module) and doesn’t intermix with the other filters, but it also means you have to run the plug-in when you want to use it. To address this, there are presets available from the onOne menu, which are essentially a collection of filters—such as brighten the image and adjust colors—grouped into one so you can access them without having to start the plug-in. They are still grouped separately, however.
Once you start the module, the main idea is to stack the effects. For example, you might apply a portrait effect, then soften edges, and then apply a sharpen filter. Each one is added to a column on the right-hand window pane so you can see them easily. The stacked effects function just like layers in Photoshop in that you can move them around, click an eye icon to disable that effect, and build a workflow for any given photo. You can save these stacked effects as a preset and even send a preset to another PhotoTools 2 user who can load them and apply the same treatment to one or a series of photos.
When you apply an effect—no matter how many effects you use—PhotoTools 2 adds a new layer to the image with all the applied effects. (In Aperture, the program creates a new version of the image.)
 |
|
 |
|
 |
|
|
It’s easy to find the right effect. You can type in a name such as “landscape” and see all effects related to landscape photography, even if they do not have the name landscape in them. You can also click through categories of effects, such as photo filters and camera tricks. Keywords for effects are also easy to find and use. For each search, you just click on the method you want. Each effect usually has some minimal options for adjusting how much that effect changes your photo. For example, with a skin tone effect, you can adjust the color change using a simple Fade slider for that effect.
Another important feature in PhotoTools 2 is the ability to mask a portion of an image—you can make adjustments on just one area, or even paint in or paint out an effect. For example, if you see a blemish in a photo, you can paint over it to remove the blemish or create a mask of one portion with the blemish and make adjustments just on that area.
- Log in or register to post comments


