Master Class
Shutterbug's Alaskan Cruise Page 2
Before long many of them began including people in their viewfinders to add interest and perspective to their images. Now, looking everywhere, some of them began thinking differently. A good example of this came early on in our trip.

Each location where we stopped for pictures had countless running streams from
the melting snow and glaciers up above us. We could see them in a distance,
but hadn't gotten close to one yet. At this particular location several
photographers were taking shots of the stream, trees, and distant glacier. It
was a perfect spot for me to include my friend, Ellen, in a picture. I demonstrated
how you could include people in the picture, make them the center of interest
and still have a beautiful scene in the background.
To create this picture I used a 17-35mm wide angle lens, keeping her close to
the camera. I explained how placing her farther from the camera would make her
an almost insignificant part of the scene. For this picture she was probably
less than 10 ft from my camera. The wide angle lens emphasized her and still
included the complete scene behind her.
The characteristics I like with a wide angle lens are both the terrific depth
of field and the fact that subjects close to the camera appear much larger and
more important than the areas that are just a little bit behind them. You can
see that clearly here, where Ellen took off her shoes, rolled up her pants,
and waded into the stream.

Hiking back to the ship I was following a couple of our photographers and realized what a great spot we were walking through. The light, the scale of the people to the trees, the road--they were all perfect. I just raised my camera up from around my neck and grabbed the shot. Again, afterward I picked up a little more detail within the leaves by going to Image/Adjust/Shadows & Highlights. What a treasure that's turning out to be!

One of the most interesting and spectacular places of our expedition was when
we toured Glacier Bay. At the end of the bay there is an enormous glacier coming
down from the mountains and terminating right in front of our cruise ship. The
scene and its historical significance kept everyone spellbound.
I used a wide angle lens to capture this scene showing some of the people on
the ship looking at the glacier. When I was preparing this article I felt that
there needed to be a little something more in the foreground than I had in the
shot, so I added the bird that I photographed just moments before.
To bring the gull into the picture I first selected it with the Magic Wand tool
in Photoshop, then inverted the selection and went Edit/Clear to get rid of
the rest of the picture. With the Move tool I placed it where I wanted it on
the image of the glacier. Finally, I adjusted its size with Edit/Free Transform.
Yes, this is really an Alaskan gull. (The bird is now a permanent stock file
in my computer along with other birds, boats, and clouds.)

When parts of the glacier occasionally split off into the bay (it's called
calving) the excitement and the cameras roared to crescendos. We were, maybe,
just 100 yards or so from the base of the glacier. The views were awesome as
our ship, the Norwegian Star, circled and circled the area for several hours
of viewing.
But to me one of my most interesting pictures there was made with a Canon 400mm
lens--zeroing in to just a very tiny small area on top of the glacier.
There just was no way that you could have seen this with your naked eyes, unless
you had a good pair of binoculars (which I didn't think of bringing along
with me). Thank goodness for telephoto lenses!

One of my final shots in Glacier Bay was this view showing some of the ice
that had broken off the glaciers in the foreground and the mountains and clouds
filling the rest of the image. Without question I could never have picked up
this much detail without going through the above steps to multiply the intensity
of the sky and clouds, and then using Image/Adjust/Shadows & Highlights
to pick up more detail in the mountains.
But what I really want to demonstrate with this picture is the necessity of
filling up the composition vertically as well as horizontally when doing scenic
views. Too often when viewing photographers' portfolios I see pictures
that have all
of the interest in a narrow band through the center of the picture with nothing
much going on above or below it.

Leaving Glacier Bay we toured for several hours looking at the amazing vistas
that appeared all around us. Still a portrait photographer, I was watching the
faces of the people around me. Everyone was spellbound with the scenery. At
one point I was sitting in a guest cabin and looking out at some of my friends
on their veranda. When Ginny turned to speak to me I noticed the light wrapping
around from behind on both sides of her face. In an instant I picked up my camera
with the 28-135mm lens and made this snapshot from my viewpoint inside the cabin.
This is all natural light--no flash or reflectors! The high-key background
is a snowy mountain behind her.
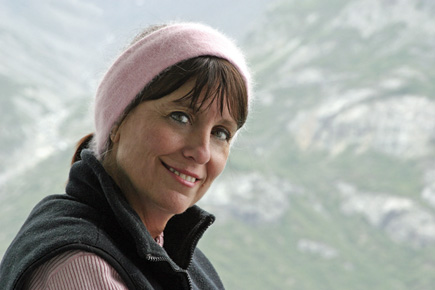
You can see in this next picture where Ginny was standing when I took the previous
picture of her. This time I called Ellen to join her and photographed the two
of them looking out from their veranda balcony. Once again I used my wide angle
14mm lens. Without it I would never have been able to capture this view. I was
only 2 or 3 ft from them!
But distance wasn't my problem here. What I had to do was to balance the
low light between the two of them under cover of the ship's deck above
us with the brightness of the light in the scene behind them. I managed to do
this with the aid of both the Canon EOS 10D's built-in flash and some
more Photoshop magic.

Had I used the flash at full power I would have lost the naturalness of the
ambient light. To correct this possibility I lowered the intensity of the built-in
flash two f/stops below its normal power by the simple adjustment of a control
on the camera.
Next, I wanted to deepen and intensify the color of the scene that they were
watching. To do this I learned from several of the other instructors on our
trip to first set the Background Layers icon in Photoshop to black and white.
Then, go to Layers/New Adjustment Layer/Levels, setting the Mode to Multiply.
This doubles the intensity of the image, darkening it and saturating the color.
Finally, with the Paintbrush tool you can eliminate the areas that you don't
want intensified by painting with black and/or adding back areas that you may
have crossed over inadvertently by painting with white. Once again, the results
amazed me!
Tips For Scenics
1. Fill up the entire frame of each image with detail that
keeps the whole composition interesting.
2. Keep the horizon line above or below the center of the picture.
A horizon line going through the center of a picture seems to cut it in half.
3. Keep the horizon line straight. It's so easy to correct
that in Photoshop if necessary. There's nothing so disturbing than a horizon
line that slants up or down.
4. Try for backlighting or sidelighting. Frontal lighting just
can't capture the depth and texture of a scene.
5. Try to place something in the foreground to show scale and
to create more depth.
- Log in or register to post comments


