Light & Exposure Photography: Seeing & Photographing Shadows Using A Key Visual Element


All Photos © Jim Zuckerman
Being aware of shadows allows you to incorporate them into your work in artistic ways when they are attractive, complementary or perhaps dramatic. I consider the landscape in Namibia (#2) dramatic while the shadow of the palm tree in the Dominican Republic (#3) complements the scene. In both of these images, I included the shadows because they contributed to the graphic design of the photograph.


Paying attention to shadows also means you can avoid photographic situations that are unattractive and unflattering to the subject. The woman tending cattle in an 1855 pioneer settlement recreation in Missouri (#4) was taken when the sun was high in the sky. Look at the shadows on her face and on the cattle. This is what you want to avoid. Yes, fill flash can open up the shadows, and yes, you can work on images like this in post-processing (as I did) to restore detail back into the dark shadows, but the pictures will never be truly successful. They will never fall into the category of fine art.

The portrait of a warrior of the Angami tribe in Nagaland, India (#5) also has a problematic pattern of light and dark on his face. The horizontal nose shadow isn’t good. The sun was too low in the sky and I didn’t take the time to ask him to angle his head differently. The nose shadow should fall across the corner of his mouth (see below: Rembrandt light).

Texture
One of the fascinating aspects of photography is the realization that shadows create texture. When light is striking a subject from the side, every detail of the subject that sticks up high enough catches the light on one side and makes a shadow on the other. A good example is the Texas horned lizard (#6). I lit this with a ring flash held off to the side of the reptile, and the 90° angle of light caused the creation of pronounced texture on the reptilian skin and also on the rock. This gives the picture a greater sense of depth and dimension even though it’s a two-dimensional image.

One of the characteristics of sunrise and sunset lighting is that it skims the surface of the land, thereby creating dramatic texture. The Navajo sandstone pictured in (#7) is an example. The reason the surface of the rock looks like a work of art is largely because of the angle of the light. The golden color is beautiful, but if the sun had been high in the sky this wonderful texture would essentially disappear. Similarly, the texture of the cracked desert floor in Death Valley (#8) is pronounced and helps make the image dynamic.


Can shadows seen during the middle of the day in bright sunlight create dynamic shadows that, in turn, introduce texture to a picture? The answer is yes, but this happens usually when the subject is vertical. In essence, the sun is affecting the scene as if it were coming from the side. You can see what I mean in the wall called Organ Pipes in the Namib Desert of Namibia (#9). Look at the dynamic role the shadows in this picture play. Nearby, I photographed an ancient petroglyph (#10) and a sun high in the sky provided the texture on the rock to make the giraffe stand out, and the rock itself has a wonderful surface made visible by the fact that the light was skimming the rock face and making every minute particle cast a shadow.


“Patchy” Light
To be aware of shadows means that you must know when shadows are detrimental to a picture. Such is the case with patchy lighting, and this is never more obvious than when you take pictures of a forest. Patchy lighting is problematic for several reasons, and one of them is that it sets up a pattern of light and dark that dominates the attention and diverts the focus from the subject. Another issue is one of contrast. This is more applicable when the sun is high in the sky because a digital sensor (and film in the past) is not capable of rendering good detail with a large discrepancy in light values. When the sun is close to the horizon, this is much less of a problem, but the pattern of light and dark is still unattractive on most subjects. There are always exceptions, but this is true most of the time.
In looking through my photo library to show you an example of patchy lighting in a forest, I didn’t have one. I have spent my entire photographic career avoiding this kind of light, so I forced myself to go to a nearby forest and take a few bad pictures! To drive home the point, study (#11, #12, and #13). These are completely unedited, Raw files taken at 11:30AM at the end of June when the sun was high. None of these are award-winning compositions, but look at the contrast, the pattern of light and dark, and how overexposed the highlights are. I chose to expose correctly for the shadows, and because of the significant contrast the highlight detail became too light and the deep shadows are virtually black. Had I exposed for the highlights, the shadows would be mostly black. If I tried to compromise between the two, the pictures would still be disappointing because the digital sensor can’t handle this much contrast.
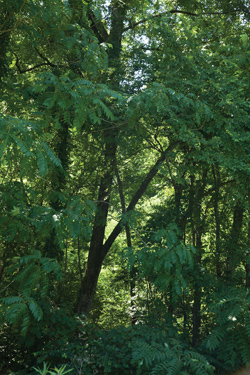


The point is you should avoid patchy lighting at all costs. If the sun is weak because it’s diffused by a hazy sky and/or it’s close to the horizon, then patchy lighting isn’t terrible. The model I photographed in Seoul, Korea is an example (#14). I don’t like the pattern of light on the architecture because our eye seeks out those hotspots, but this image isn’t nearly as awful as the forest images.

Shadows And Faces
Facial shadows are crucial in any kind of portraiture, whether it’s formal or informal, indoors or out. Learning what types of shadows are attractive and complimentary and what shadows are not is an important step in taking successful people pictures.
There are 4 types of lighting on a face that are considered attractive. They are front lighting, sidelighting, Rembrandt lighting and butterfly lighting. These are normally thought of as studio types of light/shadow scenarios, but they certainly are applicable outdoors as well.
Front lighting is characterized by shadow-less light. The light is either very diffused such as the shade I used in photographing two young ladies wearing masks (#15). Notice that there are no shadows on their faces. I used the same kind of light when I photographed a woman near Montreal (#16). I asked her to stand in the shade of a tree to take advantage of the shadow-less front lighting, and I think this was the most complimentary type of light for this subject.


A self-portrait in black and white I made in 1971 (#17) was done with sidelighting. I placed the light—in this case a simple photoflood that consisted of nothing more than a $10 hardware store reflector and a light bulb—at a 90° angle to the lens axis. Notice how the light divides my face, and also notice that the shadow is solid black. I purposely wanted this kind of drama.

I used off-camera flash in photographing a model in Venice (#18) and in this case I balanced the artificial light with the ambient light of dawn. That enabled me to see detail in the shadow side of the face. Using a gold reflector as a fill light, I also used sidelighting to make a portrait of a young woman in India (#19). We can see all the detail in her face perfectly, and the division between light and shadow is subtle. Compare this image with my self-portrait and you see the range of effects possible with sidelight.


Another approach to using sidelight is to have the subject turn away from the camera, as I did in (#20). The light source in this case is a window, and from the camera’s point of view the light is coming from the side. As such, it created texture and dimension in this model’s face.

Rembrandt light is a term that is derived from the type of illumination the famous Renaissance artist used over and over again in his paintings. Carefully study the light on the woman’s face in (#21) a painting Rembrandt made in 1632. The shadow from the nose crosses the corner of the mouth, and this creates an inverted triangle of light on the cheek opposite the light source. The way you duplicate this is to place the artificial light source at a 45° angle to the lens axis, and at the same time it should be about 3-4 feet away from the subject and 3 feet above the subject’s face, figure A. I used the same type of light in photographing a model (#22) but my lighting was more contrasty than Rembrandt’s. Nevertheless, notice how the nose shadow crosses the corner of the young lady’s mouth and how the inverted triangle of light on her cheek is on the opposite side of her face from the light source.


Outdoors, you don’t place the light. The sun moves across the sky in a predictable path, and the way photographers use it is to orient a model in relation to the sun. For example, when I photographed a woman in Gujarat, India (#23) I asked her through my interpreter to angle her face in such a way that I was able to capture Rembrandt lighting from the mid-morning sun.

Butterfly lighting was popular in the 40’s and 50’s for dramatic portraits of movie stars. It is characterized by a shadow under the nose that resembles a butterfly (#24). To create this kind of shadow, the light must be positioned above the subject’s head and forward slightly so the nose shadow forms just above the lips. If you don’t want the shadow to be so harsh and devoid of detail, a reflector fill will bounce light into the face and open up the shadows.
Trans-Illumination
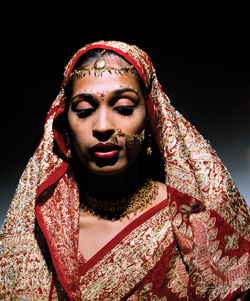
When light comes through a translucent material such as a leaf, thin fabric, a sheet of paper, etc. the effect is called trans-illumination. It’s a stunning type of light, and the potential for capturing unique shadows is significant. The shadows on the rigging on the tall ship (#25) is an example. In this instance the shadows could only occur with a low angled sun because the sails were vertical. In the photo of the frog on a leaf (#26) I used flash to create the brilliant backlighting so the silhouette of the amphibian was defined dramatically. Because I placed the light close to the leaf, this gave me the ability to use f/32 to make sure the leaf was sharp edge to edge.


This kind of light can be extremely effective in photographing models wearing sheer clothing. I used this kind of light when I photographed a model in Death Valley, California (#27). Just after sunrise, I positioned myself so the sun was directly behind the subject. The light not only created a shadow of her body, but the shadows on the sand extended toward the camera to create strong leading lines that bring our eye right to the model.

Shadows As Art
Many images are embellished and dramatized when bold and beautiful shadows are incorporated into an image. The shadows can elevate a picture to fine art. Landscape photographers are drawn to shoot sand dunes simply because of the play of light and shadow on the stunning contours of the sand as you can see in (#28). Namibia is famous because it has the largest sand dunes in the world, and they happen to be orange. The juxtaposition of color—orange and blue—is visually arresting, and the dramatic shadows seen at sunrise and sunset are amazing.

I was in the right place at the right time to photograph a paraglider in front of one of the dunes at sunset (#29). The shadow on the huge dune was beautiful, and it made an incredible backdrop. As the pilot steered his way down, I waited until he was in front of the shadow to shoot. The sunlight on the canopy made it stand out against the darker background.

Shooting dunes from the air is an exciting proposition, too. I hired a small plane with the provision that they take the door off for an unobstructed view. I asked my pilot to veer away from dunes that had vegetation because I wanted the pristine look of light and shadow only. The artistry of multiple S-curves and C-curves in the sand was amazing (#30).

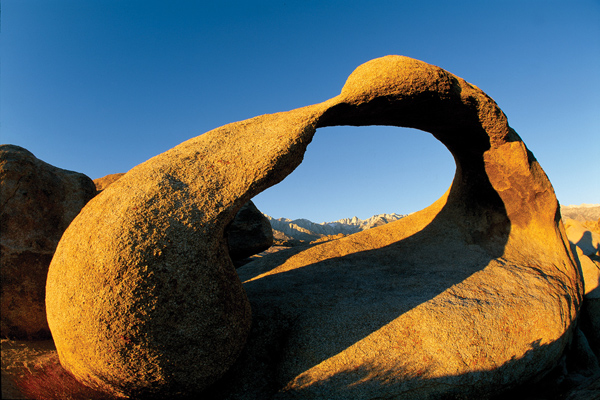
Sometimes I like to incorporate my own shadow as an interesting element as I did at the Great Sand Dunes National Monument in Colorado (#31). Shadows of other types of subjects can add to the artistry of an image like the sea lion in the Galapagos Islands (#32) and the pronounced shadow of the yucca at White Sands National Monument in New Mexico (#33). In all landscape work, when the sun is low in the sky, shadows can play a large role in your compositions. The arch in the Alabama Hills near Lone Pine, California (#34) that I took at sunrise makes this point.


- Log in or register to post comments


