How To Create A B&W Infrared Effect From Any Image


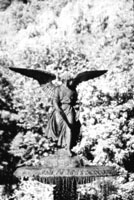
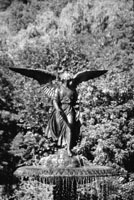
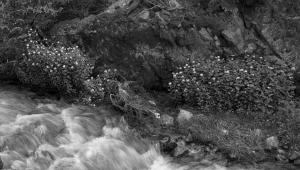
To achieve the eerie, glowing effect of infrared black and white film, I applied several techniques in Adobe Photoshop.
Photos © 2001, Howard Millard, All Rights Reserved
Are you attracted to the mysterious, otherworldly glow of black and white infrared film? But you've heard that it's a bit of a hassle to shoot and print. Well, here's how to emulate that exotic infrared (IR) look digitally starting with any color original.

Why not shoot IR film to begin with? Kodak High Speed Infrared film is a challenge. First, to avoid fogging, it should be stored in the refrigerator and must be loaded and unloaded in the darkroom or a changing bag. Then, for the best effect, you must shoot with a deep red or opaque filter over your lens. Once you've focused, you must re-focus the lens manually to the infrared focus point. Since your camera meter doesn't measure IR light, it's advisable to bracket exposures widely. In the field, you must load and reload your camera in a light-tight changing bag. After the film has been processed, the negatives are extremely contrasty and often require extensive dodging and burning to get a good print.


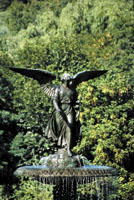
I started with this original color 35mm slide shot on Fuji Sensia II and scanned it on a Polaroid Sprintscan 35 Plus scanner at 2700dpi for a 26MB file.

The Digital Option
While I sometimes enjoy these challenges, I'm delighted to be able to emulate the IR effect digitally. Now, I can take any color slide, print, or negative I've shot anywhere, anytime and transform it into a monochromatic IR print. You can even start with a file from a digital camera. Here's how.

First, the infrared effect is most pronounced in landscapes with lots of green foliage, so choose a color original with this kind of subject. The foliage reflects high levels of infrared light and causes the glow associated with IR film. If you're starting with a print, negative, or slide, scan it in RGB color mode. Once you've got the digital file, open it in Adobe Photoshop to follow the steps outlined here, or use another advanced image-editing program. Always work on a copy to preserve your original scan. In fact, with this technique, it is a good idea to make two or three copies in order to try different settings in search of the effect you like best.

Next, duplicate the background layer by dragging it to the New Layer icon at the bottom of the Layers palette or by choosing Layer>Duplicate Layer. The new layer will automatically be called "background copy." You can accept this name, but I prefer to change it to "IR layer." On both the Mac and Windows platforms, you can rename a layer by clicking on it in the Layers palette and then choosing Layer Properties from the Layers palette menu (accessed by the little arrow in a circle at the top right of the palette). Then type in the new name in the dialog box.

Channel Mixer
With the IR layer activated, choose Image>Adjust>Channel Mixer. Check the Monochrome box at the lower left of the Channel Mixer. This will change the Output Channel at the top to "Gray", indicating that you are outputting a gray scale black and white image. The Channel Mixer allows you to decide which amounts of the red, green, and blue channels will be used to create a black and white image. Since green foliage is what becomes prominently white with IR film, drag the green slider all the way over to the right to +200 percent. Don't worry if your screen goes totally white or black during these operations--as you move the other sliders, you'll regain more normal tonalities.

Try setting the red and blue channels to about -50 percent each, then experiment with different mixes of these two. For example, for one photo I found that -30 percent red and -70 percent blue worked best. You'll now begin to see the IR effect: Your screen image is now black and white and, as you move the sliders, the foliage becomes lighter than normal. In general, you should adjust the percentages so that their total equals 100 percent, as it does with -30 red, +200 green, and -70 blue. This is not a hard and fast rule, though. The Constant slider near the bottom of the Channel Mixer dialog box changes brightness. While I usually prefer to leave it at 0, you may find it useful when the final mix of percentages is more or less than 100 percent.

That IR Glow
Now it's time to add the IR glow effect, but we're going to add it to the green channel only. With the IR layer still active (highlighted in the Layers palette), switch from the Layers palette to the Channels palette. If the Channels palette tab isn't visible on your screen, choose Window>Show Channels. In the Channels palette, Click on the green channel to activate it.

Now, blur this channel with Filter>Blur>Gaussian Blur. The radius amount will vary with the size of your file, so experiment. As a starting point, try 5 to 20 pixels for a 25MB size image and 2 to 10 pixels for a 5MB image. Your screen image will now become totally blurred and unrecognizable, but don't worry.


This is the standard Photoshop conversion of my color original to black and white via Image>Adjust>Grayscale.

Blending Mode
Choose Edit>Fade Gaussian Blur. Click the preview box and change the mode of the blurred channel to Screen or Overlay. This is the Blend mode which controls how each layer will interact or blend with the layers below it. Since the default Blend mode is Normal, this is what you should first see in the mode window in the Fade dialog box. Click on the double arrows and then select "Screen" or another mode from the mode pop-up menu. You'll probably want to re-adjust the Opacity slider according to the mode setting you've chosen. Try Screen first, then Overlay. Sometimes, Overlay provides better contrast and richer blacks, but sometimes it makes the image too dark. Again, you have to experiment. Try other mode settings, too, like Hard Light or Soft Light.

While you're still in the Fade dialog box, drag the Opacity slider to the left to reduce the effect of the blur. The amount varies with each image and with the amount of blur you applied originally, so try a number of different settings. In some images, 5 to 25 percent works well, in others, 80 percent.

Once you've achieved the look you want, flatten the image via Layer>Flatten Image and convert it to black and white: Image>Mode>Grayscale. Remember at the outset I suggested that you make several copies of your original. Now is when you might want to haul some of those out and repeat the steps mentioned trying a totally different Gaussian blur, mode, and opacity settings.

And Grain, Too
Kodak IR film exhibits pronounced grain while Konica IR film does not. If you want to add a grain effect to your digital IR image, choose Filter>Noise>Add Noise. The Distribution-Gaussian setting usually works best while the Amount varies according to the size of your image. Play with the slider until you see the look you like.

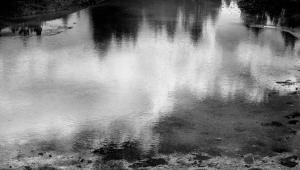
Another hallmark of an IR image is dramatically darkened skies. If your photo includes sky, you can darken it with the burn tool and a soft edged brush. If you'd like to add clouds, select the sky area loosely and choose Filter>Render>Clouds.

Finally, for the richest results from a desktop ink jet printer, convert the black and white image back to the Color mode. It will still print in black and white, but you'll be using all the inks instead of just black for a smoother, deeper print. Choose Image>Mode>RGB for most desktop printers.

These operations take much longer to describe than they do to actually perform. So open up one of your favorite color landscape photographs and step in to the eerie and dramatic world of infrared.

Contact
Adobe Systems Inc.
345 Park Ave.
www.adobe.com

X