Corel’s Painter IX.5; Transforming Images Via Software
 Would
you like to transform your photographs into striking works of art echoing oil
paint on canvas, charcoal on textured art paper, woodcut, silkscreen, watercolor,
pastel, pencil drawing, even mosaic tiles or scores of other natural art media?
Whether for your own artistic expression or to broaden the services you offer
to clients, creating naturalistic art directly from your photographic images
is one of the compelling capabilities of Corel's Painter software, recently
updated to Version IX.5. You might start by using the new automatic commands
in Version IX.5 to create specific art effects, or, with a bit of practice,
you can trace and paint over your original photos with digital natural media.
Combining artistic effects with your photographs can give you an extra edge
in portrait, wedding, and commercial work. Use your photo as a background and
trace over it with digital pen, pencil, brushes, watercolor, crayons, chalk--any
of many different media. Then remove the original photo entirely, or blend it
with the painting effects. At hand in Painter IX.5 you'll find a combination
of some 900 brushes with 30 different media on a huge library of 600 paper and
canvas surfaces, all offering tremendous depth and versatility.
Upgrade Improvements
Improvements found in Version IX.5 include greater stability and improved speed
when laying down effects with brushes. Corel claims that the average speed has
doubled and that, for some brushes, it has increased tenfold. I still found,
though, on my 3-year-old dual processor Mac, that some brushes are rather slow,
especially when working with large files. Also, while Painter is a fantastic
program unparalleled in its scope and depth, it does take an investment in time
to learn. Version IX.5 works with both Mac and Windows, and supports color management
on both.
If you use Painter intensively, you can assign keyboard shortcuts for your most
frequently used commands. New Brush Control palettes allow you to quickly fine-tune
brush settings without having to go back into the Brush Creator, as you did
with previous versions. The handy color Mixer palette has been retained from
the previous version, and Painter now remembers all of your settings between
painting sessions. Making selections within Layers is much improved, and the
compatibility between Corel's Painter and Adobe's Photoshop layers
has been enhanced, although adjustment layers from Photoshop are not supported.
You must merge or flatten an adjustment layer in Photoshop for its effect to
be visible once it is exported to Painter. Version IX.5 does offer the equivalent
of many of Photoshop's layer blend modes, called "layer composite
methods," and adds a few of its own.
Let The Painting Begin
Here's how to get started with Version IX and IX.5: Fortunately, Painter
can work with several different file formats, including JPEG, TIFF, and the
native Photoshop and Elements PSD. So set your photo to the resolution you'll
print at, say 240 or 300 ppi. If possible, keep the file size down for the best
performance. Start with 5-10MB for print, 1MB or under for the web. Make a copy
of your original and open it in Painter IX.5 using the File>Open command
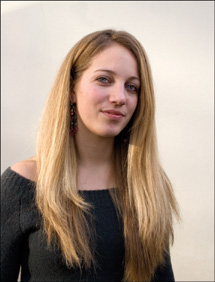
from the menu bar. I began with a portrait of Kayla (#1), 4x6" at 300
ppi.
 |
|
|
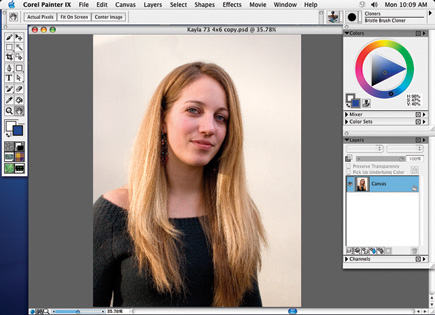
Next, set the palettes to their normal positions by choosing Window>Arrange Palettes>Default; then Window>Brush Controls>Show General; then Window>Library Palettes>Show Papers (#2). Next, choose File>Quick Clone. This will create a new "clone" file which is a solid white background with a digital "tracing paper" overlay containing a copy of your photo added on top, at about 25 percent opacity. You will draw or paint on this tracing paper so you can follow the outlines of the photo. Keep the original photo open in the background, but work only on the clone copy (#3). You don't need to see the original--you can move it behind the clone--but the original must remain open as the source for your brush strokes.
 |
|
|
 |
|
|
To the upper right of the Painter window is the Brush Selector (#4). Click on the down arrow to the right of the square containing a soft-edged black circle and go down the list to select Soft Cloner. This brush will yield a very delicate, dreamy high-key effect. In the properties bar at the top of the window, I chose a size of about 90 and an opacity of 3. To set a precise number, you can click on the arrows at the end of the slider bar. Unlike Photoshop, very low opacity settings are used in Painter to transform photos into brush strokes.
 |
|
|
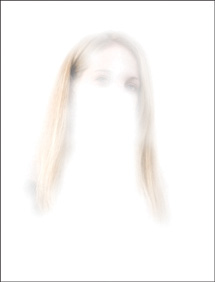
Make a few light strokes around the edges of the subject, using the light tracing paper image of your photo as a guide (#5). Then move to fill in other areas of the image. To increase the color saturation, paint over the same area again. Check your work periodically by switching off the tracing paper. Do this by clicking on the icon at the top right of the clone image window, which looks like overlapping white and black sheets of paper. Now you can see your brushwork over the plain white background. Click again to turn the tracing paper back on. You can also use the keyboard shortcut Cmnd/Ctrl-T.
 |
|
|
Draw your strokes in the direction of the lines of the subject, or for any
effect you want. Reduce the brush size to paint in smaller details. To enlarge
a portion of the picture, you can use the zoom slider at the bottom of the clone
image window, or use the Zoom tool, which works like the one in Photoshop. If
you make a mistake, choose File>Undo (or Cmnd/Ctrl-Z) to revert to the previous
state. Unlike Photoshop, each time you use the Undo command, it continues to
undo up to the number of steps set in the Painter preferences, up to a maximum
of 32. You can also use the Eraser tool--I suggest setting it at a low
opacity.
After fine-tuning the painted image to create a new delicate, dreamlike portrait
(#6) I chose File>Save and saved it in the Photoshop format. If you want
to increase the saturation or contrast, you can also add Hue/Saturation, Levels,
or Curves adjustment layers in Photoshop. I suggest that you first experiment
with all the cloner brushes, trying different brush sizes, opacity, and resaturation
settings. Incidentally, though some work more successfully than others, all
the Painter brushes can be used for cloning.
 |
|
|
A few extra mouse clicks are required for the setup.
Instant Woodcut
Now let's do something easier. Almost at the click of a button, Painter
will transform the photo of your choice into any number of media effects, here
a graphic woodcut. Starting with an image of a sculpted lion adorning a wall
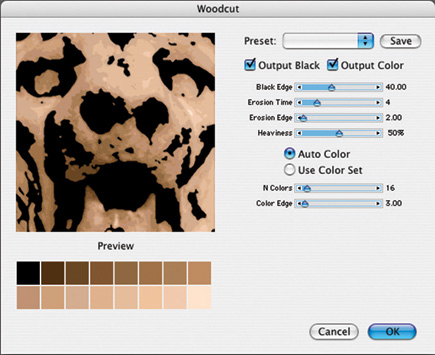
of the NY Public Library (#7) I opened it in Painter IX.5. Next, I went to the
menu bar and chose Effects>Surface Control>Woodcut which brought up the
dialog box (#8). Note the range of slider controls which allow you to vary the
effect, such as the width of the line.
 |
|
|
You can let Painter choose colors for the woodcut based on the original photo, as I did here, by choosing the Auto Color radio button, or you can select another color scheme by clicking the Use Color Set option. Under the preview, Painter displays the set of colors it will apply to the woodcut. You can vary the number of these with sliders and see them in real time.
 |
|
|
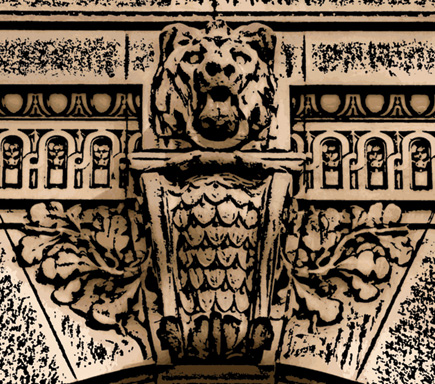
Once you have a look you like in the preview window (you can slide the view around with the Hand tool), click OK. For this 5x6", 300 ppi, 8MB file, it took about 15 seconds to process the woodcut effect (#9). The result is a strong graphic with lines that look like they were carved by hand. Next, I saved the woodcut in the Photoshop file format. As with the previous example, you can then vary color, saturation, and contrast by adding Hue/Saturation, Levels, or Curves adjustment layers in Photoshop or another image editor. Painter creates the woodcut as a new file while preserving the original photo unaltered in the location you opened it from on your hard drive.
 |
|
|


