My nephew is a photographer and I helped him to make the design of his own studio, I have taken a couple of ideas from this post as they seem interesting and in this way we could save some money. We also decided to make a Bathroom Remodel Towson to make a surprise for his wife, she wanted to change the bathroom but could not find a good company that would have good rates and highly skilled personnel.
Studio In A Small Space; Big Studio Effect Without The Cost
Much of my portrait and fashion photography is done on location, but living in a place like Colorado the models (and the photographer, too) just aren’t always in the mood to stomp around in the cold weather and snow. That’s when a studio comes in handy. Some photographers just prefer having complete control over the lighting. Instead of the hassle and cost of renting a studio, why not create one using a room you already have? The real secret, if there is any, of making portraits in limited spaces is having the right equipment with gear that doesn’t have to be expensive.
 |
 |
||
|
|
Space: A Final Frontier In Lighting, Too
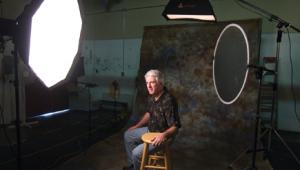
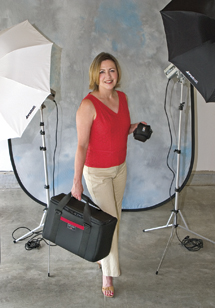
The first thing you need for an in-home (or in-apartment) studio is space. You don’t need much, but more is always better than less. You can put a studio in a basement, if you have one, garage, spare bedroom, or just use the living room, as Mary and I did when we were getting started many years ago. Back then, we set up the lighting equipment and background for each shoot and then had to knock it down and pack it away afterward. That’s not the best way to shoot but it worked because in creating a studio from existing space you need to be both inventive and flexible. Some of the images accompanying this article were made in my basement using an 8x9-foot space sandwiched between my model train layout at (what would be) camera right and an old sofa on the left. In the illustration showing my original setup (top, left), you’ll even see a water drainpipe on the left edge of the frame.
No matter where and what kind of space you use, some compromises are inevitable. Using the basement the way I do now means the gear can remain set up from shoot to shoot, saving time, but it also means I have to deal with low ceilings. Shooting in the garage (photo top, right), which I’ve also done, offers high ceilings, providing more flexibility in lighting setups, especially the ability to use booms and hairlights, but that is not a viable option for me because of the local weather in the winter. In more temperate climates, this could be an ideal solution, if your cars don’t mind being put outside. (You can see some of my garage shots in “Quantum’s Leap,” December 2004 issue of Shutterbug or online at: www.shutterbug.com.)
Another ceiling-related issue is its color. In my basement studio, I have joists and subfloor above the subject that creates a light trap, avoiding reflecting any unwanted light falling on the subjects. Some photographers who have finished drywall ceilings in their studios paint them black to avoid reflections, but that may not be a permanent solution if you occasionally have to convert that space back for living. In that case, you might consider using Westcott’s (www.fjwestcott.com) Scrim Jim (see the “What’s a Scrim Jim?” sidebar) covered in Black Block fabric and strategically placed to avoid unwanted reflections that would ordinarily be caused by a light-colored ceiling.
This year, I decided that I wanted to shoot full-length shots and the answer was to clean up some of the junk on the opposite side of my basement from my original studio and pose the models in the space where I used to stand. This produced a clear space of 10x10 ft. Not a huge increase in space but bigger than my first try and one that will have to work for a long, long time. I am using that space to test lighting products for Shutterbug as well as shooting glamour photographs for my 2010 book on the subject from Amherst Media. Full-length poses require wider-angle lenses than I might prefer or would have used outdoors, but when working in smaller spaces, as I said, compromises are required.
Tip: Making wider-angle lenses work requires more close attention to camera height and sometimes I find sitting in a chair to photograph the model works best. You can use whatever contortionist trick works for you as long as you are not shooting down on your subject with a wider-angle lens. If you do, it will create unflattering foreshortened and distorted portraits with disproportionate head sizes.
 |
Putting It All Together
Here’s a list of all of the gear I’m currently using for portrait sessions in my 10x10-foot basement studio:
Lighting
In my basic setup, lighting is provided by three monolights. The main light is a Flashpoint II 620A
(www.adorama.com) monolight that produces 300 ws output. It has continuously variable power that lets me tweak exposure by adjusting the flash power instead of my camera’s aperture so I can control depth of field. Fill light is another Flashpoint II 620A that produces 150 ws that also features stepless power output control from Full down to 1⁄8 power. A Flashpoint II 320A monolight is used as a hair or background light. If you’re just getting started, Flashpoint offers a lighting kit that includes a 320A monolight, umbrella, and stand for only $129.95.
Light Modifiers
Umbrellas and light banks can have a big effect on the quality of the light produced in your temporary studio. For the later portrait sessions shown in my 10x10 studio, my main light was fitted with a Plume Ltd. (www.plumeltd.com) Wafer light bank whose slim profile makes it practical for use in small spaces and on location, yet produces amazing light quality in a compact package. Plume does not make a speed ring to attach the Wafer to the Adorama monolights, but does for many other brands. The one I use was custom made by sawing off the mount of a Flashpoint II’s reflector and adapting a Photogenic speed ring. I use a 45” Westcott Optical White Satin Umbrella for fill and an inexpensive Flashpoint II Snoot ($39.95) on the hairlight.
Light Stands
One old studio rule of thumb is that you can never have too many light stands. Most of the heavy lifting in my 10x10 basement studio is done with two Flashpoint Heavy Duty Pro 10-foot ($54.95) and two Flashpoint Heavy Duty Pro 9-foot Air Cushioned light stands ($49.95). I have probably another half-dozen stands that I use to hold reflectors and scrims but the Flashpoint stands are my workhorses because of their rugged construction—even though I can rarely extend any of these stands to their full height because of the low basement ceiling.
Backgrounds And Stands
I use Adorama’s affordable Belle Drape backdrops. For a background stand that perfectly complements Belle Drape muslins, JTL’s (www.jtlcorp.com) $139.95 B-1012 stand is perfect. It expands to 12.6 ft wide using the four extension poles provided. For the 70” wide scenic background shown in the setup photograph, only two of the support sections were required. When I set up a 10x12 or 10x24 Belle Drape, I use three or four sections.
Digital Darkroom To The Rescue
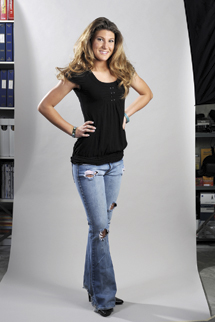
Many problems of shooting full-length poses in my basement studio were partially solved when I cleaned and flipped my basement studio space, but not all of them. While muslin backgrounds can be softly shaped to fit the available space, seamless paper backdrops firmly resist such treatment, so while a 53” paper background fits my space, the 107” version won’t. I could shoot on the narrow background but the images would have to be rescued later in the digital darkroom. So, here’s what I did:
Step 1: I photographed Haley standing in front of a Savage Soft Gray seamless paper background using three of Adorama’s Flashpoint II monolights. Because of her full-length pose and the narrow 53” seamless paper, I was unable to capture a full background in the same frame as the model.
 |
 |
|
|
1
|
||
- Log in or register to post comments


