Ulead’s PhotoImpact 12; A Powerful Photo Editor At An Affordable Price
 Adobe's
Photoshop is unarguably the most popular photo editor in use today, although
not everyone needs its myriad of features or is willing to spend the money to
get them. There are options out there, among them Ulead's PhotoImpact
12. It's a feature-packed photo editor that may well offer you both the
power and efficiency that you need, and do so at a very affordable price.
It may surprise you to learn that Adobe's Photoshop and Ulead's
PhotoImpact have a shared history. When the first Photoshop was released it
was Macintosh-only software, as there was not yet enough demand for such a product
among Windows users. As demand for a Windows version grew, Adobe's software
engineers, accustomed to designing graphic software for the Mac, were running
into delays in creating a Windows version. At the same time, Ulead had already
created a successful Windows photo editor, marketed under the name "Aldus
PhotoStyler 2.0." Adobe purchased PhotoStyler, along with the source code
used to create it, and used this information to help create the first version
of Photoshop for Windows. Ulead, now operating under a limited (and long since
expired) non-compete contract with Adobe, made some changes to PhotoStyler 2.0,
and reintroduced it as Ulead's PhotoImpact 3.0.
Unique Interface Options
The first thing you'll notice when PhotoImpact 12 opens is a set of interface
options, with eight available. These include:
1. ExpressFix mode (for making quick fixes to images)
2. Full Edit mode (all of PhotoImpact's tools and features are available
here)
3. Web mode (for designing web pages)
4. Video & DVD mode (for creating DVD menus with PhotoImpact's Menu
Maker Plug-in)
5. Manage Photos (opens Ulead's photo management program, Photo Explorer
8.6)
6. Get Photos (opens an interface for downloading photos from digital cameras
and card readers)
7. Create New Image (starts PhotoImpact with its New File dialog box already
opened)
8. Photo Project Wizard (opens a wizard-guided interface for designing greeting
cards and CD/DVD labels)
I'll take a closer look at the two most commonly used interfaces, ExpressFix
mode and Full Edit mode.
ExpressFix Mode
ExpressFix mode opens with a before and after view of your photo. Available
features include two single-click auto adjustment filters (Reduce Noise and
SmartCurves), thumbnail-guided access to six adjustment categories (Overall
Exposure, Subject Exposure, Color Cast, Color Saturation, Focus, and Beautify
Skin), and full access to all of PhotoImpact's photo-editing adjustments
and filters (#1).
 |
|
|
The thumbnail-guided adjustments provide a convenient method of correcting common problems, particularly when working with large numbers of photos. Each of the six categories provides thumbnail examples of suggested changes; clicking on a thumbnail applies the changes to your image. If the thumbnails did not produce exactly what you had in mind, there's a "Customize" button that gives you access to more detailed slider controls. Images #2 and #3 demonstrate an image adjusted with just two thumbnail clicks in ExpressFix mode.
 |
|
|
|
 |
|
|
Full Edit Mode
Full Edit mode is where PhotoImpact's true editing power comes to the
fore. Well over 100 adjustments and filters are made available in PhotoImpact's
"Adjust," "Photo," and "Effects" menus.
With almost every adjustment or filter, thumbnail samples of modifications are
provided. The thumbnails are not designed to replace fine-tuning, but to make
the process more productive. When clicking on a thumbnail, slider controls are
automatically adjusted to show the changes that you've just made. This
provides an instant visual reference as to exactly how the filter works. You
can then fine-tune these changes as much as desired, to get the exact look that
you have in mind (#4 and #5).
 |
|
|
|
 |
|
|
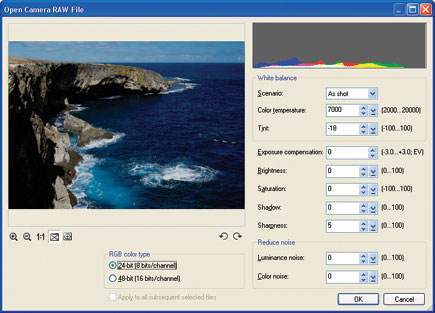
Digital Camera Raw File Support
PhotoImpact 12 includes a module for opening raw files in a variety of formats,
including Adobe's new DNG (Digital Negative) file format. Features include
a group of "Scenarios" (As Shot, Auto, Daylight, Cloudy, Shade,
Tungsten, Fluorescent, Flash, and Custom) which are used to set critical white
balance values such as Temperature and Tint. In addition, there are controls
available for setting Exposure Compensation, Brightness, Saturation, Shadow,
Sharpness, Luminance Noise, and Color Noise. Files can be imported into PhotoImpact
in both 24-bit and 48-bit RGB mode. A Batch Processing option, which applies
your settings to all of the raw files that you're importing, is also available
(#6).
 |
|
|


