Software Cinema DVD Training; Are They Effective Teaching Tools? A Walk Through Lesson With Steve Anchell
Even though I am pretty handy with Adobe's Photoshop there is always
more to learn and so many new avenues to explore. As a photographer, I want
to learn and play with as many of the new techniques as I can, applying those
to my own work that are most appropriate. And as much as I would like to take
a workshop with John Paul Caponigro or Eddie Tapp it just isn't possible
for me to take the time off from my own teaching schedule, photography, and
writing. It's not just the time, but the travel, lodging, and sundry expenses
associated with attending workshops that made me take a look at some of the
Software Cinema training DVDs.
Software Cinema has enlisted some of the best names in Photoshop education to
make top-quality training DVDs. The company was founded by Dean Collins, who,
sadly, passed away in late 2005. His skill as a photographer and sense for promotion
and organization helped to revolutionize the way photography was taught, then
and now. Software Cinema continues that tradition with highly affordable interactive
training through Training Camps, Products-On-Disc, Workshops-On-Demand, and
Video Presentations. After trying a few of the training videos I decided to
share some of the lessons to illustrate how these DVDs work.
The lesson I chose is from a DVD combo set entitled "The Painted Portrait
for Photographers: Watercolor in Painter and Photoshop & Expanded Portrait
Techniques with Painter" taught by Jane Conner-ziser. She is an accomplished
photographer, photographic artist, Photoshop expert, and, like all the Software
Cinema instructors, a consummate teacher.
While I don't personally use Corel's Painter the lessons dealing
with Photoshop interested me immensely, as portraiture is one of my favorite
areas of photography. Finding new ways to improve or enhance my technique always
appeals to me.
There are a total of 16 lessons on two DVDs, including the first lesson, Workspace
Set Up for Photoshop, which explains how to optimize a work space that lends
itself to facial retouching and enhancement. The lessons on this DVD are divided
between Painter and Photoshop. They also include Workspace Set Up for Painter,
Creating the Composition, Adding Interest with Painter, Textures, Classic Photo
Oil Painting, plus Tinting, Chalk, and Sketching Techniques in Painter. One
of the nicest features about the program is that when you switch back and forth
between the lesson and your own open version of Photoshop CS2 the lesson will
automatically pause.
The lesson I chose to summarize here teaches how to change the color of a portrait
and introduce or enhance highlights to create a pleasing, three-dimensional
image. As I worked it also taught me how to work with brushes, layers, and layer
masking techniques. In other words, tools and techniques are taught in context,
not in the abstract.
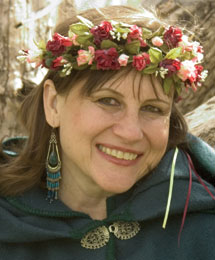
I selected my own image, Renaissance Woman (#1), to work on with the lesson.
All the steps are made following the suggestions in the DVD.
 |
|
|
1. I began by making a duplicate background layer, always a good idea.
2. I then, as suggested, used the Spot Healing Brush to clean up any obvious
blemishes. In my original image the light is high and behind the subject and
her eyes are in shadow. While the subject's left cheek (camera right)
has a specular highlight, the chin, forehead, and right cheek (camera left)
are all flatly lit. The color of her face is monochromatic with a slight green
tint, which could be made more appealing.
3. I opened the Swatches palette and chose the bright red in the upper left-hand
corner. On the Brushes Option bar I chose Normal mode, 3 percent Opacity, and
100 percent Flow. Finally, I clicked on the Brush Preset Picker on the left
side of the Option bar and chose a large diameter brush, around 250 pixels,
and moved the Hardness to zero. I applied a coat of "red paint"
to the shadow side of the subject's face and on the throat. I was encouraged
to put on more than I'd would like to see, giving the subject the old
sunburnt look (#2).
 |
|
|
I was encouraged to select a smaller brush to get into areas around the nose,
eyes, and lips, if necessary. (A fast way to change brush size is to press "["
for a smaller brush and "]" for a larger brush. If the brush line
is too hard, even with Hardness set on 0 percent, open the Brush palette, Window>Brushes,
use the small arrow on the upper right-hand side to enable expanded view, and
disable shape dynamics and enable smoothing.)
4. Now you clean up the overspray. To do this add a layer mask to the Red 1
layer by clicking the Layer Mask icon at the bottom of the Layers palette. It
looks like a gray square with a white circle in the middle. The layer mask will
allow you to use the Brush tool with white or black paint to erase or paint
back in the red color you just applied. Start with black as the foreground color
in the Tools palette.
On the Brushes Option bar move Opacity to 100 percent as you want to remove
all of the paint on the subject's eyes, hair, teeth, and other areas where
it is not desired. Use a smaller diameter brush to start, around 75 pixels.
You can change the size for small areas of detail. If you make a mistake you
can change the foreground color to white and paint the red back in. This is
where a Wacom tablet really shines--you can paint extremely fine areas
in or out with the pen. Zoom in and out as needed.
Take a look at #3. It may be subtle, but I have removed the red overspray from
the hair, eyes, teeth, green cloak, and head wreath.
 |
|
|


