Return Of The Polaroid Transfer; A Tutorial In Smart Objects And Filter Effects

Remember the Polaroid? You push the button and the print is ejected and developed right before your eyes. But rather than settle for these "straight" prints, for many years professional image-makers used the unique features of this technology to create wonderfully textured images as well. The process involved transferring the image from the original to damp watercolor paper. As a result the image took on a distinctly different look and feel to a standard Polaroid print.
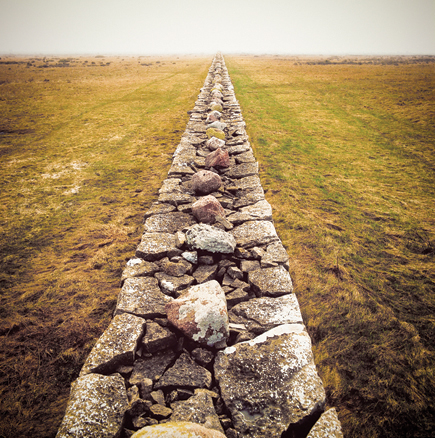
A popular technique a few years ago, Polaroid transer involved the migrating of the film image to a watercolor paper background.

Much acclaimed for its artistic appeal, the technique was not always predictable. There were three main problems--dark areas of an image often didn't transfer to the new surface, colors and image detail would bleed unpredictably (due to the moisture in the paper), and it was difficult to control how dark or light the final print would be. I know these problems intimately as it once took me 16 sheets of expensive instant film to produce a couple of acceptable prints.

This success ratio is not one that my budget, or my temperament, could afford. So I started to play with a digital version of this popular technique. I wanted to find a process that was more predictable, controllable, and repeatable. My first step was to list the characteristics of the Polaroid transfer print so that I could simulate them digitally. To me it seemed that there were four main elements:
·Desaturated colors
·Mottled dye
·Distinct paper texture and color
·The Polaroid film frame

To duplicate these characteristics on the desktop would mean that I could capture the essence of the Polaroid process. To create a workflow that made use of the smart technology in Photoshop CS3 would mean that the whole process would be nondestructive.

Step By Step
#1

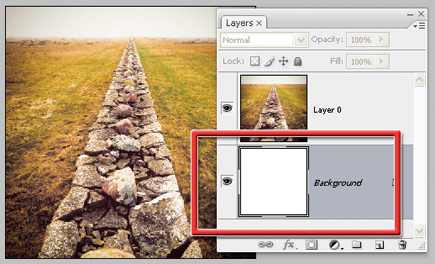
To start the process we will add a white background to the picture that will eventually accommodate the Polaroid edge or frame. Do this by creating a new layer (Layer>New>New Layer) and
then dragging this layer beneath the image in the layer stack. If the image layer is a background layer then you will need to double click it to change to a standard image layer before the move. Next, make sure that the default foreground and background swatches are selected (white = background) and then select the new layer and choose Layer>New>Background from Layer.


#2

With the Crop tool selected, draw a marquee around the whole of the image and then click drag the corner handles outward to extend the background layer (and the canvas) beyond the image area. As the rest of the technique requires us to make filter changes to the image that are destructive, we will now select both layers and convert them to a single Smart Object (Layer>Smart Object>Convert to Smart Object) before moving on.


#3

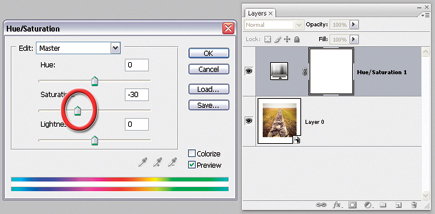
The Polaroid technique requires the watercolor paper to be slightly wet at the time of transfer. The moisture, while helping the image movement from paper to paper, tends to desaturate the colors and cause fine detail to be lost. These characteristics are also the result of the coarse surface of the donor paper. So the next step of the digital version of the process is to desaturate the color of our example image. In Photoshop this can be achieved nondestructively using the Hue/Saturation adjustment layer (Layer>New Adjustment Layer>Hue/Saturation). With the dialog open, carefully move the Saturation slider to the left. This action will decrease the intensity of the colors in your image.


#4

The distinct surface and image qualities of Polaroid transfer prints combine both sharpness and image breakup in the one picture. To reproduce this effect digitally and nondestructively, we will use the new Smart Filter options in CS3. My idea is to manipulate the look of the photo with a couple of filters to simulate the mottled effect of the transfer print and then use the Smart Filter Blend mode and Opacity settings to adjust how much sharpness (of the original image) or mottle (from the filters) is obtained in the final result. To do this I selected the Smart Object layer and applied the first of two filters, Paint Daubs, to the picture.
Though the look is not quite right, I found that by combining the effects of the Paint Daubs and Palette Knife filters I could produce reasonable results. When using these filters keep in mind that the settings used will vary with the style and size of your image. Use the ones in the example as a starting point only. This part of the process is not an exact science. Play and experimentation is the name of the game; keep in mind that you can adjust the settings any time in the future as these are Smart Filters. You might also want to try other options in the Artistic, Sketch, or Texture selections of the Filter menu.


#5

The next step is to adjust how these filter effects combine with the original photo. This can be achieved by either changing the filter's Blending mode or by adjusting its Opacity, or both. For the example image, a simple Opacity change (to 59 percent) was all that was needed, but don't be afraid to try a few different Blend/Opacity combinations with your own work. To access these options, double click the Settings icon at the right-hand end of the filter layer. This will display the Smart Filter Blending options palette. Here you can alter both Blend modes and Opacity of the selected filter and view the changes in the associated preview. Be careful though, as any filter selected that is not on top of the filter stack will be previewed without the combined effects of the other filters.


#6

The paper color and texture are critical parts of the appeal of the transfer print. These two characteristics extend throughout the image itself and into the area that surrounds the picture. To change the color of both the image and the white surround, I played with the overall color of the document using a Levels adjustment layer (Layer>New Adjustment Layer>Levels). I altered the blue and red channels independently and concentrated on the lighter tones of the image so that rather than the paper being stark white it took on a creamy appearance. Specifically, I dragged the white Output slider in the blue channel toward the center of the histogram (to add some yellow to the highlights) and I moved the white Input slider of the red channel to the left to bring in some warmth.


#7

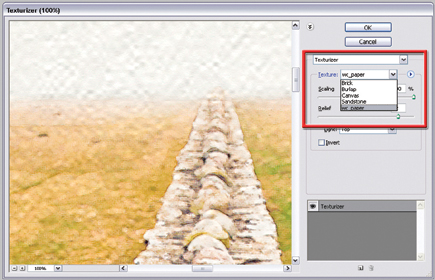
To add the texture to both image and the white background surround, I added yet another filter to the Smart Object layer. This time I used the Texturizer filter, combined with a custom texture of the surface watercolor paper that I created by photographing a section of paper that was lit with a light source positioned low and to one side. To load the watercolor paper file, select the Texturizer filter from the Filter>Texture menu and then click onto the sideways arrow in the top right of the dialog and choose the Load Texture option. Browse for and select the texture file before adjusting the Scaling, Relief, and Light options in the filter to suit.


#8

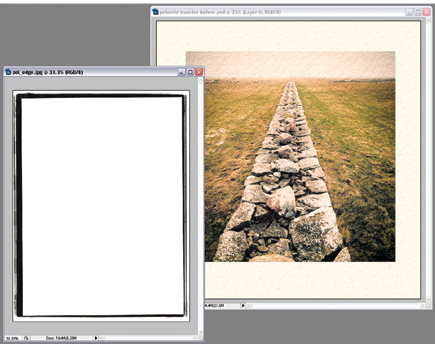
The last part of the process involves combining the final image with a scan of a Polaroid film edge. You can make your own by scanning a Polaroid print and then removing the image or use a ready-made rough edge frame image (available for download from many sites on the web). Start by opening the edge file as a separate document. Click onto the edge picture and drag it onto your Polaroid transfer image. The edge will automatically become a new layer on top of the existing image layer. Convert the edge layer to a Smart Object by right clicking on the layer and choosing the Convert to Smart Object entry.


#9

Next, with the edge Smart Object layer selected, change the layer's Blend mode to Multiply. Notice that the white areas of the layer are now transparent, allowing the picture beneath to show through. Drag the edge layer to just above the image in the layer stack (below the Hue/Saturation and Levels adjustment layers), to ensure that the adjustments made by these layers are applied to the Polaroid edge image as well. Finally, use the Edit>Free Transform command to adjust the size of the edge to fit the image and the Crop tool to remove any unwanted background areas.

COMMENTS
freerolll's picture

This was a great read thank you
Psoriasis free for life

X