Master Class
Photographing People Of Color


Photos © 2003, Monte Zucker, All Rights Reserved

Shooting digitally has made it easier for me to photograph black people. I can see what I'm doing as I'm creating each image and make adjustments accordingly. Detail is what I'm looking for...detail everywhere. It's not that difficult to achieve.

Now that I'm working digitally with Canon's EOS 10D and their EOS-1Ds, I can check the images immediately and look at the histograms. What I'm looking for in particular is that I don't blow out the highlights. If there's no detail in the specular highlights, it's not that easy to fake information to put in there.

In order to photograph people of color you have to create strong specular highlights. The darker the skin tone the more intense the highlights need to be. Change in exposure? Yes! I'm a little surprised, myself, but I've found that I did have to change the exposure slightly to get all the detail that I wanted in some of these portraits.

This gentleman told me in advance that he's never really seen his face in a photograph. I laughed knowingly and told him not to worry. They originally came in to be photographed in their native West African costumes.

This photograph was actually the last one I made. Yes, it shows their clothing, but they are simply lost in the photograph, I explained to them. Having already viewed the original pictures that I had just made, they readily agreed with me.
So, let's go back and see exactly how the images were created. I used a Delkin 640 memory card in the camera. I don't have to wait between exposures--even when shooting in the raw mode. I placed two lights in Westcott softboxes in profile position. Silver reflectors (black on the back side) bounce the light back onto the faces while keeping the lights from flaring into the lens. A fill light in an umbrella is behind my camera.

Lighting Diagram For Couple's Portrait
I basically expose for the main lights (in this case the two lights in profile position) and then keep the fill light two f/stops less. When photographing these people the histograms and immediate images were exceptionally helpful. I could see, for instance, that I was losing detail in the bright specular highlights on the faces. I continued to move the two lights back, until I saw good tonal values in the highlights and the spikes on the histogram staying within acceptable limits. Once there, I found that I wanted to raise the fill light on the front of the faces an extra f/stop. I needed to see more detail, especially on the man's face. It ended up that the main and the fill were one f/stop apart.

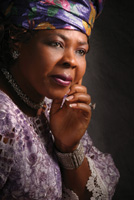
The first close-up portrait that I actually created was this 2/3 view of the woman.

It was made with my regular lighting pattern, lights in normal position for the 2/3 facial view.

Besides normal retouching, the only thing that I did to all of these portraits was to darken the corners slightly. I did this by creating an extra layer in Photoshop, darkening the entire image in Curves, and then erasing the center of the darkened layer to create the burning-in effect.

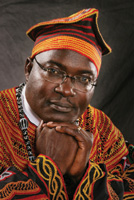
Then, her husband got in front of my camera. His statement that he had never really seen his face in a picture was right up my alley. I knew exactly how to handle the situation. I put my two main lights both in profile position, and blocked the lights from my lens with reflectors (that also bounced some of the light back onto his face). A quick look at the image on the back of my camera told me that I needed to give him one more f/stop to pick up detail in his face. It worked perfectly.

I saw the back of his hand facing the camera (usually a no-no) and liked the strength that it communicated. I left it there. He was wearing a polka dot bow tie that I tried to cover but finally had him remove. It was just too disruptive to the look I was creating. He looked at the back of my camera and I had him in the palm of my hand! Anything I wanted after that...

Here's the lighting diagram for his portrait:
His wife had changed costumes by then. I did a few more close-ups of her and ended up with this profile. She had never seen this view of her face. She loved it.

So, I then added him behind her for a pose that I've used before as a romantic portrait. It worked beautifully again!

The lighting remained the same. To get them this close I sat them both facing one another. They each leaned toward the other one, until their faces were only inches apart. I had to be careful where her profile met his face. I didn't want her to cut into his eyes or nose. I also was careful not to turn his face away from the light that was coming from his left. The focus should be on her profile.

Finally, I ended with the close-up of him showing his full cap.

Now, review all the pictures. See how important the highlights are that were created from my lights in profile position. Without these specular highlights the faces would be flat and would lack dimension. With them you can see detail even in his dark skin tones.

Lit properly the skin tones of people of color have more luster than that of most others. Watch your TV. Watch the movies. You'll see side, kicker lights all the time. Once you realize howsimply and beautifully faces can be lit, you'll be creating some of the best portraits of your subject's lives, too!

X